> ## Documentation Index
> Fetch the complete documentation index at: https://docs.goguardian.com/llms.txt
> Use this file to discover all available pages before exploring further.
# Create a Filtering Policy
> Create, assign, and validate a new filtering policy in GoGuardian Admin.
Use this workflow when you need a new reusable rule set for a school, grade band, OU, custom group, or supported network [filtering context](/products/admin/filtering-contexts).
GoGuardian filtering is user-level, not device-level. Policies assigned to OUs that contain only devices and no user accounts have no effect.
## Review Prerequisites
* Admin access to GoGuardian Admin
* A clear target for the policy, such as an OU, custom group, or network use case
* The categories, sites, or [YouTube filtering](/products/admin/youtube-filtering) behavior you want to allow or block
* A decision on whether out-of-school behavior should be different
* One or two test URLs you can use to validate the result
Creating and modifying policies requires Full Access or Filter and Monitor permissions. Users with Monitor Only access cannot create or edit policies.
Use a naming convention that makes the policy easy to identify later, such as audience plus purpose.
## Create the Filtering Policy
1. Sign in to GoGuardian Admin and open the area where your district manages filtering policies.
2. Click **Create New Policy**. Select from one of the available [pre-built templates](#start-from-a-template) to start with a ready-made rule set, or choose **Blank** to build from scratch.
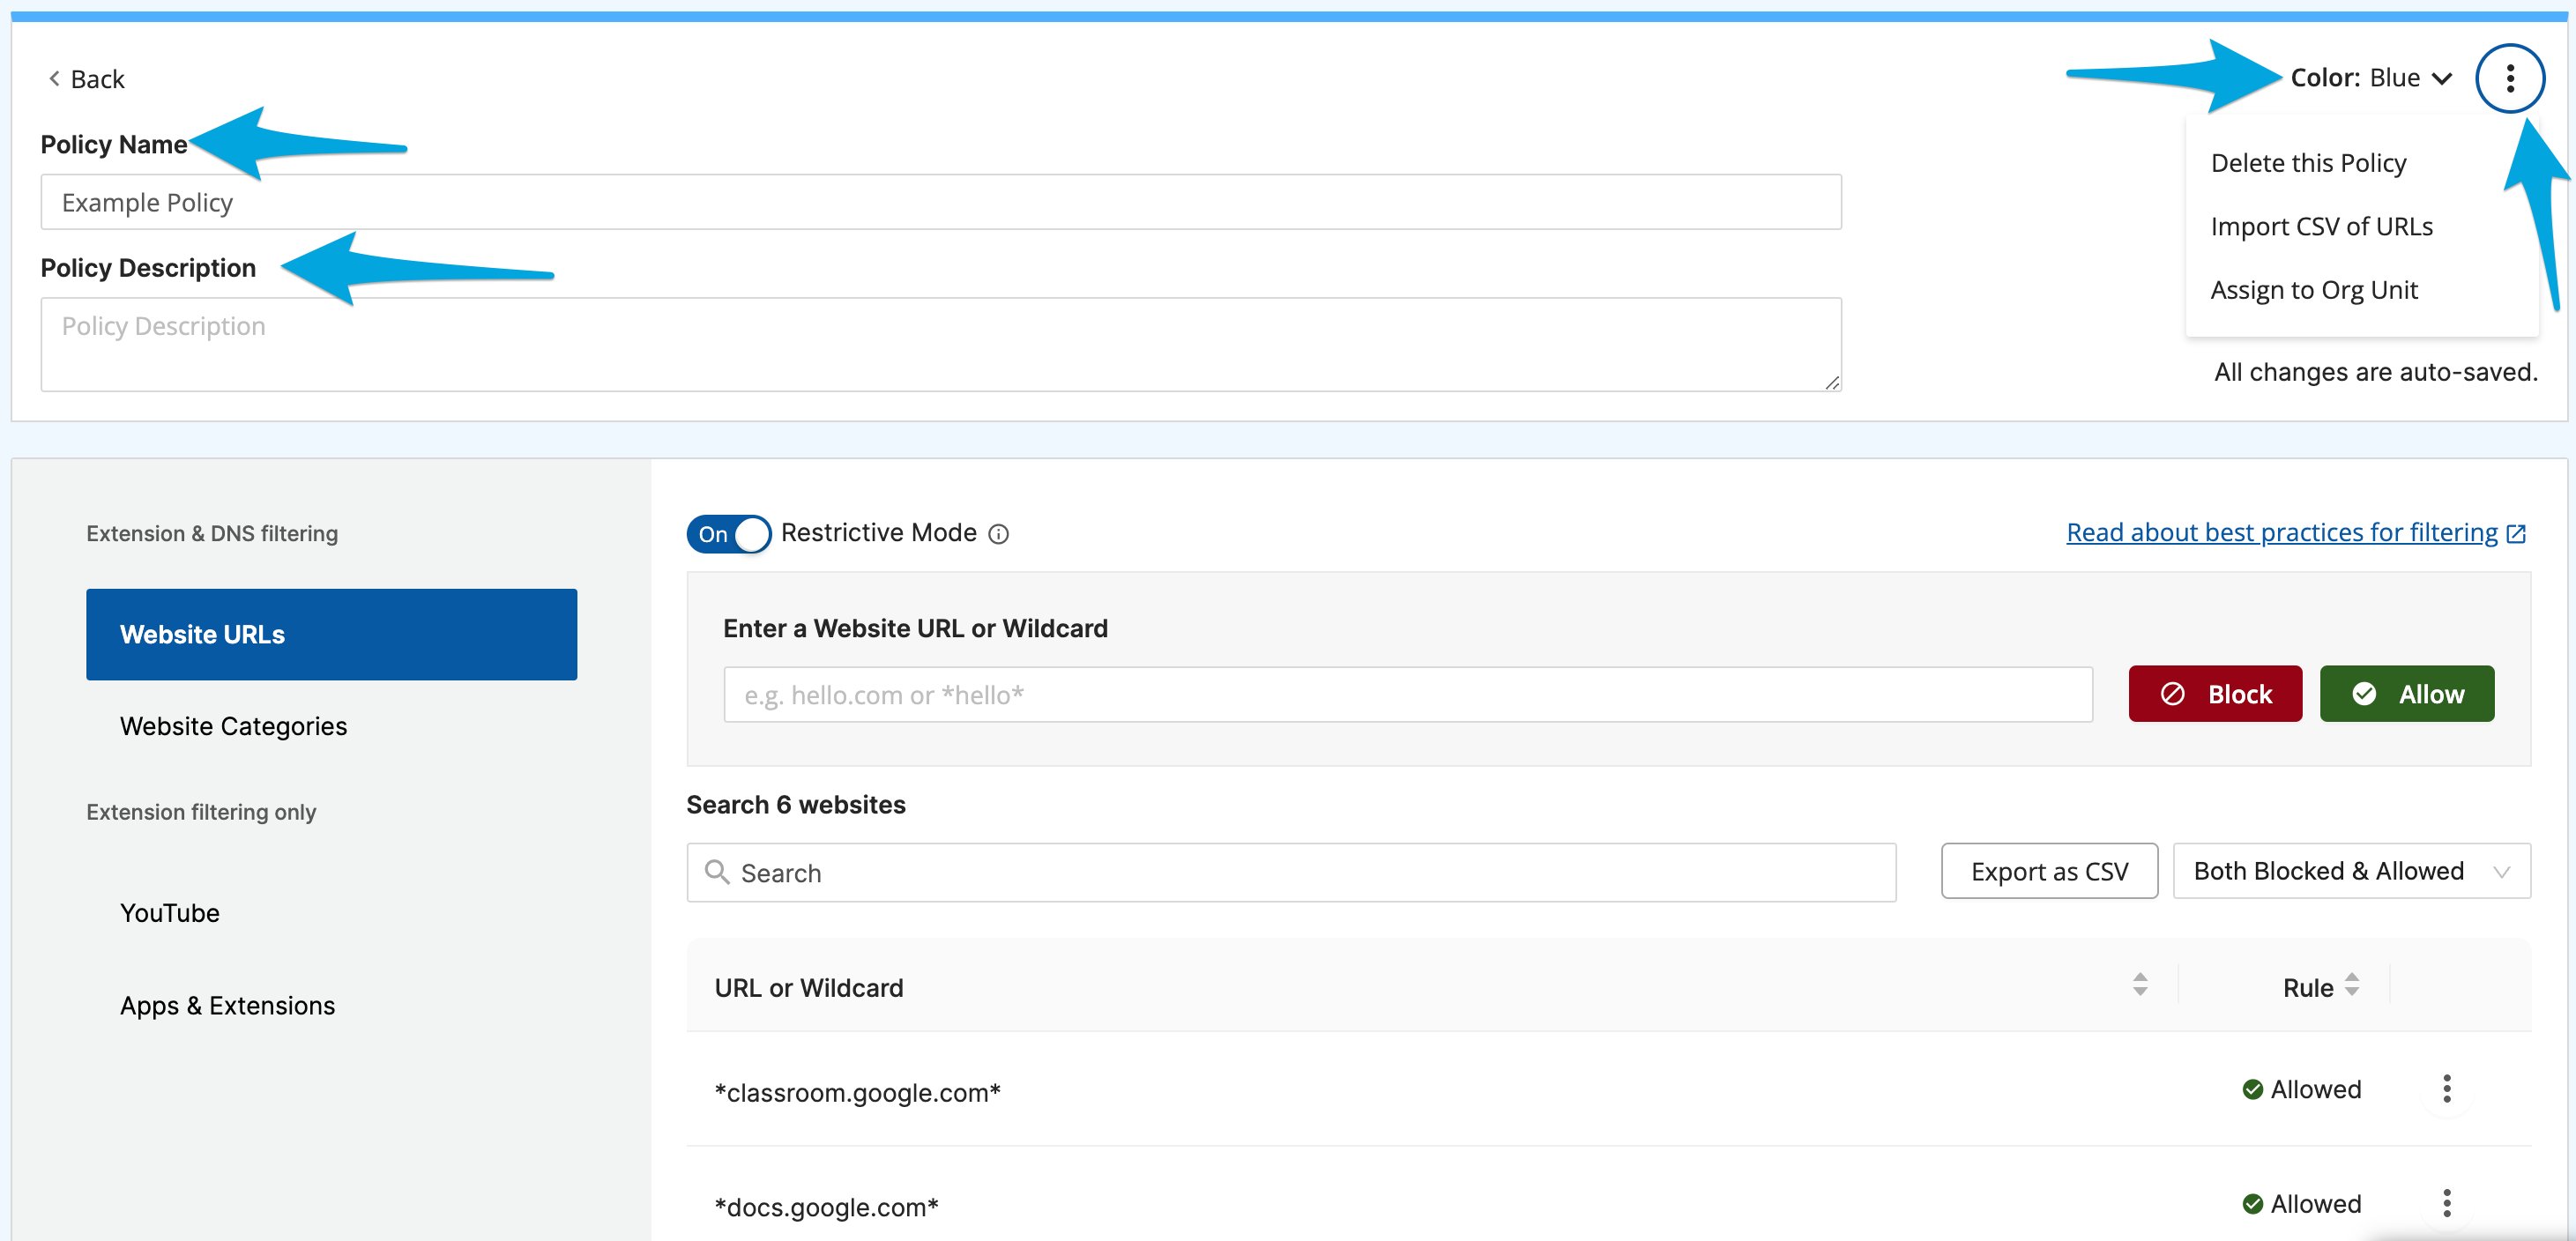
3. Enter a name that clearly describes who the policy is for and why it exists. Optionally add a description and select a color from the color drop-down menu to help identify and distinguish the policy later.
4. Configure the categories to allow or block for this audience. Start with the broadest rule set first, then add narrower exceptions only where needed.
A category being "not blocked" is not the same as an allow rule. It means the category is not actively blocked, not that it is explicitly permitted. To permit a specific site within a blocked category, add an explicit allow rule in the Website URLs section.
5. Add the URLs, domains, or patterns to explicitly allow or block, even when the category-level rule would produce a different result.
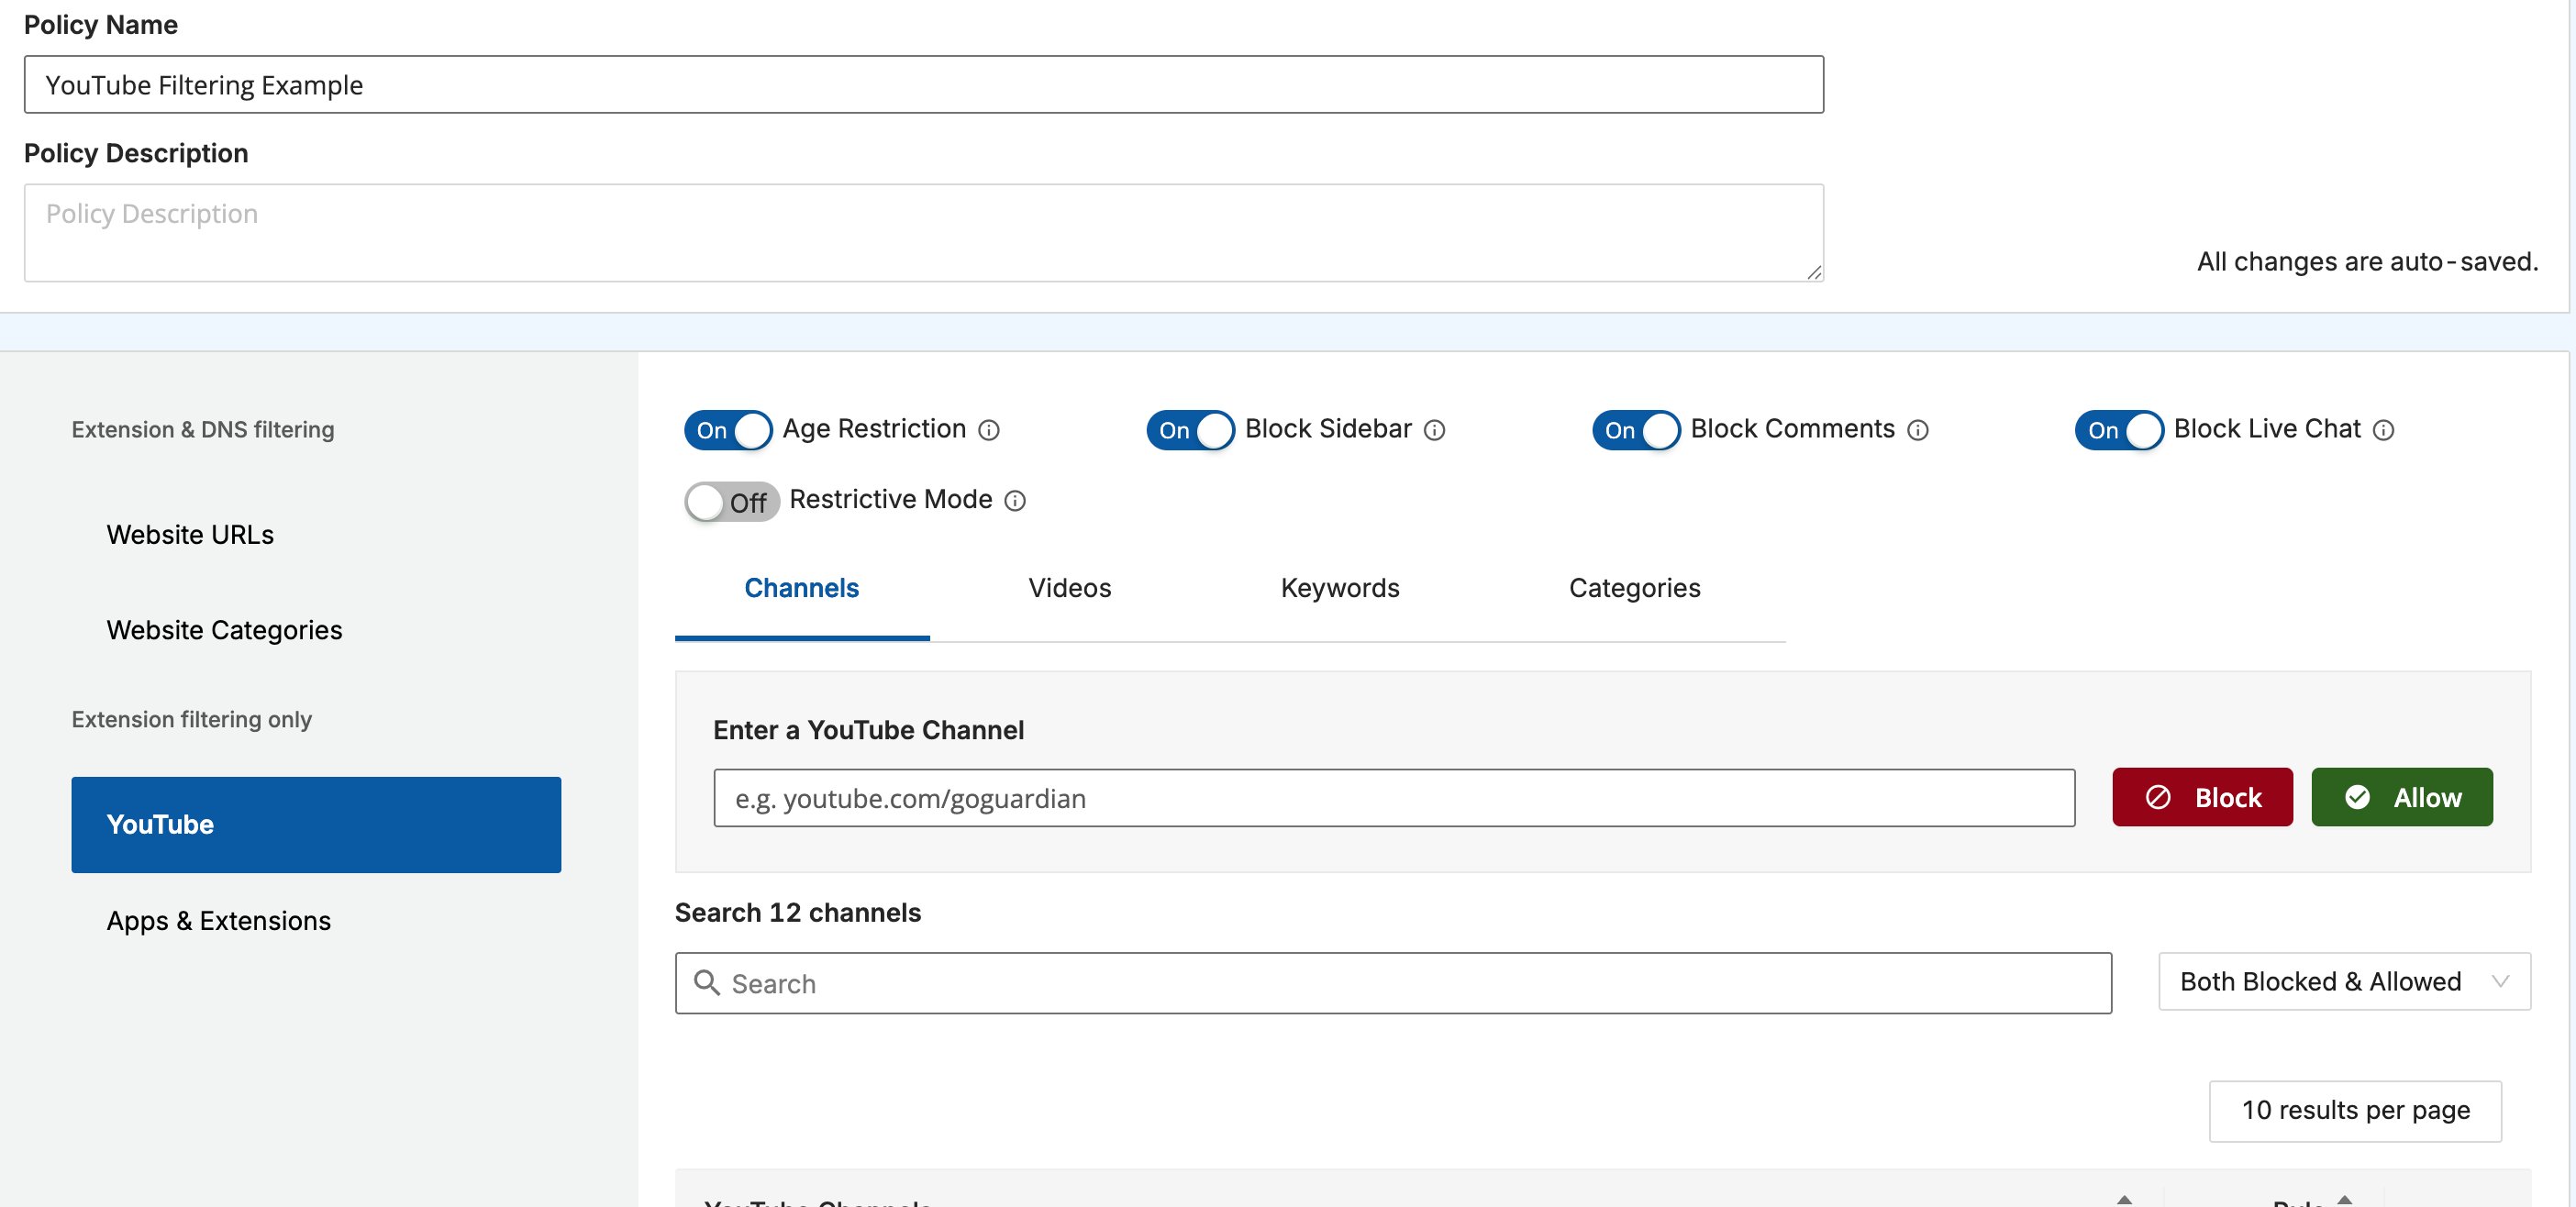
6. If you need to block all content of a given type by default, turn on the Restrictive Mode toggle in the relevant section. Restrictive Mode is available in the Website URLs, YouTube, and Apps and Extensions sections independently. When on, all content of that type is blocked unless an explicit allow rule exists in that section. Leave it off if you only need to block specific categories or sites.
7. If this audience needs YouTube access, define whether to block YouTube, allow it by category, or handle it with more specific video-level, channel-level, or keyword-level exceptions. The YouTube section includes a **Keywords** tab that blocks any video whose title or description contains a defined keyword, and four toggles: **Age Restriction**, **Block Sidebar**, **Block Comments**, and **Restrictive Mode** for YouTube. For the full YouTube filtering model, see [Filter YouTube Content](/products/admin/youtube-filtering).
8. If students should have different access outside the school network, configure the out-of-school behavior before assigning the policy.
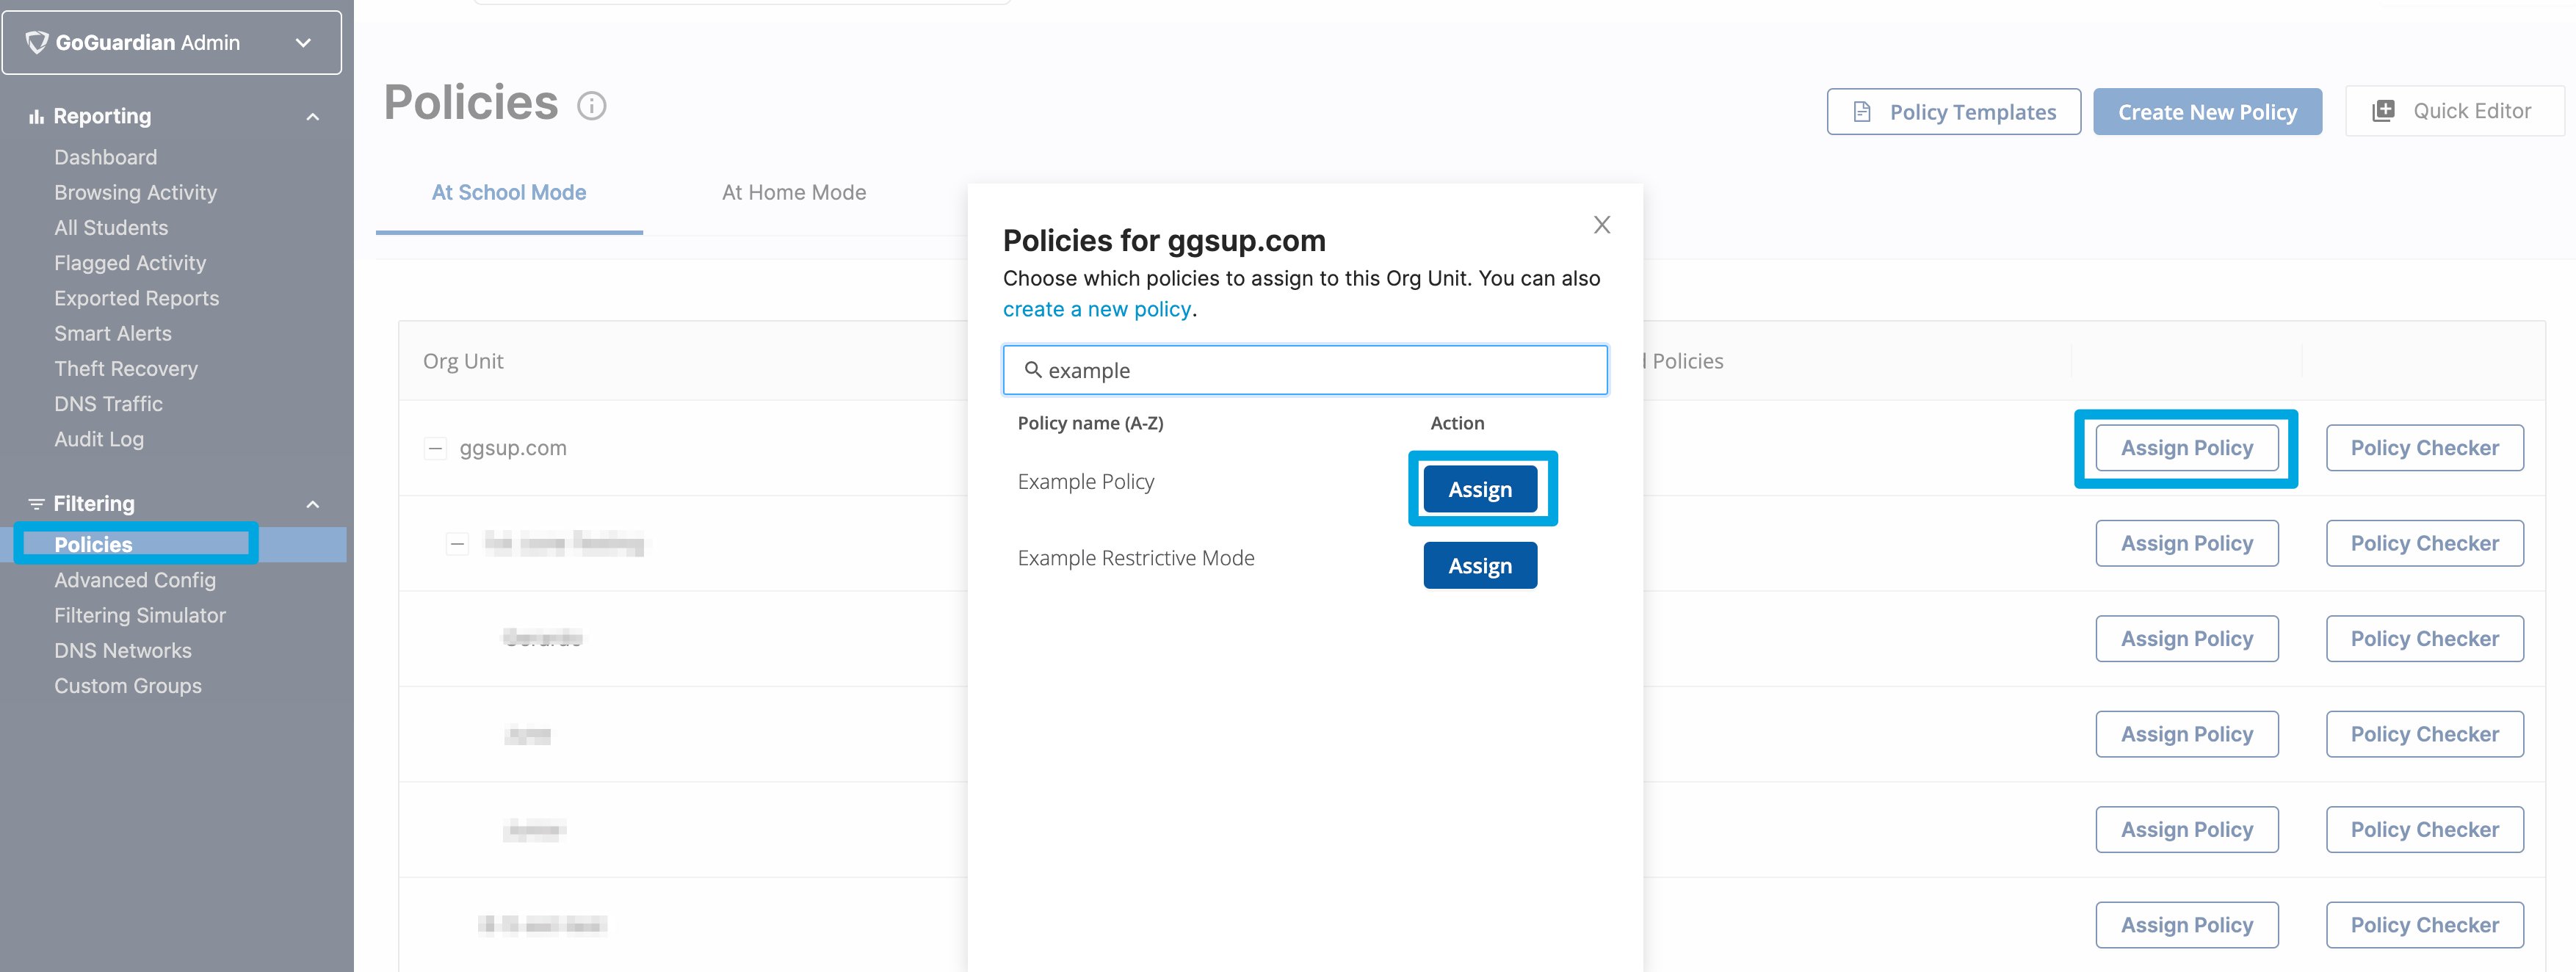
9. Apply the policy to the OU, custom group, or supported filtering context it is meant to control. Policies cascade from OUs to all sub-OUs beneath them.
10. Verify the result: Test the URLs and access scenarios the policy is meant to address. Confirm the expected outcomes appear before assigning the policy to all groups.

 ## Start From a Template
Policy templates give you a curated starting point instead of building rules from scratch. Each template is a ready-made rule set drawn from configurations schools commonly use.
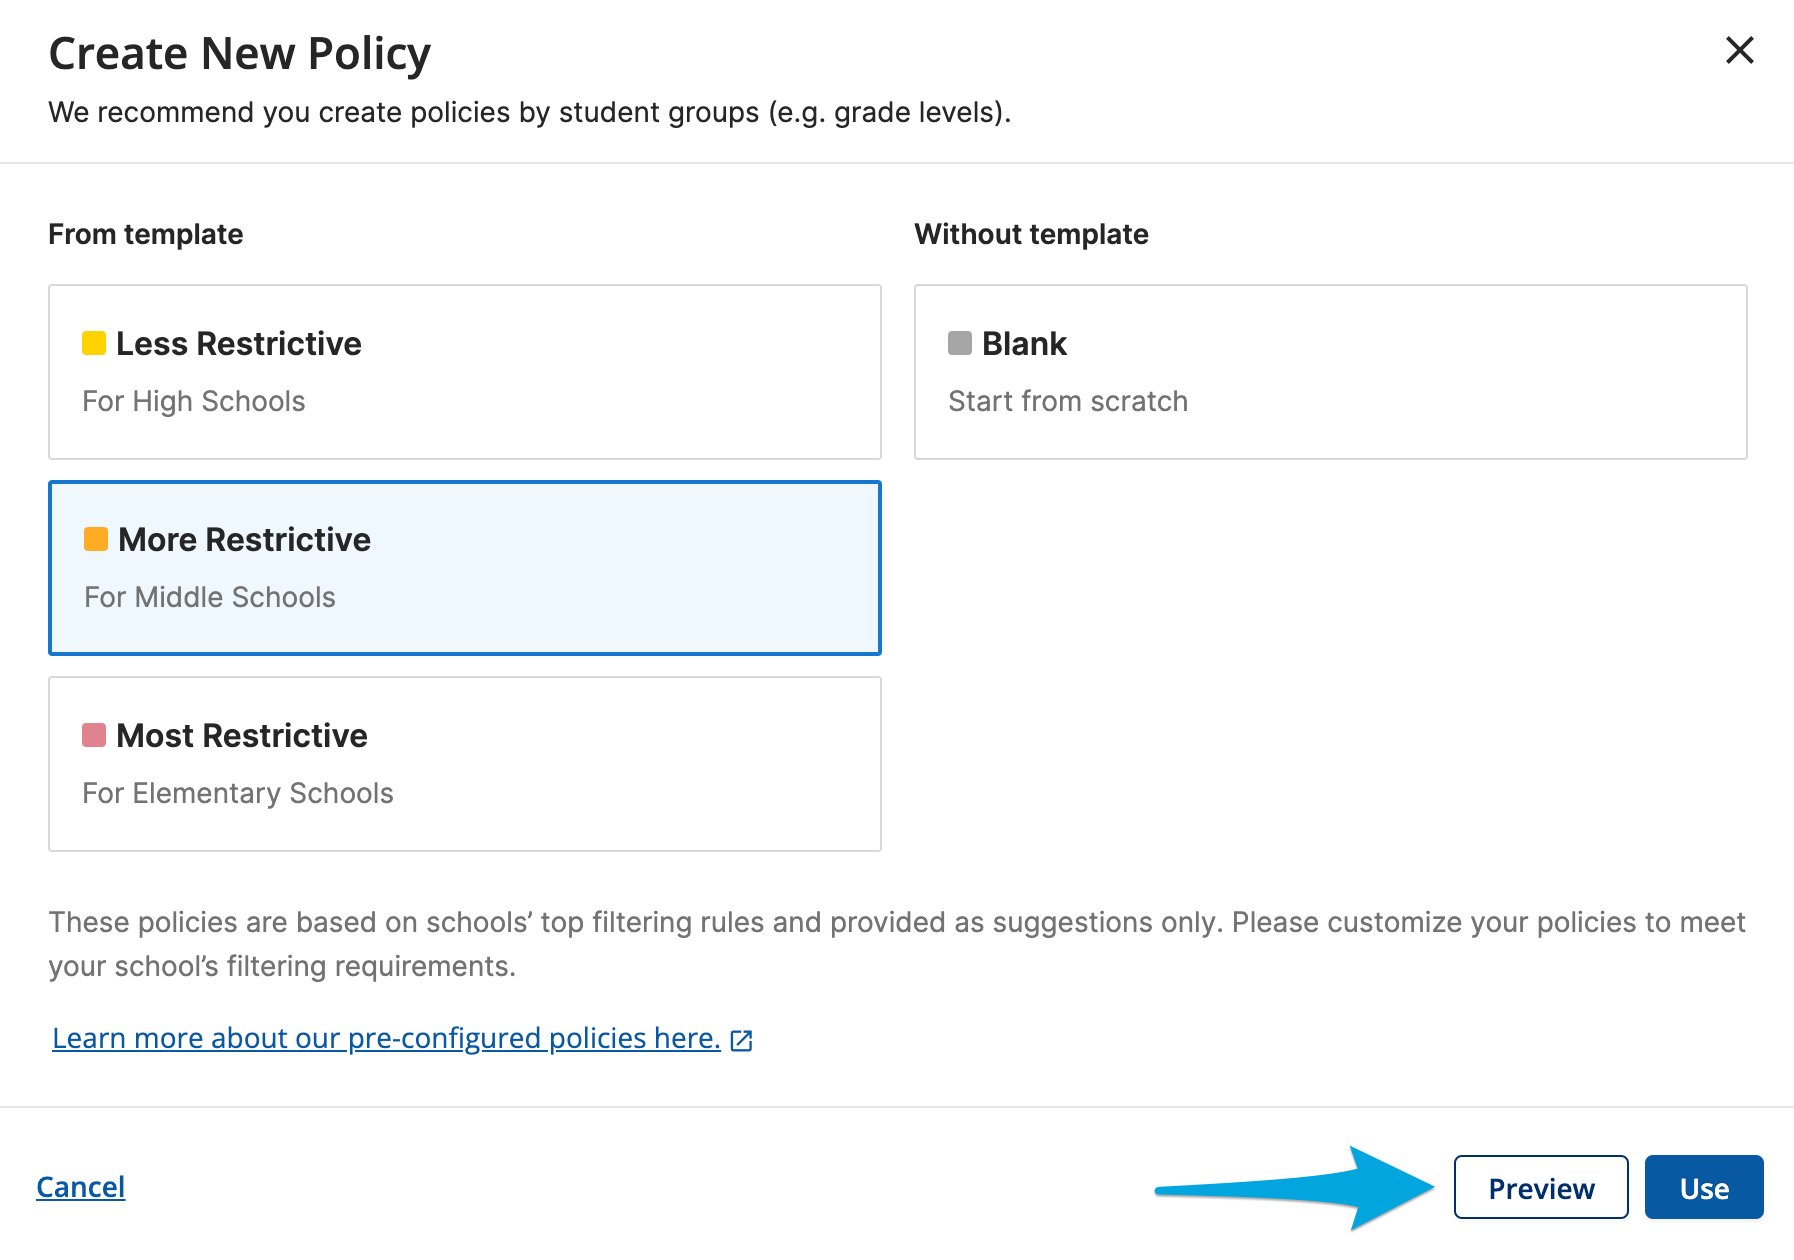
1. In GoGuardian Admin, go to **Filtering** > **Policies**, then click **Create New Policy**.
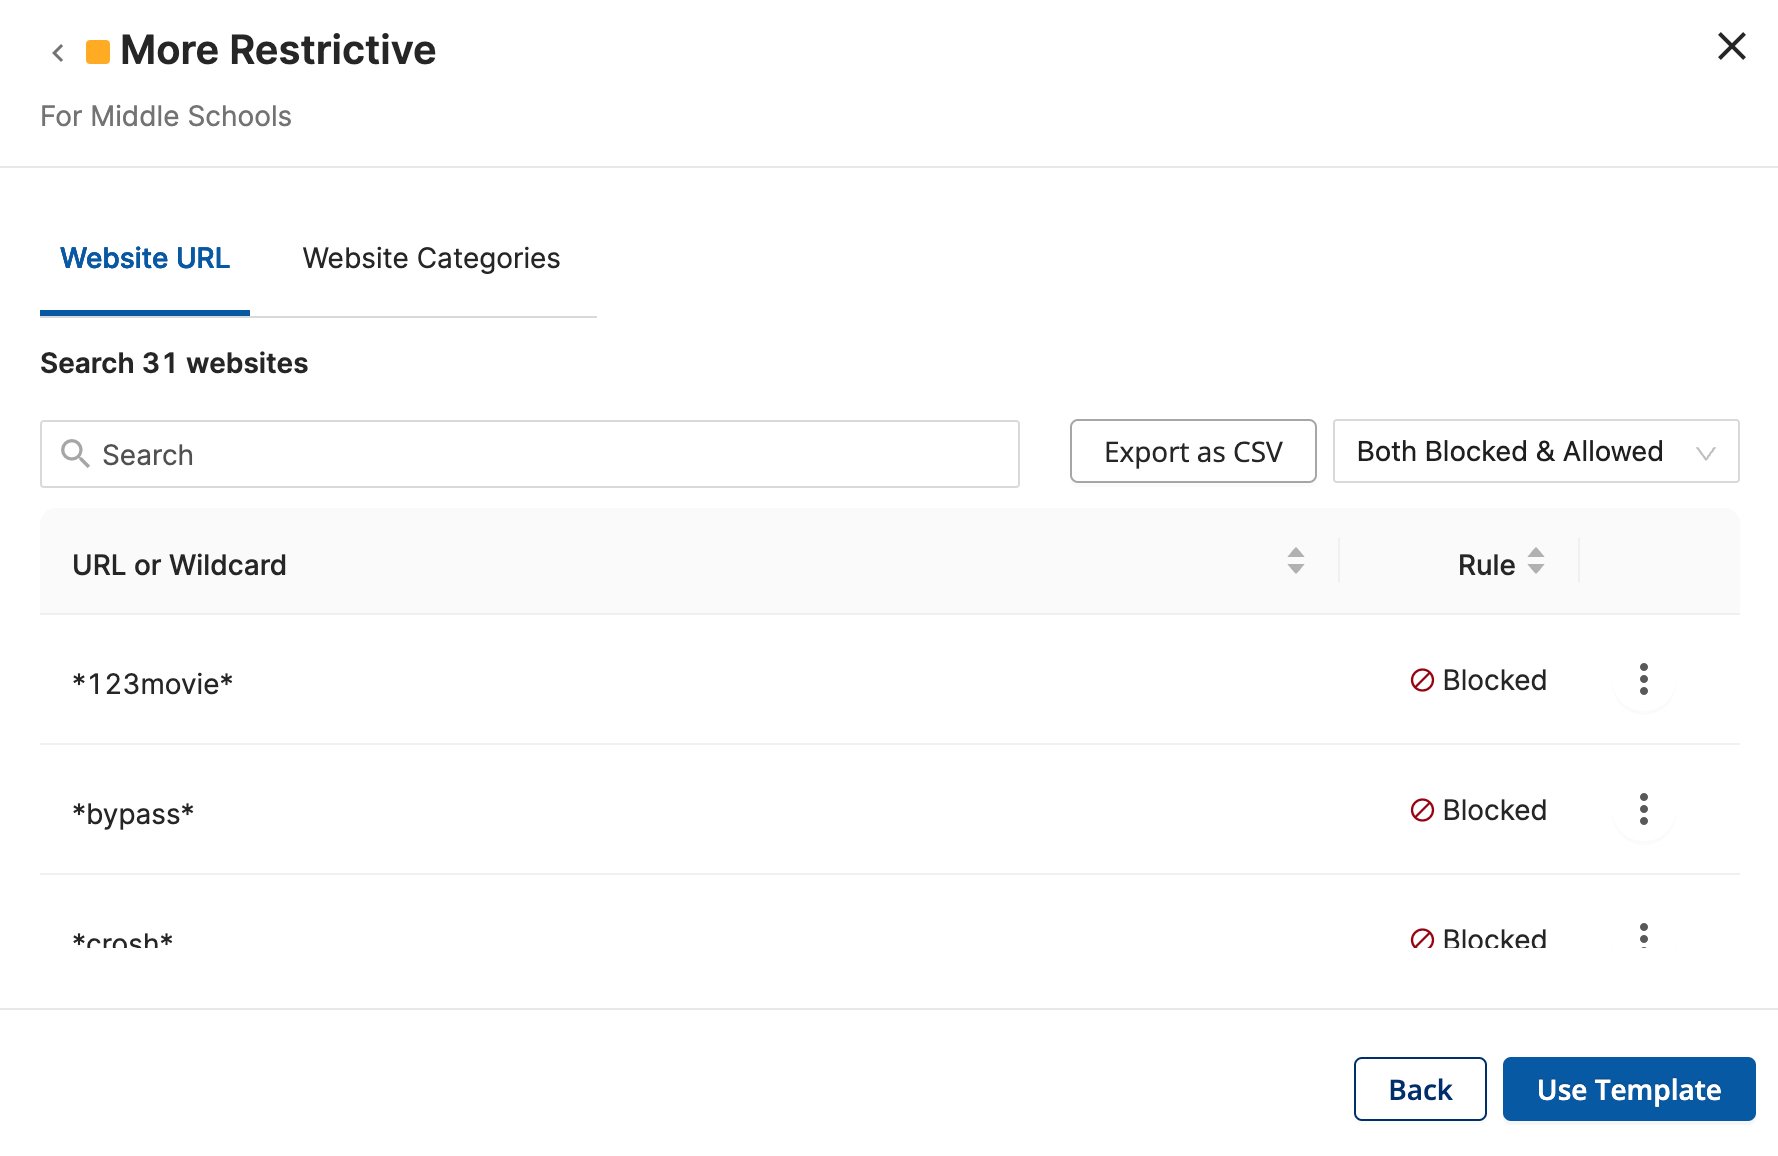
2. Select a template: **Less Restrictive**, **More Restrictive**, or **Most Restrictive**. To review a template's rules before applying it, click **Preview**. To download its Website URL rules as a spreadsheet, click **Export as CSV**.
3. Click **Use Template**. GoGuardian Admin creates a new policy with the template's rules applied.
4. Update the policy name, description, and color, then adjust the filtering rules to fit your school. All changes save automatically.
5. Assign the policy to the appropriate organizational units or custom groups.
An allowed website rule overrides a blocked category for that website. After applying a template, add or remove specific websites and categories without losing the rest of the template's rules.
## Start From a Template
Policy templates give you a curated starting point instead of building rules from scratch. Each template is a ready-made rule set drawn from configurations schools commonly use.
1. In GoGuardian Admin, go to **Filtering** > **Policies**, then click **Create New Policy**.
2. Select a template: **Less Restrictive**, **More Restrictive**, or **Most Restrictive**. To review a template's rules before applying it, click **Preview**. To download its Website URL rules as a spreadsheet, click **Export as CSV**.
3. Click **Use Template**. GoGuardian Admin creates a new policy with the template's rules applied.
4. Update the policy name, description, and color, then adjust the filtering rules to fit your school. All changes save automatically.
5. Assign the policy to the appropriate organizational units or custom groups.
An allowed website rule overrides a blocked category for that website. After applying a template, add or remove specific websites and categories without losing the rest of the template's rules.
 ## Unassign a Policy
Two methods are available to remove a policy from an OU.
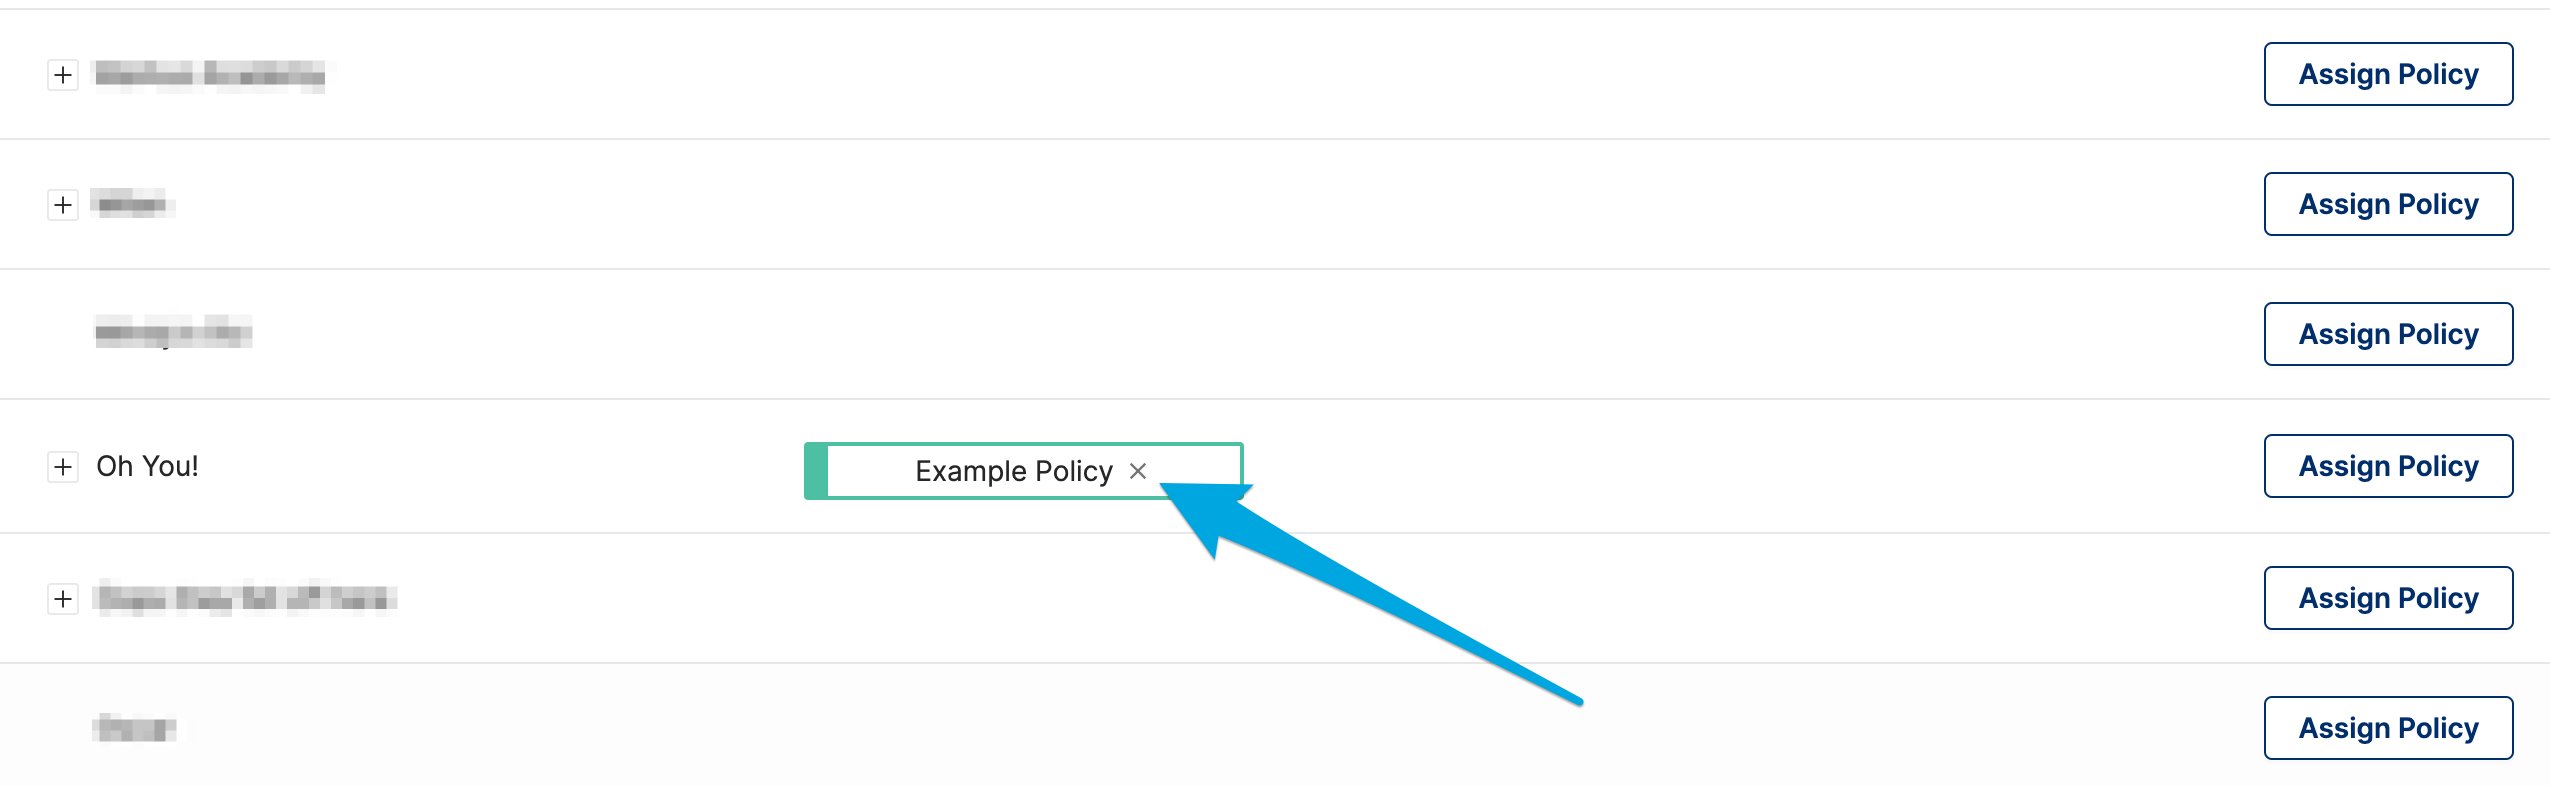
* Find the OU in the Custom Policies tab, click **Assign Policy**, then choose **Unassign**.
* Click the **X** on the policy tile directly.
If a policy is assigned to one or more OUs outside your OU access, you cannot unassign or edit that policy. Contact your Super User or IT admin to request the removal.
## Unassign a Policy
Two methods are available to remove a policy from an OU.
* Find the OU in the Custom Policies tab, click **Assign Policy**, then choose **Unassign**.
* Click the **X** on the policy tile directly.
If a policy is assigned to one or more OUs outside your OU access, you cannot unassign or edit that policy. Contact your Super User or IT admin to request the removal.
 ## Manage Chrome Apps and Extensions
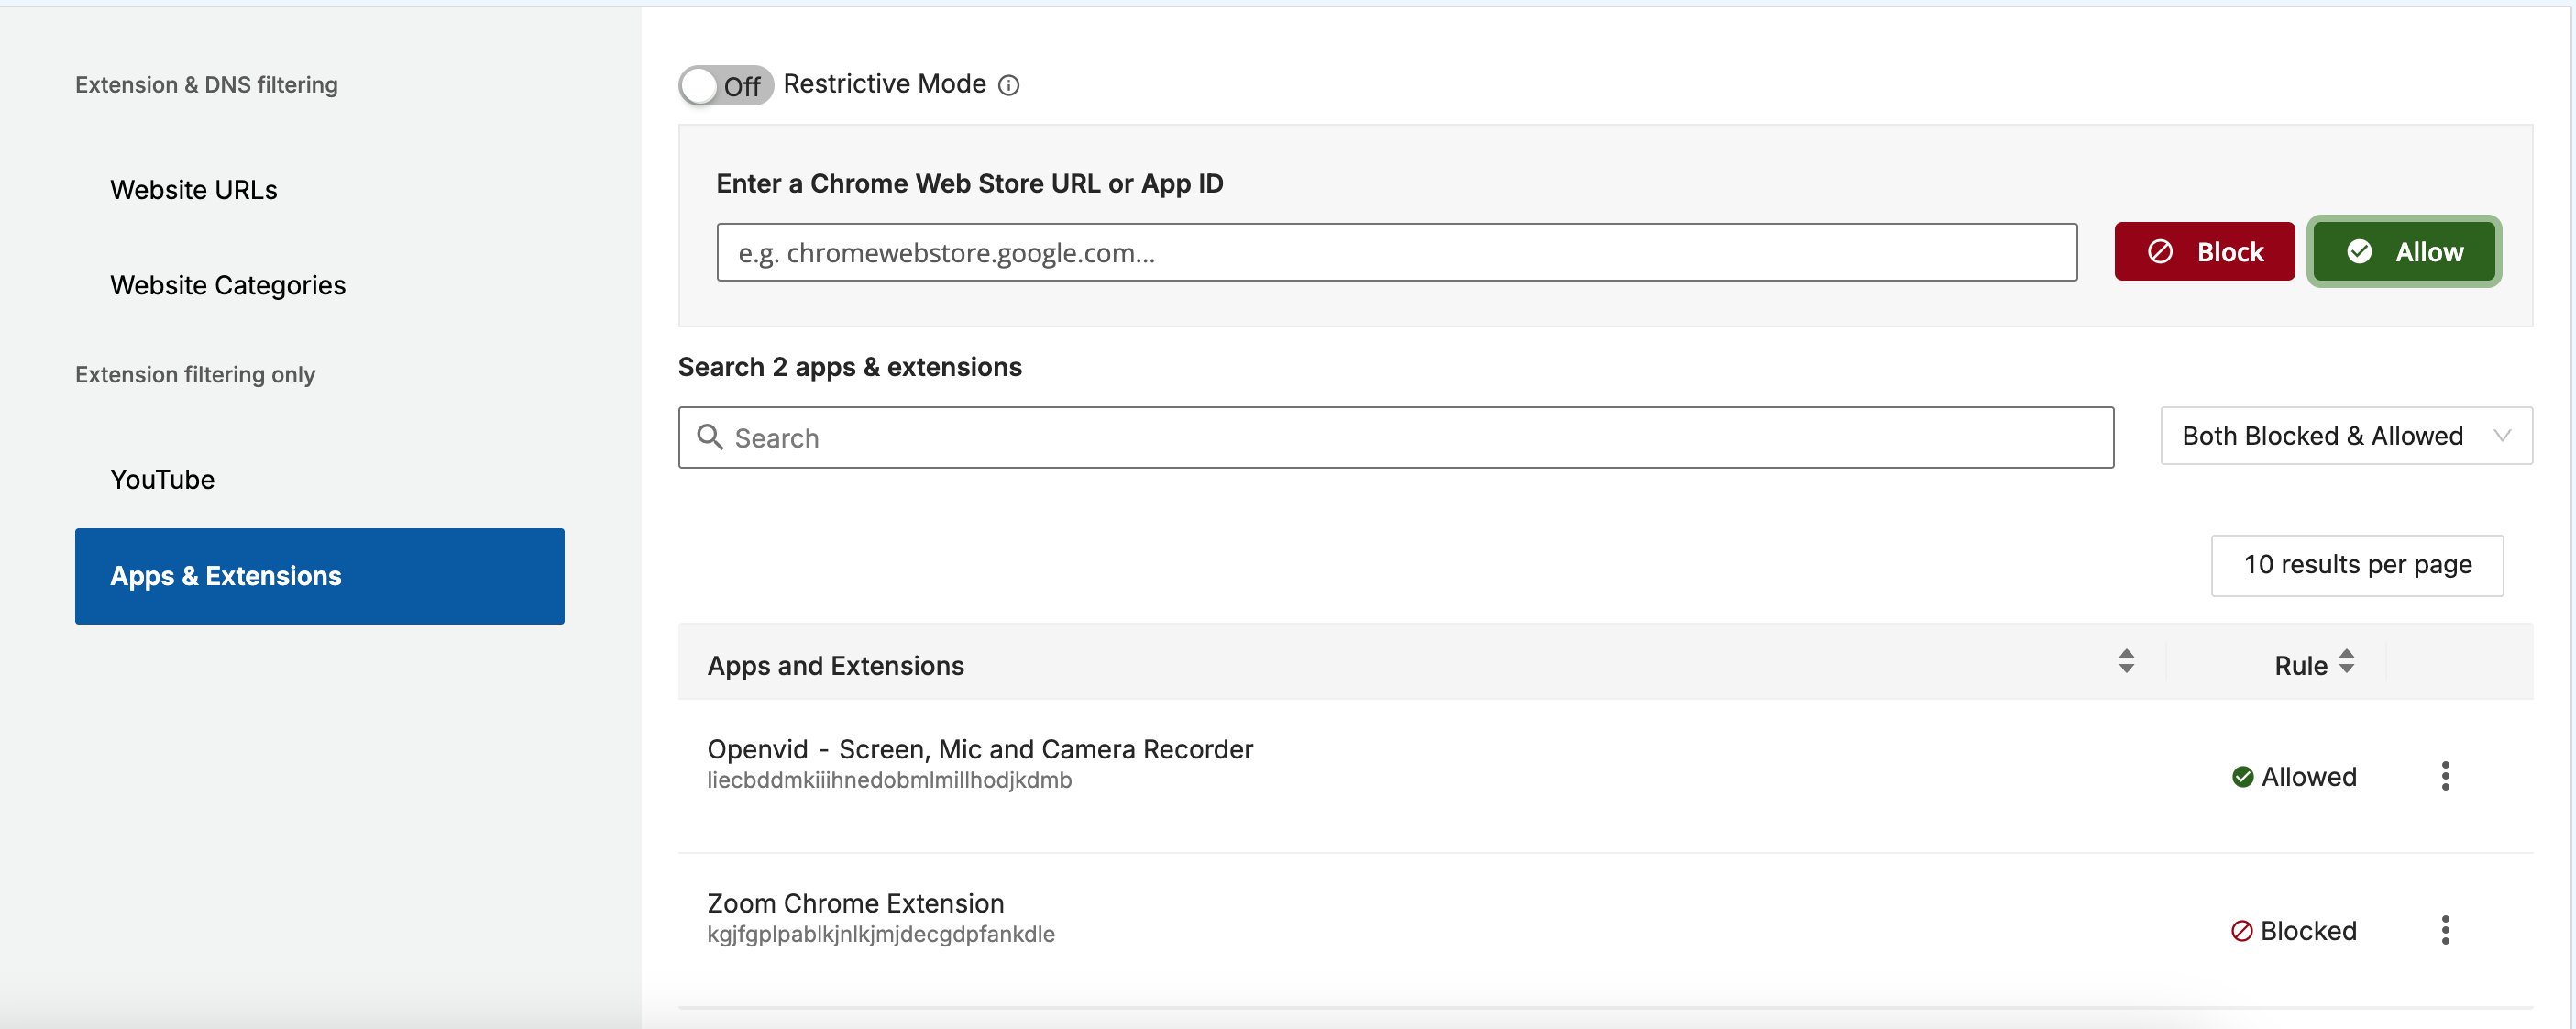
In the **Apps & Extensions** section of a policy, block or allow Chrome apps and extensions in one of three ways:
* Paste an app's 32-character App ID into the filter field, then click **Block** or **Allow**. Find the App ID after the last slash in the app's Chrome Web Store URL.
* Paste the app's full Chrome Web Store URL into the filter field, then click **Block** or **Allow**.
* Open the **Top Apps** tile on the GoGuardian Admin dashboard, open an app's detail page, click **Block** or **Allow**, then choose the policy to apply the rule to.
To remove a rule, click the **3-dot menu** next to it and select **Delete Filtering Rule**.
Google Admin Console (GAC) app and extension rules are honored before GoGuardian Admin rules. If the GAC blocks or force-installs an app, GoGuardian Admin cannot override that rule. To allow a GAC-blocked app, add it to the allowlist in the GAC. GoGuardian Admin cannot filter Google Play Store apps.
## Manage Chrome Apps and Extensions
In the **Apps & Extensions** section of a policy, block or allow Chrome apps and extensions in one of three ways:
* Paste an app's 32-character App ID into the filter field, then click **Block** or **Allow**. Find the App ID after the last slash in the app's Chrome Web Store URL.
* Paste the app's full Chrome Web Store URL into the filter field, then click **Block** or **Allow**.
* Open the **Top Apps** tile on the GoGuardian Admin dashboard, open an app's detail page, click **Block** or **Allow**, then choose the policy to apply the rule to.
To remove a rule, click the **3-dot menu** next to it and select **Delete Filtering Rule**.
Google Admin Console (GAC) app and extension rules are honored before GoGuardian Admin rules. If the GAC blocks or force-installs an app, GoGuardian Admin cannot override that rule. To allow a GAC-blocked app, add it to the allowlist in the GAC. GoGuardian Admin cannot filter Google Play Store apps.
 ## Import and Export Policy Rules as CSV
To bulk-add Website URL rules and YouTube video rules, import a CSV into any policy.
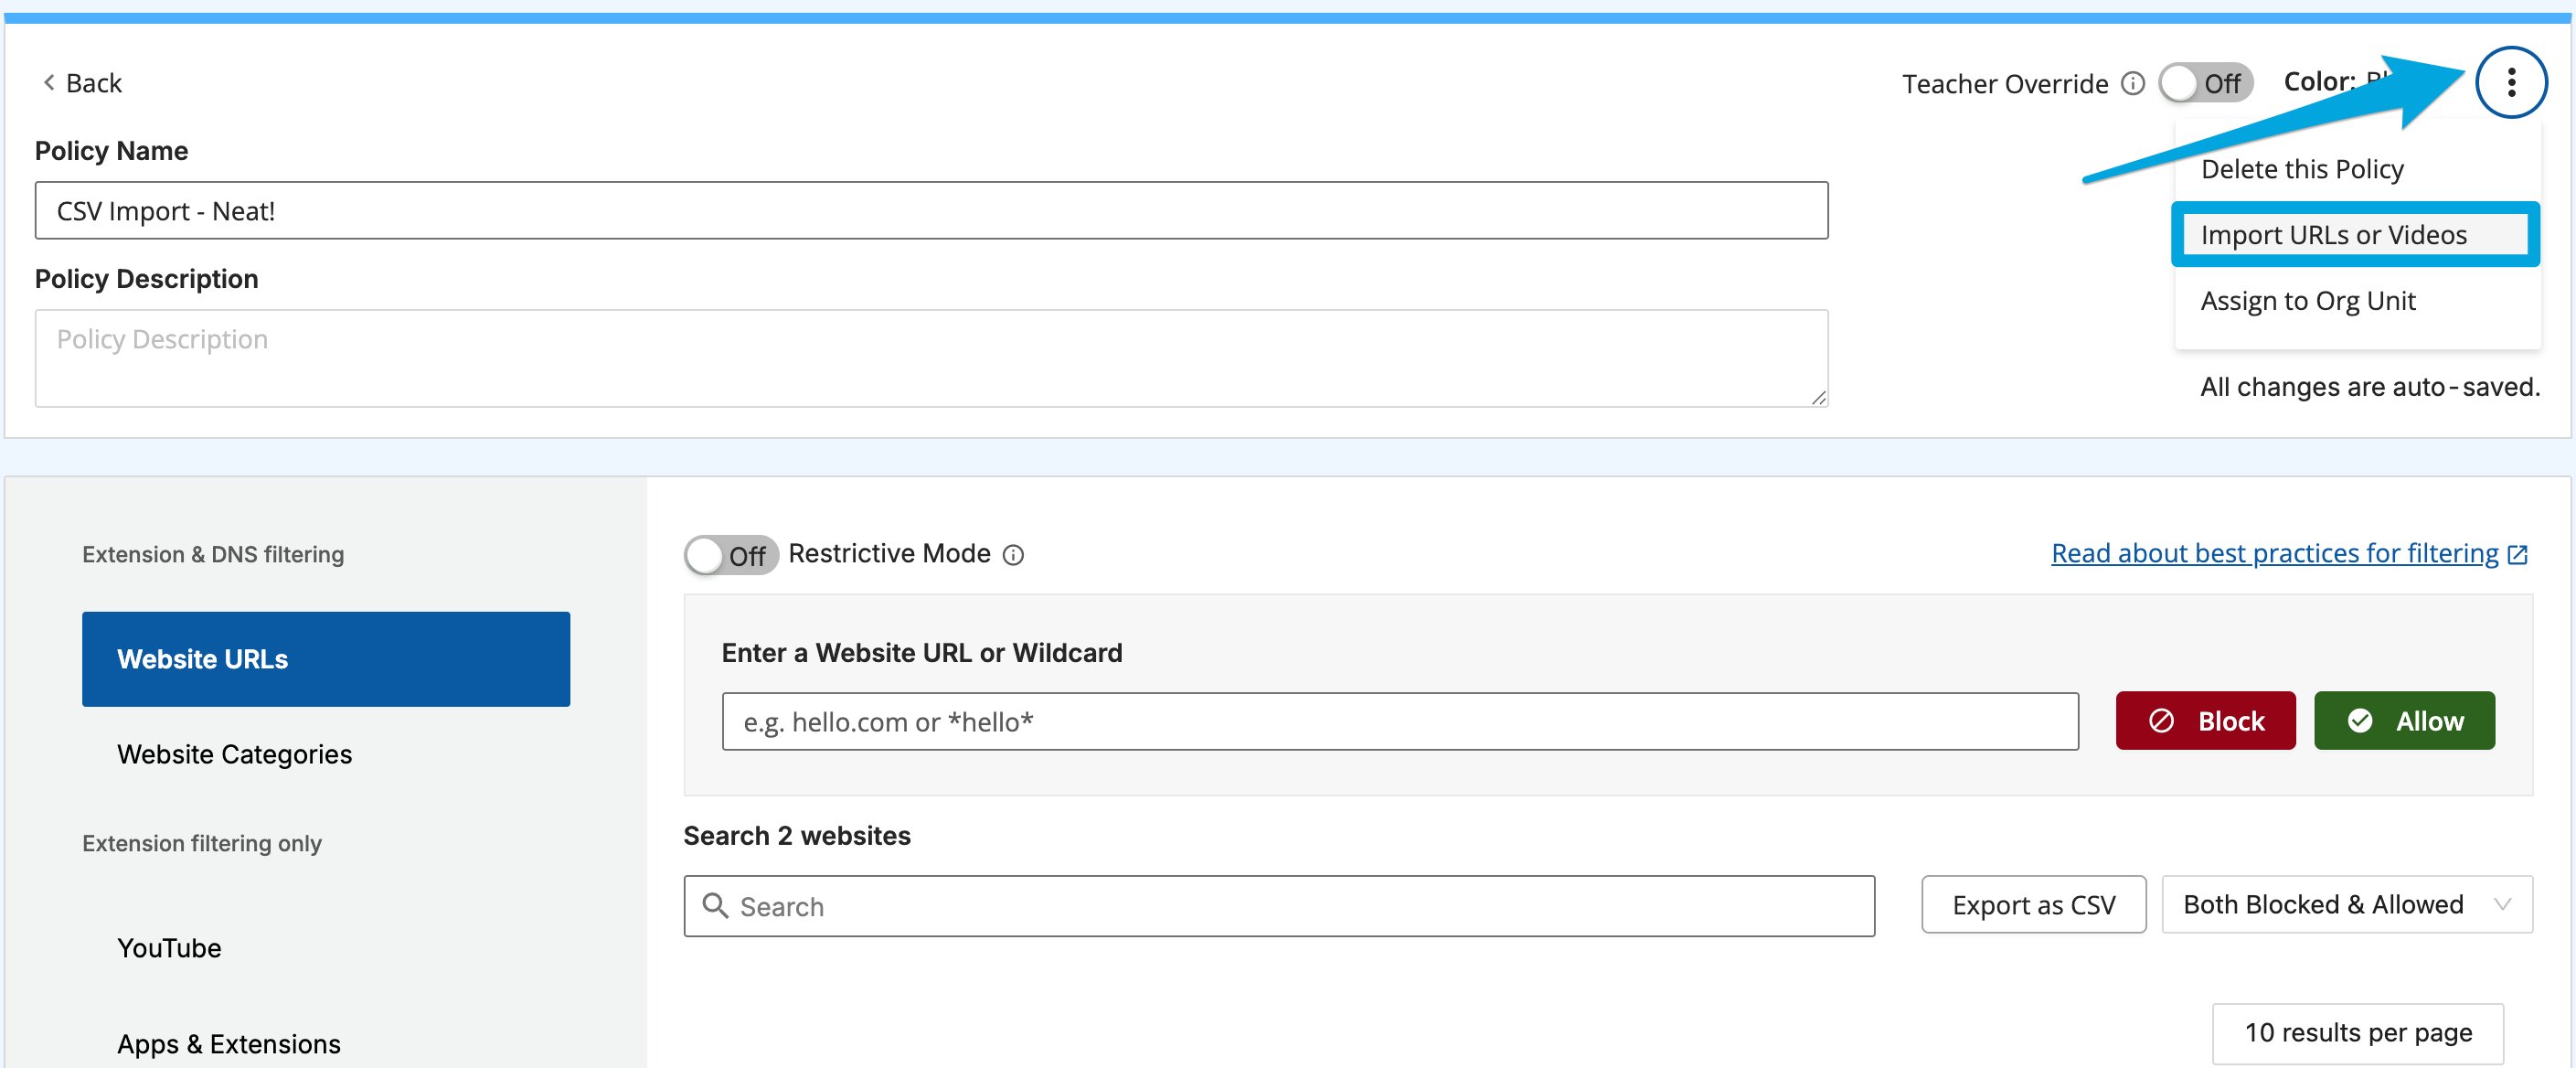
1. On the policy page, click the **3-dot menu** in the corner.
2. Click **Import CSV of URLs**, then select or drag and drop your CSV file.
3. To review requirements or download a template, click the **Need help?** drop-down menu.
Imports add to the existing rules rather than overwriting them. For CSV format and limits, see [Allow and Block Websites](/products/admin/block-and-allow-websites).
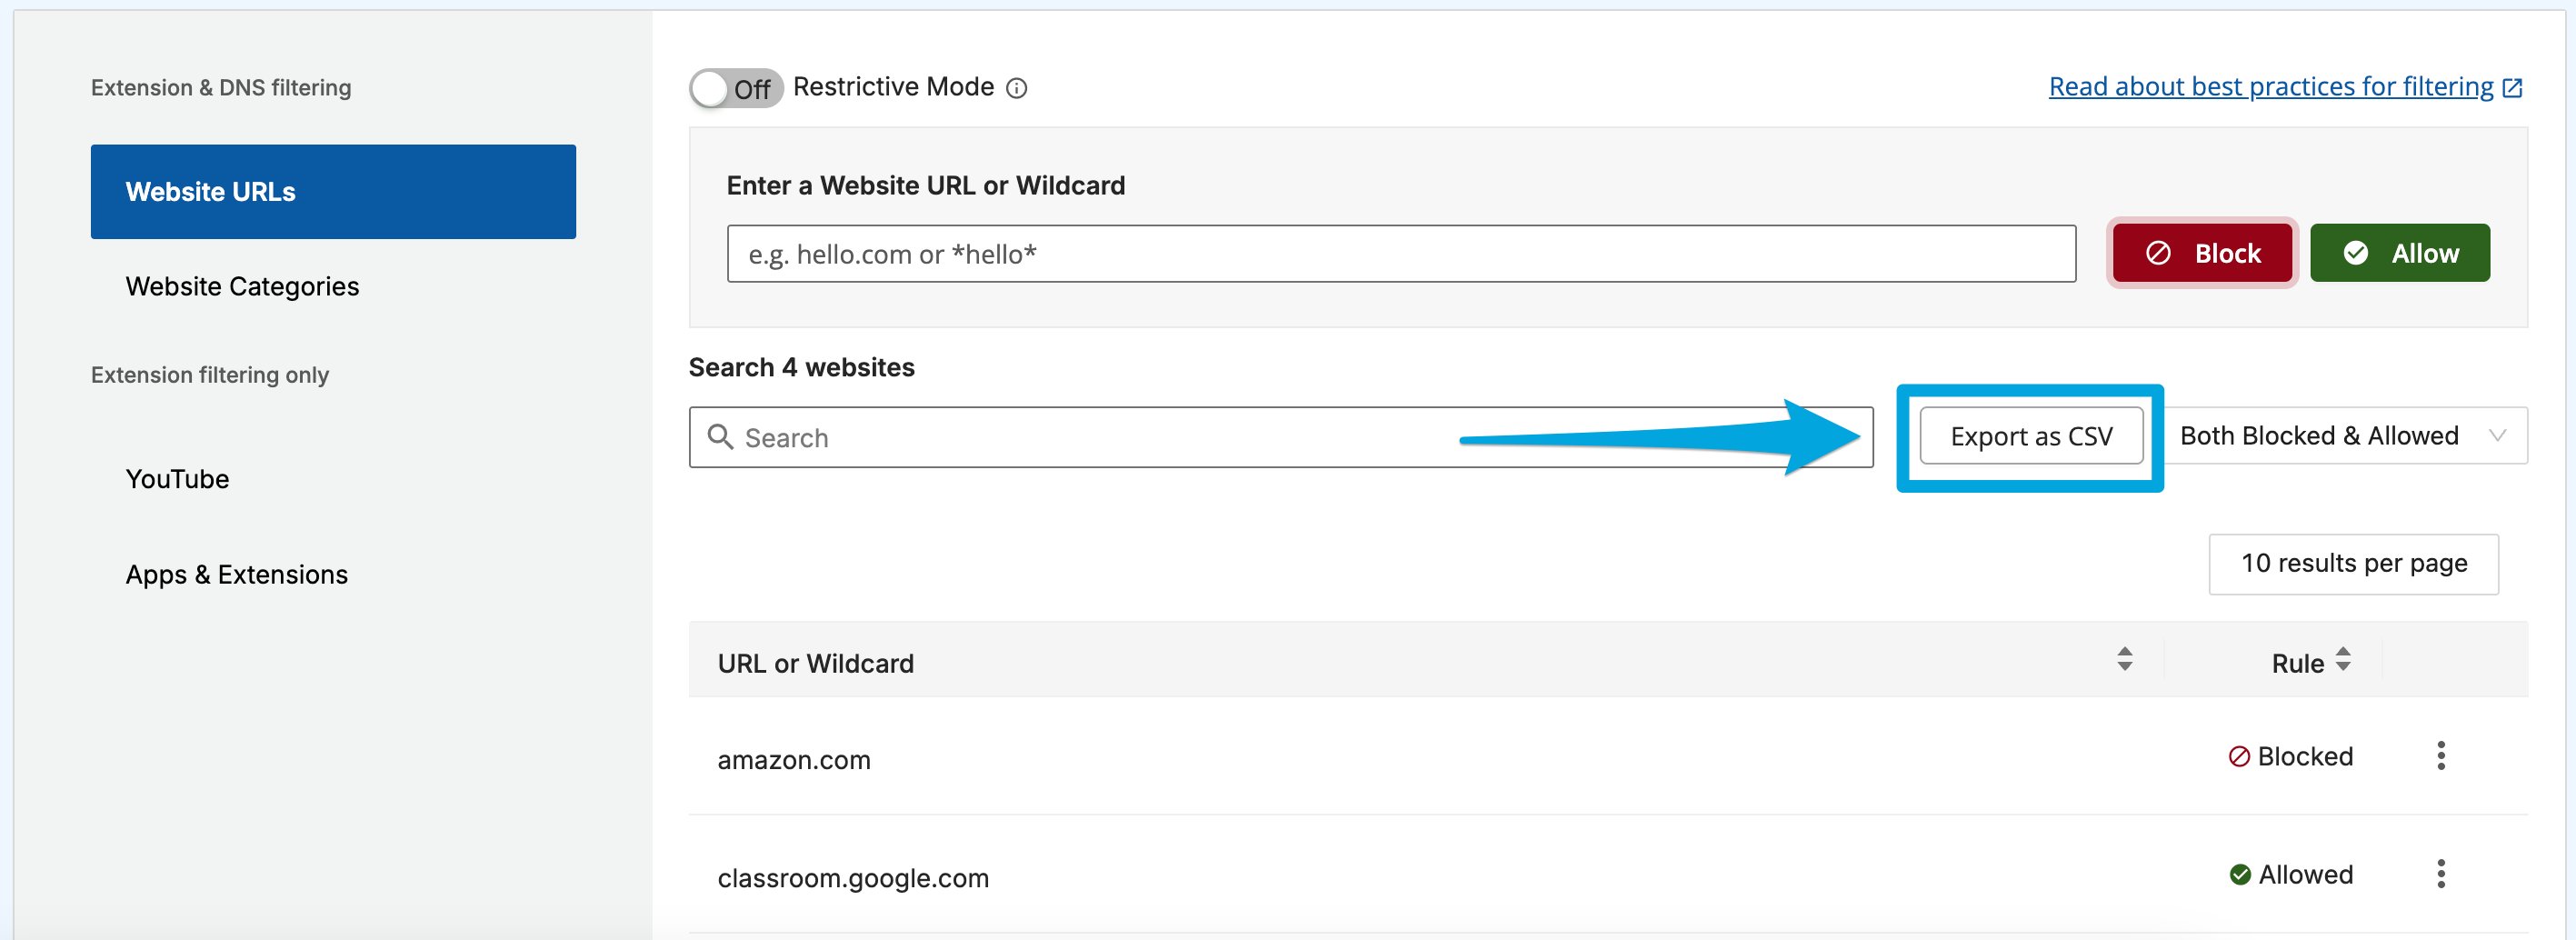
To export a policy's rules, choose **Export as CSV** on the policy page.
A CSV export contains only the blocked and allowed Website URL rules in the policy. It does not include Website Category, YouTube, or Apps and Extensions settings.
## Import and Export Policy Rules as CSV
To bulk-add Website URL rules and YouTube video rules, import a CSV into any policy.
1. On the policy page, click the **3-dot menu** in the corner.
2. Click **Import CSV of URLs**, then select or drag and drop your CSV file.
3. To review requirements or download a template, click the **Need help?** drop-down menu.
Imports add to the existing rules rather than overwriting them. For CSV format and limits, see [Allow and Block Websites](/products/admin/block-and-allow-websites).
To export a policy's rules, choose **Export as CSV** on the policy page.
A CSV export contains only the blocked and allowed Website URL rules in the policy. It does not include Website Category, YouTube, or Apps and Extensions settings.
 ## Validate After Publishing
* Test the URLs that drove the change request
* Confirm that the right users are receiving the policy
* Check for overlapping policies if the result is different than expected
* Document why the policy exists so future edits are easier to evaluate
If the same user can be affected by more than one policy, verify the effective result rather than assuming a new policy will win automatically. See [Understand Policy Precedence](/products/admin/how-filtering-rules-interact) if assignment overlap is part of the problem.
## Resources
Review the feature model before adding more policy variations.
Use this concept page when assignment overlaps or inherited rules are involved.
Use this troubleshooting flow if the final result still does not match the intended policy.
## Validate After Publishing
* Test the URLs that drove the change request
* Confirm that the right users are receiving the policy
* Check for overlapping policies if the result is different than expected
* Document why the policy exists so future edits are easier to evaluate
If the same user can be affected by more than one policy, verify the effective result rather than assuming a new policy will win automatically. See [Understand Policy Precedence](/products/admin/how-filtering-rules-interact) if assignment overlap is part of the problem.
## Resources
Review the feature model before adding more policy variations.
Use this concept page when assignment overlaps or inherited rules are involved.
Use this troubleshooting flow if the final result still does not match the intended policy.