> ## Documentation Index
> Fetch the complete documentation index at: https://docs.goguardian.com/llms.txt
> Use this file to discover all available pages before exploring further.
# Configure Smart Alerts Access
> Grant GoGuardian Admin users access to Smart Alerts, choose a permission level per role, and configure OU scoping to control which alerts each admin sees.
Smart Alerts is available to GoGuardian Admin users with Full Access, Filter and Monitor, or Monitor Only permissions. Access is granted through Org Management and scoped to the organizational units (OUs) assigned to each user.
## Review Smart Alerts Permissions by Role
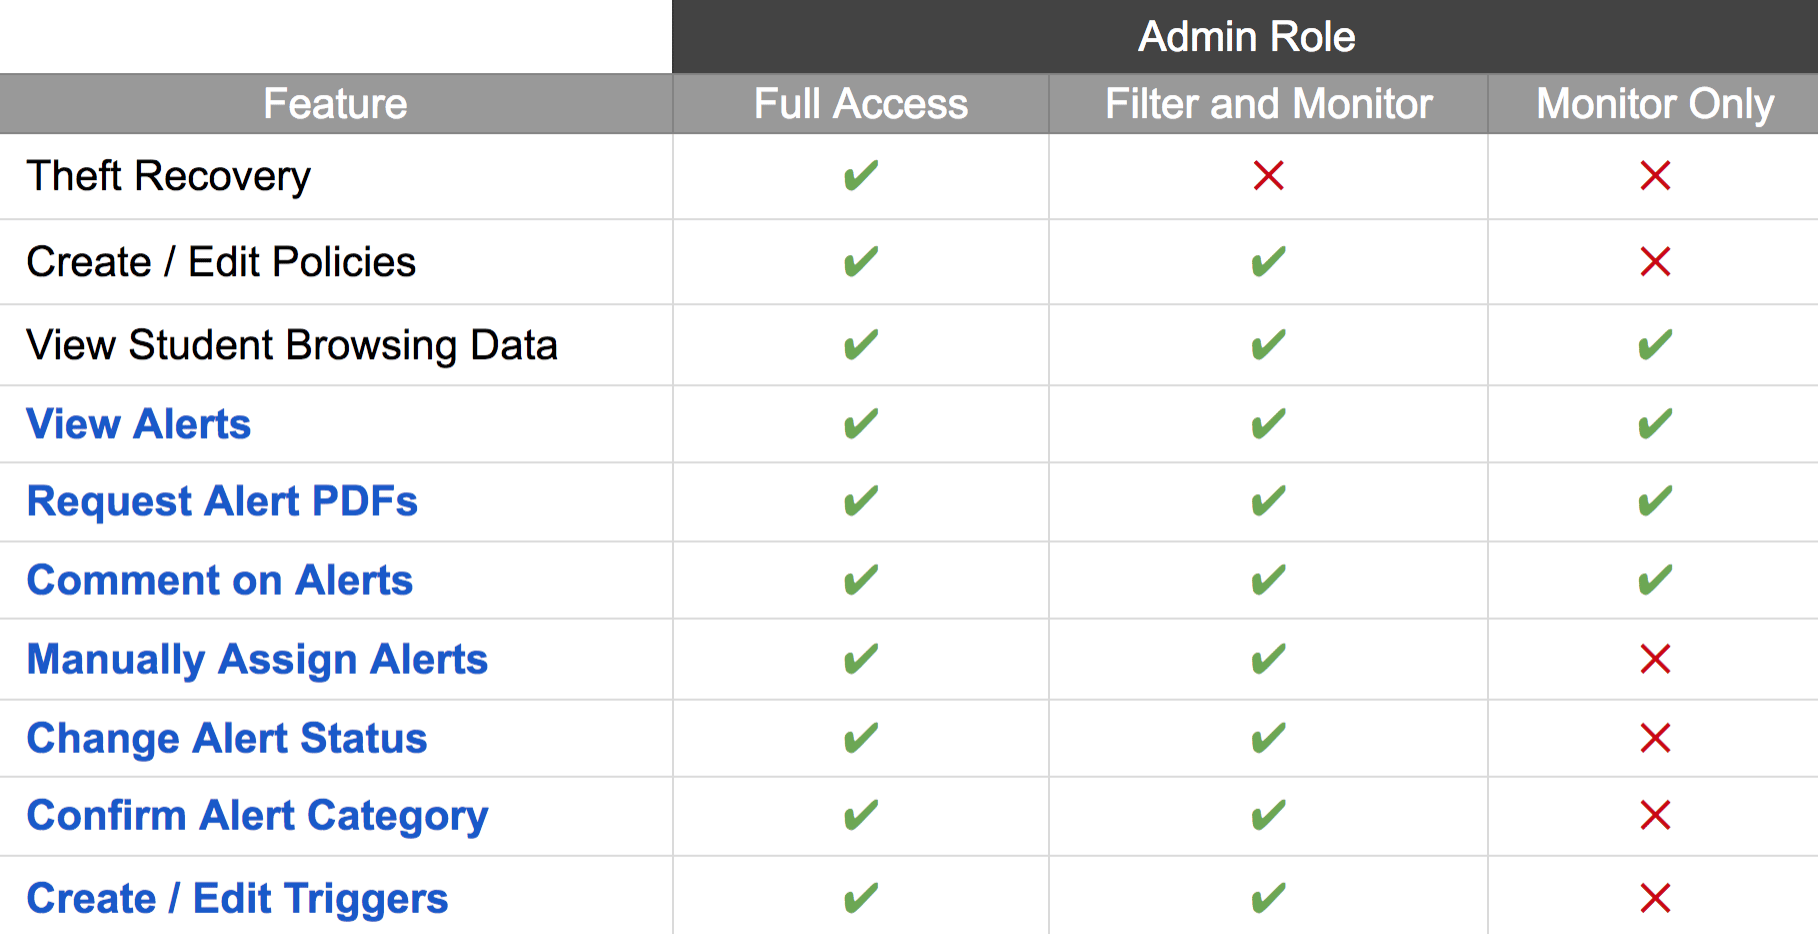
Each GoGuardian Admin permission level has a distinct set of Smart Alerts capabilities.
| Capability | Full Access | Filter and Monitor | Monitor Only |
| ------------------------ | ----------- | ------------------ | ------------ |
| View alerts | Yes | Yes | Yes |
| Request alert PDFs | Yes | Yes | Yes |
| Comment on alerts | Yes | Yes | Yes |
| Manually assign alerts | Yes | Yes | No |
| Change alert status | Yes | Yes | No |
| Confirm alert category | Yes | Yes | No |
| Create and edit Triggers | Yes | Yes | No |
For a full comparison of what each permission level can do across all GoGuardian Admin features, see [Review User Roles and Permissions](/products/org-management/user-roles-and-permissions).
## Create a New Account with Smart Alerts Access
Use these steps to create a new user account and grant Smart Alerts access at the same time. You must have a Super User account to complete this task.
1. Go to [manage.goguardian.com](https://manage.goguardian.com) and sign in with your Super User account.
2. Click **Add User**.
3. Enter a name and email address for the new account.
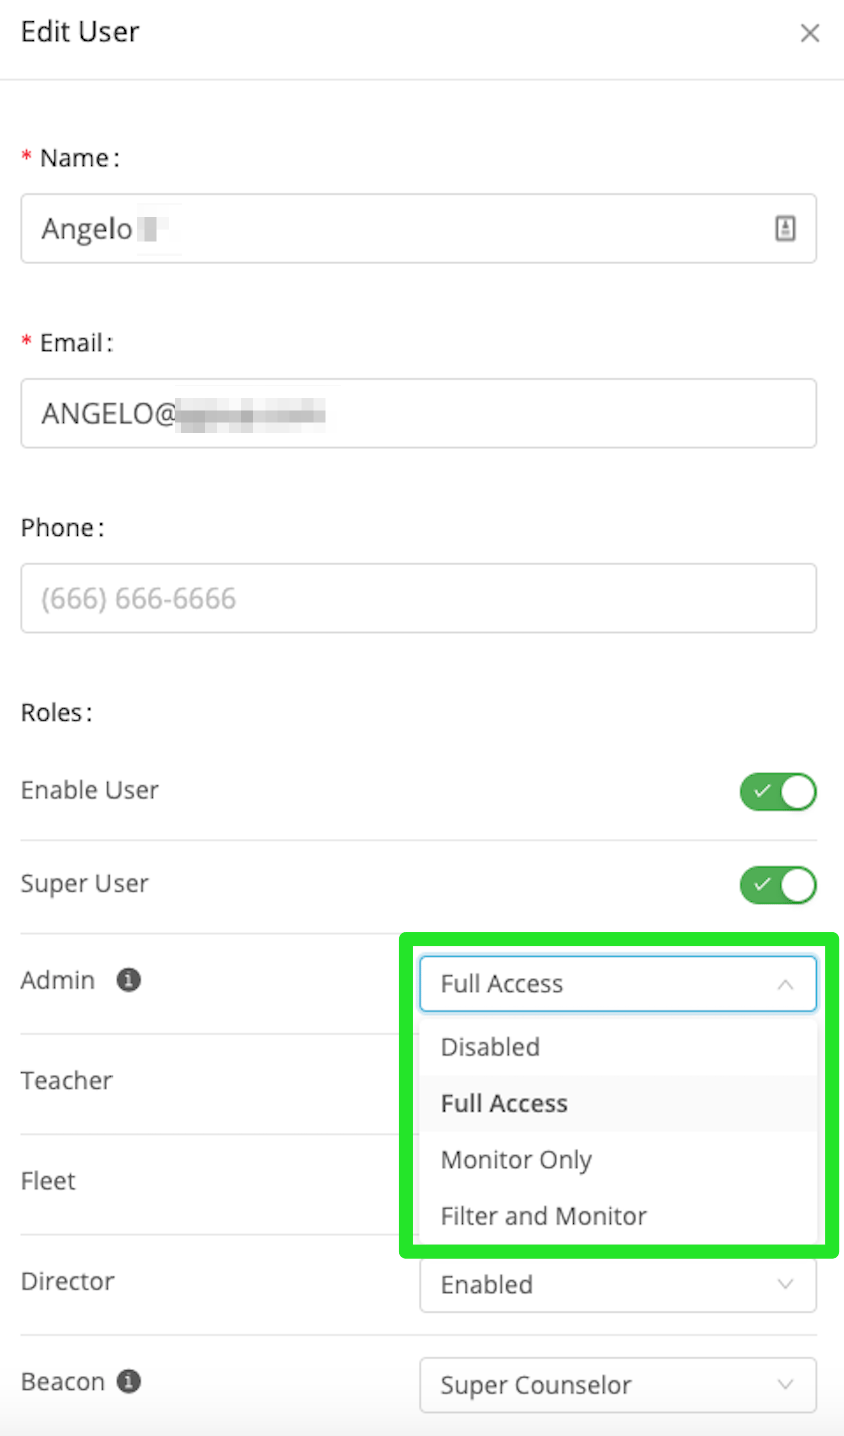
4. Under **GoGuardian Admin**, select **Full Access**, **Filter and Monitor**, or **Monitor Only**.
5. Select each OU the user can access. The user will only see Smart Alerts generated by students in OUs you select here.
6. Click **Add User** to create the account. GoGuardian automatically sends a welcome email to the new user.
7. The new account appears in the Org Management user list with the assigned permission level and OUs. The user can sign in and access Smart Alerts for students in the OUs you selected.
## Add Smart Alerts Access to an Existing Account
Use these steps to update an existing user account to include Smart Alerts access. You must have a Super User account to complete this task.
1. Go to [manage.goguardian.com](https://manage.goguardian.com) and sign in with your Super User account.
2. Use the search bar to find the user account you want to update.
3. Click **Edit** to the right of the user's name.
4. Under **GoGuardian Admin**, select **Full Access**, **Filter and Monitor**, or **Monitor Only**.
5. Select each OU the user can access. If the user already has OU assignments, confirm they cover the correct student populations.
6. Click **Save** to apply the updated permissions.
7. The user's account now shows the updated permission level and OU assignments. The user can access Smart Alerts for students in the selected OUs.
 ## Understand OU Access and Alert Visibility
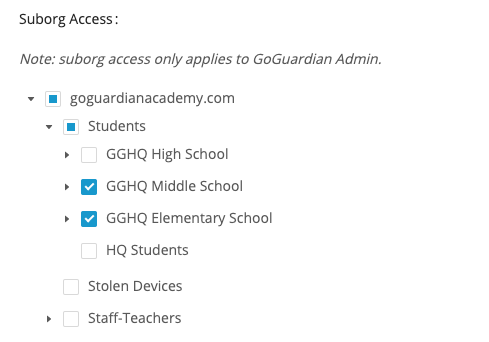
OU access controls which Smart Alerts an administrator can see. An administrator only sees alerts generated by students in OUs assigned to their account. Selecting a parent OU does not automatically grant access to child OUs unless each child OU is also selected.
In the example below, a user assigned to GGHQ Middle School and GGHQ Elementary School can view alerts only for students in those OUs. The root OU and any unselected sub-OUs appear with a partially filled indicator rather than a full checkmark, confirming that access is partial.
Assign OU access carefully. If an administrator needs to see alerts for students across your entire organization, select the root OU. If OU assignments are too narrow, the administrator may miss relevant alerts.
## Resolve the Red Triangle Indicator
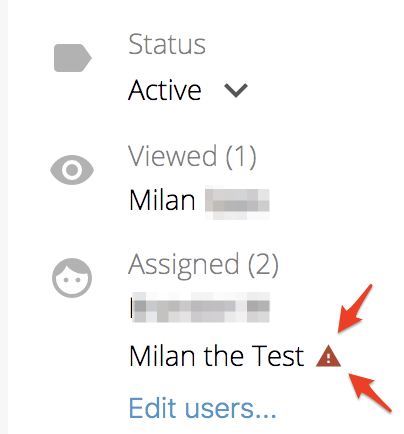
When an administrator is manually assigned to a Smart Alert for a student outside their OU access, a red triangle appears next to that administrator's name on the alert. This means the administrator cannot view the alert.
To resolve this, update the administrator's OU access in Org Management to include the OU the student belongs to.
1. Open the Smart Alert with the red triangle indicator. Note the student's OU listed in the alert details.
2. In Org Management at [manage.goguardian.com](https://manage.goguardian.com), find the administrator's account and click **Edit**.
3. In the OU access section, select the checkbox for the student's OU.
4. Click **Save** to apply the updated OU access.
5. Return to the Smart Alert. The red triangle no longer appears next to the administrator's name, confirming they now have access to view the alert.
## Understand OU Access and Alert Visibility
OU access controls which Smart Alerts an administrator can see. An administrator only sees alerts generated by students in OUs assigned to their account. Selecting a parent OU does not automatically grant access to child OUs unless each child OU is also selected.
In the example below, a user assigned to GGHQ Middle School and GGHQ Elementary School can view alerts only for students in those OUs. The root OU and any unselected sub-OUs appear with a partially filled indicator rather than a full checkmark, confirming that access is partial.
Assign OU access carefully. If an administrator needs to see alerts for students across your entire organization, select the root OU. If OU assignments are too narrow, the administrator may miss relevant alerts.
## Resolve the Red Triangle Indicator
When an administrator is manually assigned to a Smart Alert for a student outside their OU access, a red triangle appears next to that administrator's name on the alert. This means the administrator cannot view the alert.
To resolve this, update the administrator's OU access in Org Management to include the OU the student belongs to.
1. Open the Smart Alert with the red triangle indicator. Note the student's OU listed in the alert details.
2. In Org Management at [manage.goguardian.com](https://manage.goguardian.com), find the administrator's account and click **Edit**.
3. In the OU access section, select the checkbox for the student's OU.
4. Click **Save** to apply the updated OU access.
5. Return to the Smart Alert. The red triangle no longer appears next to the administrator's name, confirming they now have access to view the alert.
 ## Resources
Reference the full permission levels available for GoGuardian Admin and Org Management.
Learn how Smart Alerts works, how alerts are generated, and how to manage notifications.
## Resources
Reference the full permission levels available for GoGuardian Admin and Org Management.
Learn how Smart Alerts works, how alerts are generated, and how to manage notifications.