> ## Documentation Index
> Fetch the complete documentation index at: https://docs.goguardian.com/llms.txt
> Use this file to discover all available pages before exploring further.
# Set Up GoGuardian Parent
> How administrators configure GoGuardian Parent: inform stakeholders, add guardian accounts, link students to guardians, and enable app features.
GoGuardian Administrators with Super User access configure GoGuardian Parent through [GoGuardian Org Management](https://manage.goguardian.com). Setup involves three steps: informing stakeholders, adding guardian accounts, and enabling app features.
## Inform Staff, Guardians, and Students
Before enabling GoGuardian Parent, notify staff, guardians, and students that guardians will be able to review student browsing activity through the app.
GoGuardian provides ready-to-use email templates at the bottom of the [Parent App settings page](https://manage.goguardian.com/products/parent) for this purpose.
 ## Add Guardian Accounts and Relationships
Adding guardians is a two-step process: add the guardian's contact information, then link the guardian to one or more students.
### Add Guardians
Guardians can be added one at a time or in bulk.
**To add a single guardian:**
1. Go to [manage.goguardian.com](https://manage.goguardian.com) and select **Guardians**.
2. Click **Add Guardian**.
3. Enter the guardian's full name and email address.
4. Optional: Enter a phone number and turn on SMS notifications.
5. Click **Save**.
6. Verify the result: The guardian appears in the Guardians list.
**To add guardians in bulk via CSV:**
1. Go to [manage.goguardian.com](https://manage.goguardian.com) and select **Guardians**.
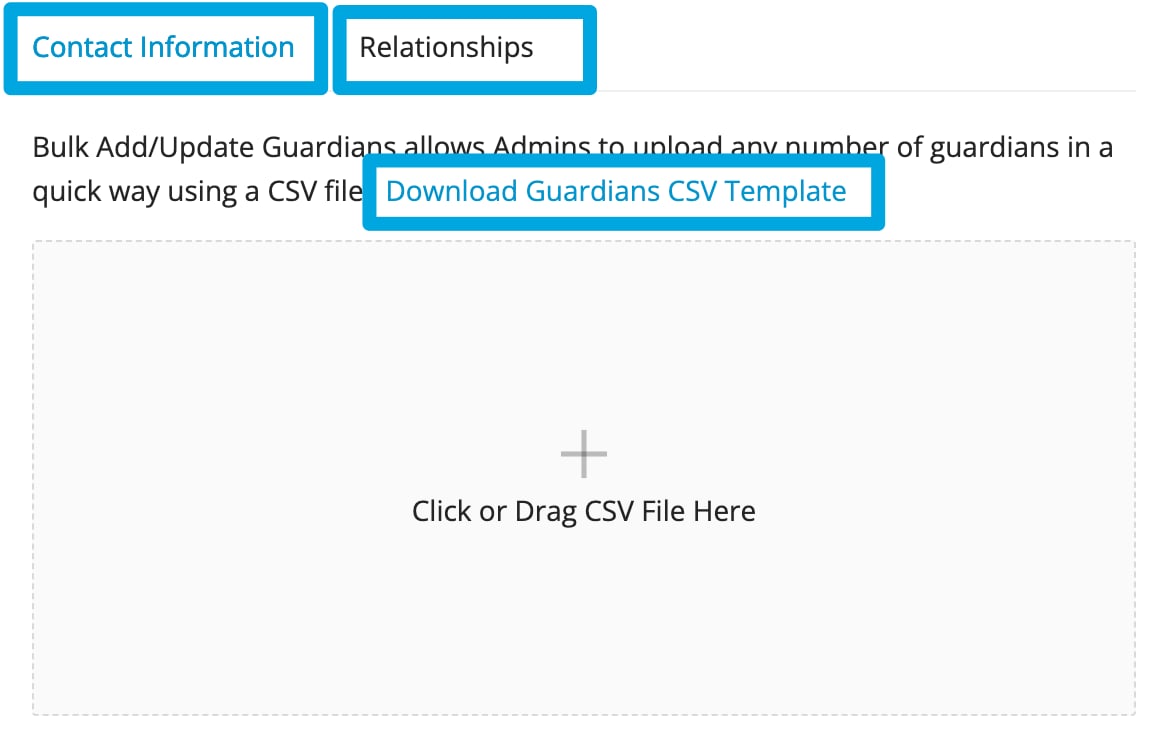
2. Click **Bulk Add/Edit** and select the **Contact Information** template to download the CSV.
3. Complete the CSV using the column definitions below, then upload the file.
4. Verify the result: Guardians appear in the list after the upload completes.
**Guardians CSV columns:**
| Column | Format | Description |
| ------------ | ----------------------- | ------------------------------------------------------ |
| `name` | Text | Guardian's full name. Example: `Wally Fletcher` |
| `email` | Text | Guardian's email address. Example: `wally@example.com` |
| `phone` | 10-digit number | Optional phone number. Example: `4158870124` |
| `parent_app` | `enabled` or `disabled` | Whether the guardian has Parent App access |
| `delete` | `delete` or blank | Enter `delete` to remove the guardian |
If your organization integrates with Clever or ClassLink, guardian and relationship data can be synced automatically. Use the Field Access settings in Clever to control which student fields are shared.
### Link Students to Guardians
After adding guardians, link each guardian to their students.
**To add a relationship one at a time:**
1. Go to [manage.goguardian.com](https://manage.goguardian.com) and select **Guardians**.
2. Click **+** next to the guardian's name, then click **Add Relationship**.
3. Enter the student's name or email address and select it from the list.
4. Enter the relationship type — for example, Mother, Father, Step-Father, or Guardian.
5. Click **Save**.
6. Verify the result: The student appears under the guardian's entry.
**To link students in bulk via CSV:**
1. Click **Bulk Add/Edit** and select the **Relationships** template.
2. Complete the CSV using the column definitions below, then upload the file.
**Relationships CSV columns:**
| Column | Format | Description |
| ---------------- | ------------------ | --------------------------------------------------------- |
| `guardian_email` | Text | Email address of the guardian |
| `student_email` | Text | Email address of the student |
| `relationship` | Text | Relationship type. Example: `Mother` |
| `primary` | `primary` or blank | Enter `primary` to designate this as the primary guardian |
| `delete` | `delete` or blank | Enter `delete` to remove the relationship |
## Enable the Parent App and Configure Features
After adding guardians and relationships, enable the Parent App and configure which features guardians can access.
1. Go to the [Parent tab](https://manage.goguardian.com/products/parent) in GoGuardian Org Management.
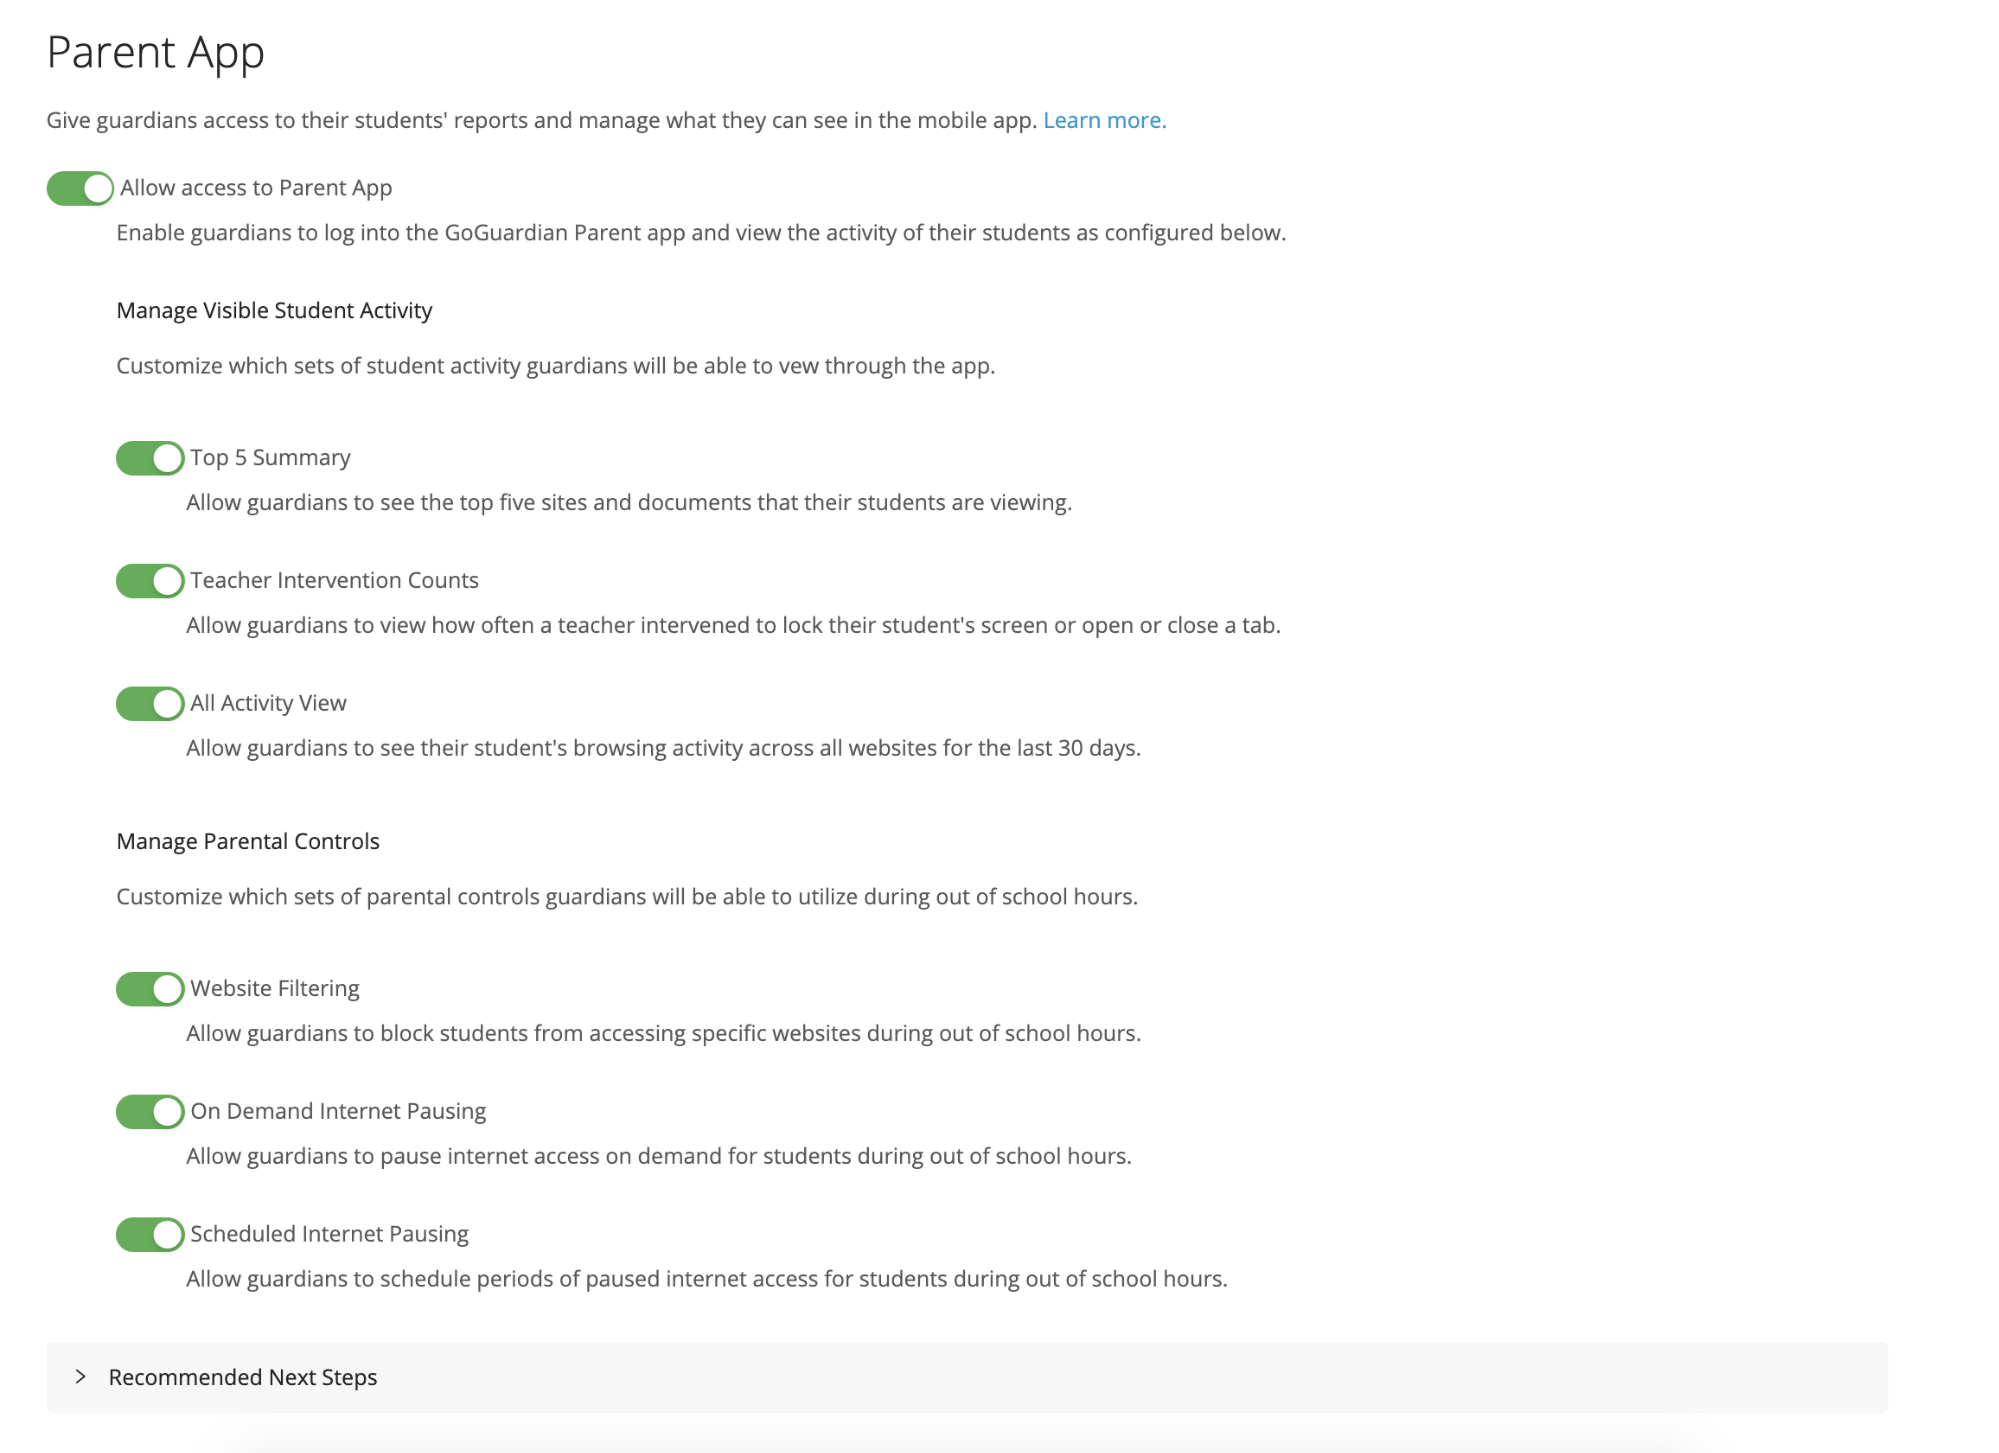
2. Turn on the **GoGuardian Parent** toggle to enable the app.
3. Select which activity views guardians can access:
* **Top 5 Summary** — top visited websites, Google Workspace files, apps and extensions, and videos
* **Teacher Intervention Counts** — count of teacher actions taken during sessions (requires GoGuardian Teacher subscription)
* **All Activity View** — full browsing activity log
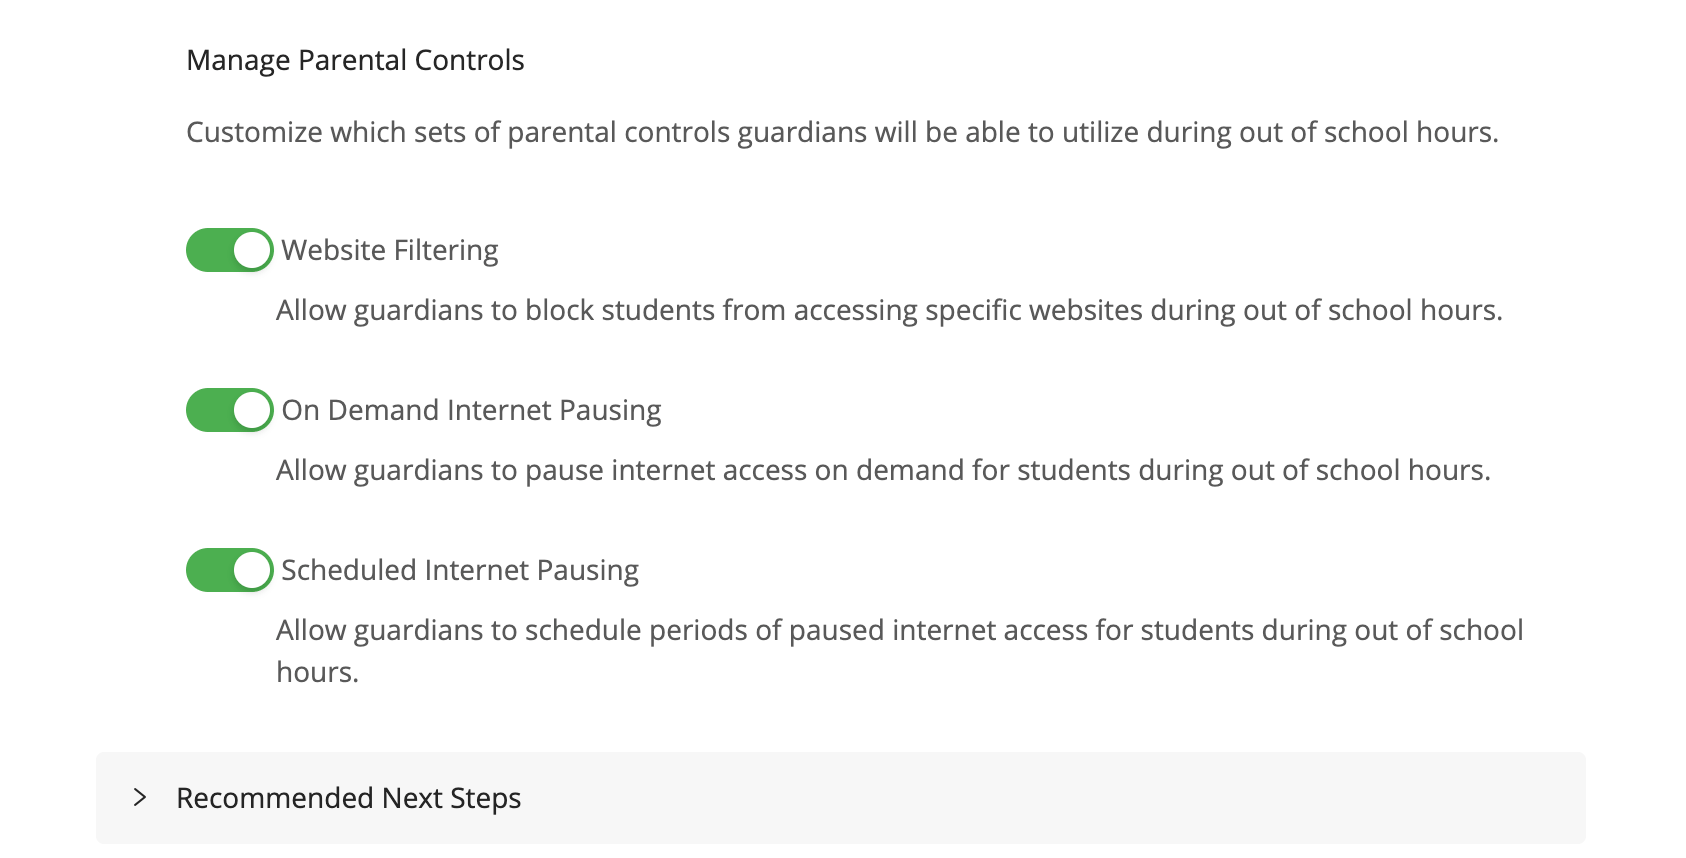
4. Optional: Turn on parental controls — **Website Filtering**, **On Demand Internet Pausing**, and **Scheduled Internet Pausing**. These controls only apply during out-of-school hours when At Home Mode is enabled.
5. Verify the result: Guardians with access enabled receive an invitation to download the app.
Parental controls require At Home Mode to be configured. See [At Home Mode](/products/org-management/at-home-mode) for setup instructions.
## Add Guardian Accounts and Relationships
Adding guardians is a two-step process: add the guardian's contact information, then link the guardian to one or more students.
### Add Guardians
Guardians can be added one at a time or in bulk.
**To add a single guardian:**
1. Go to [manage.goguardian.com](https://manage.goguardian.com) and select **Guardians**.
2. Click **Add Guardian**.
3. Enter the guardian's full name and email address.
4. Optional: Enter a phone number and turn on SMS notifications.
5. Click **Save**.
6. Verify the result: The guardian appears in the Guardians list.
**To add guardians in bulk via CSV:**
1. Go to [manage.goguardian.com](https://manage.goguardian.com) and select **Guardians**.
2. Click **Bulk Add/Edit** and select the **Contact Information** template to download the CSV.
3. Complete the CSV using the column definitions below, then upload the file.
4. Verify the result: Guardians appear in the list after the upload completes.
**Guardians CSV columns:**
| Column | Format | Description |
| ------------ | ----------------------- | ------------------------------------------------------ |
| `name` | Text | Guardian's full name. Example: `Wally Fletcher` |
| `email` | Text | Guardian's email address. Example: `wally@example.com` |
| `phone` | 10-digit number | Optional phone number. Example: `4158870124` |
| `parent_app` | `enabled` or `disabled` | Whether the guardian has Parent App access |
| `delete` | `delete` or blank | Enter `delete` to remove the guardian |
If your organization integrates with Clever or ClassLink, guardian and relationship data can be synced automatically. Use the Field Access settings in Clever to control which student fields are shared.
### Link Students to Guardians
After adding guardians, link each guardian to their students.
**To add a relationship one at a time:**
1. Go to [manage.goguardian.com](https://manage.goguardian.com) and select **Guardians**.
2. Click **+** next to the guardian's name, then click **Add Relationship**.
3. Enter the student's name or email address and select it from the list.
4. Enter the relationship type — for example, Mother, Father, Step-Father, or Guardian.
5. Click **Save**.
6. Verify the result: The student appears under the guardian's entry.
**To link students in bulk via CSV:**
1. Click **Bulk Add/Edit** and select the **Relationships** template.
2. Complete the CSV using the column definitions below, then upload the file.
**Relationships CSV columns:**
| Column | Format | Description |
| ---------------- | ------------------ | --------------------------------------------------------- |
| `guardian_email` | Text | Email address of the guardian |
| `student_email` | Text | Email address of the student |
| `relationship` | Text | Relationship type. Example: `Mother` |
| `primary` | `primary` or blank | Enter `primary` to designate this as the primary guardian |
| `delete` | `delete` or blank | Enter `delete` to remove the relationship |
## Enable the Parent App and Configure Features
After adding guardians and relationships, enable the Parent App and configure which features guardians can access.
1. Go to the [Parent tab](https://manage.goguardian.com/products/parent) in GoGuardian Org Management.
2. Turn on the **GoGuardian Parent** toggle to enable the app.
3. Select which activity views guardians can access:
* **Top 5 Summary** — top visited websites, Google Workspace files, apps and extensions, and videos
* **Teacher Intervention Counts** — count of teacher actions taken during sessions (requires GoGuardian Teacher subscription)
* **All Activity View** — full browsing activity log
4. Optional: Turn on parental controls — **Website Filtering**, **On Demand Internet Pausing**, and **Scheduled Internet Pausing**. These controls only apply during out-of-school hours when At Home Mode is enabled.
5. Verify the result: Guardians with access enabled receive an invitation to download the app.
Parental controls require At Home Mode to be configured. See [At Home Mode](/products/org-management/at-home-mode) for setup instructions.
 ## Manage Guardian Access in Bulk
To enable or disable Parent App access for multiple guardians at once:
1. Go to [manage.goguardian.com](https://manage.goguardian.com) and select **Guardians**.
2. Select the checkboxes next to the guardians you want to update. Select the top checkbox to select all guardians.
3. Click **Enable** or **Disable** to update access for all selected guardians.
4. Verify the result: The Parent App status updates for all selected guardians.
## Resources
* [Overview](/products/parent-app/overview)
* [Add Guardian Contact Information](/products/parent-app/add-guardian-contact-information)
* [At Home Mode](/products/org-management/at-home-mode)
## Manage Guardian Access in Bulk
To enable or disable Parent App access for multiple guardians at once:
1. Go to [manage.goguardian.com](https://manage.goguardian.com) and select **Guardians**.
2. Select the checkboxes next to the guardians you want to update. Select the top checkbox to select all guardians.
3. Click **Enable** or **Disable** to update access for all selected guardians.
4. Verify the result: The Parent App status updates for all selected guardians.
## Resources
* [Overview](/products/parent-app/overview)
* [Add Guardian Contact Information](/products/parent-app/add-guardian-contact-information)
* [At Home Mode](/products/org-management/at-home-mode)