> ## Documentation Index
> Fetch the complete documentation index at: https://docs.goguardian.com/llms.txt
> Use this file to discover all available pages before exploring further.
# Create a Pear Deck Account
> Sign in from peardeck.com, Google Slides, or PowerPoint Online using a Google or Microsoft Office 365 account to create your Pear Deck account.
Creating a Pear Deck account starts by signing in with your Google or Microsoft Office 365 account — no separate password required. You can begin from peardeck.com, directly in Google Slides, or from PowerPoint Online.
## Before You Begin
* You need a Google account or a Microsoft Office 365 account.
* Personal, educational, and business accounts are all supported.
* Pear Deck files are saved automatically in your Google Drive or OneDrive.
* Students do not need a Pear Deck account to join sessions. Students only need their own Pear Deck account if they want to create and present their own Pear Deck lessons.
## Start From peardeck.com
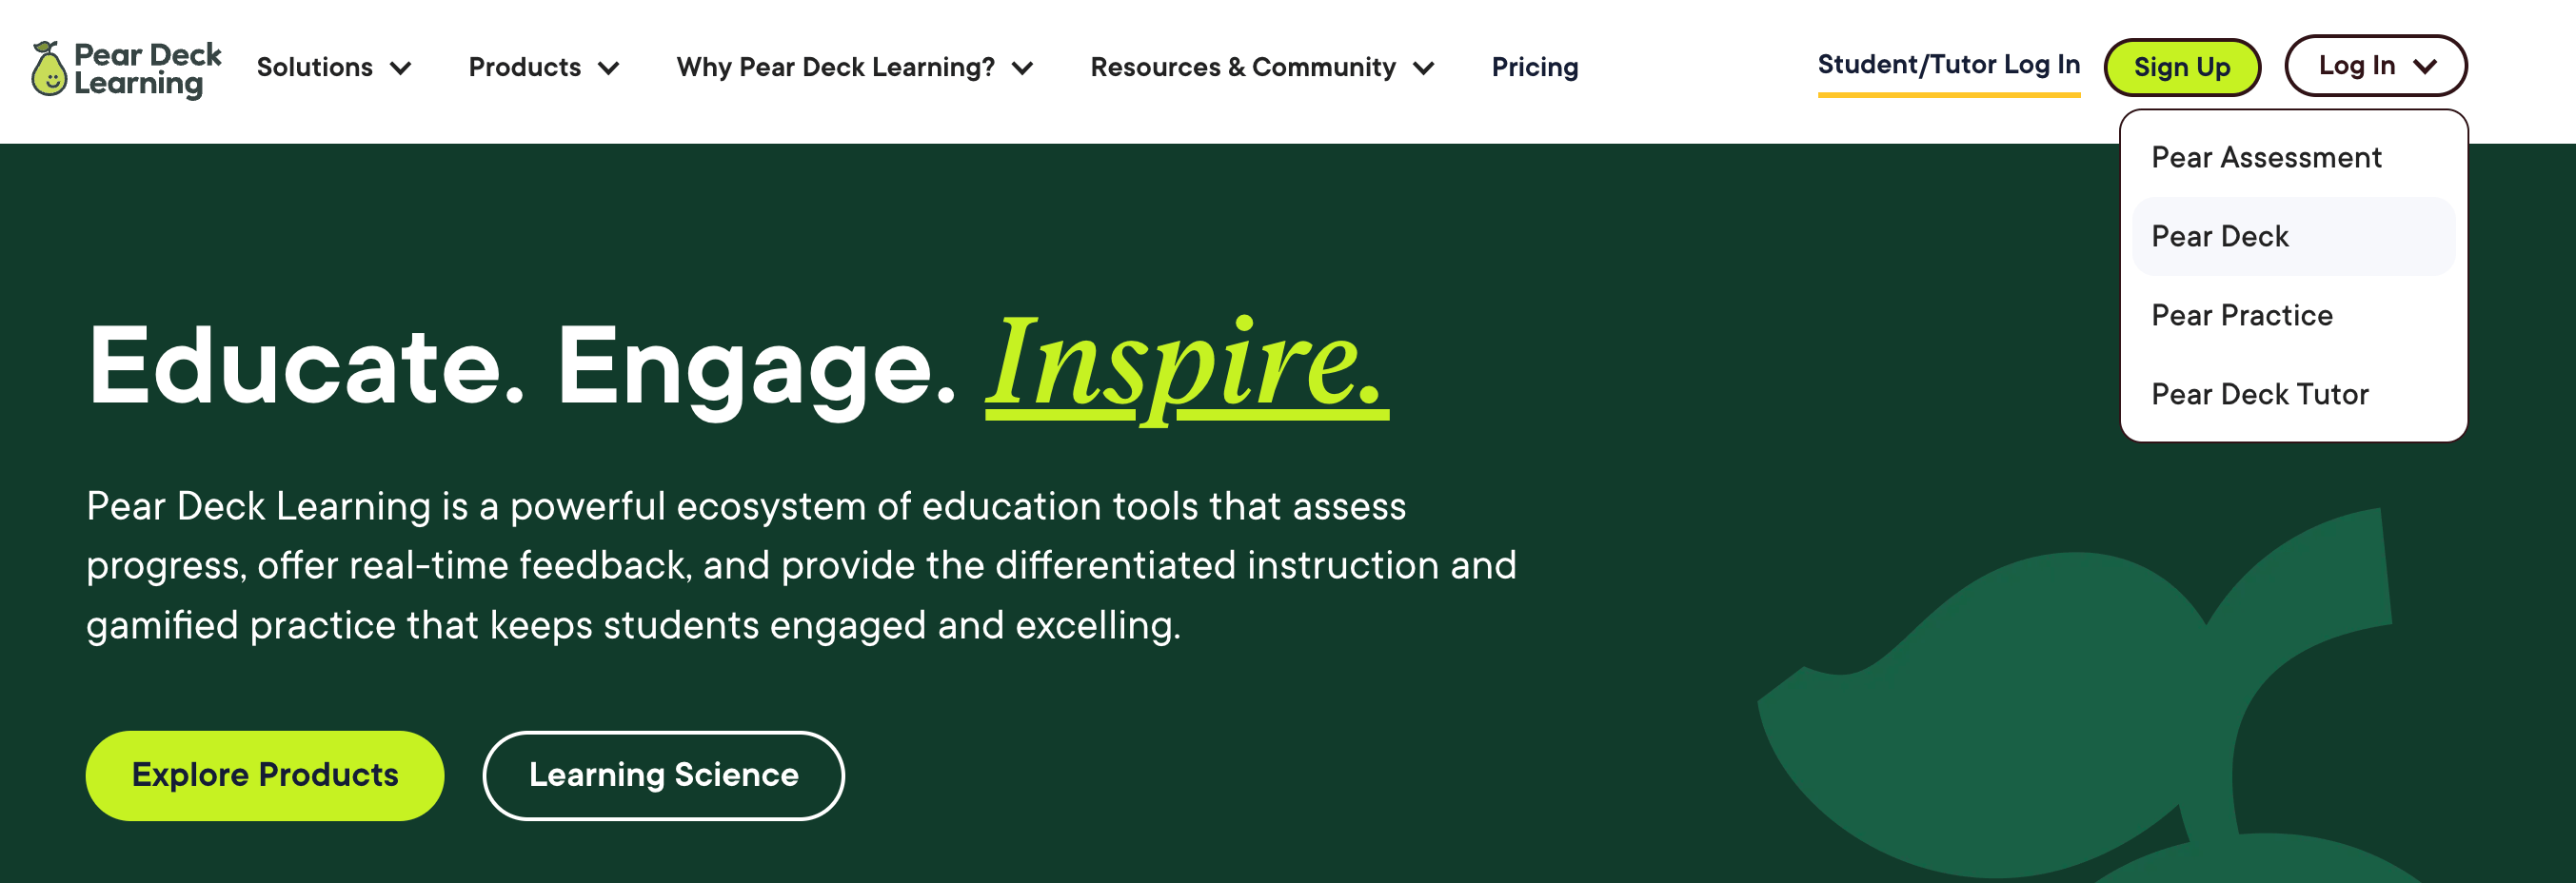
1. Go to [peardeck.com](https://www.peardeck.com).
2. Click **Log In** and select **Pear Deck**.
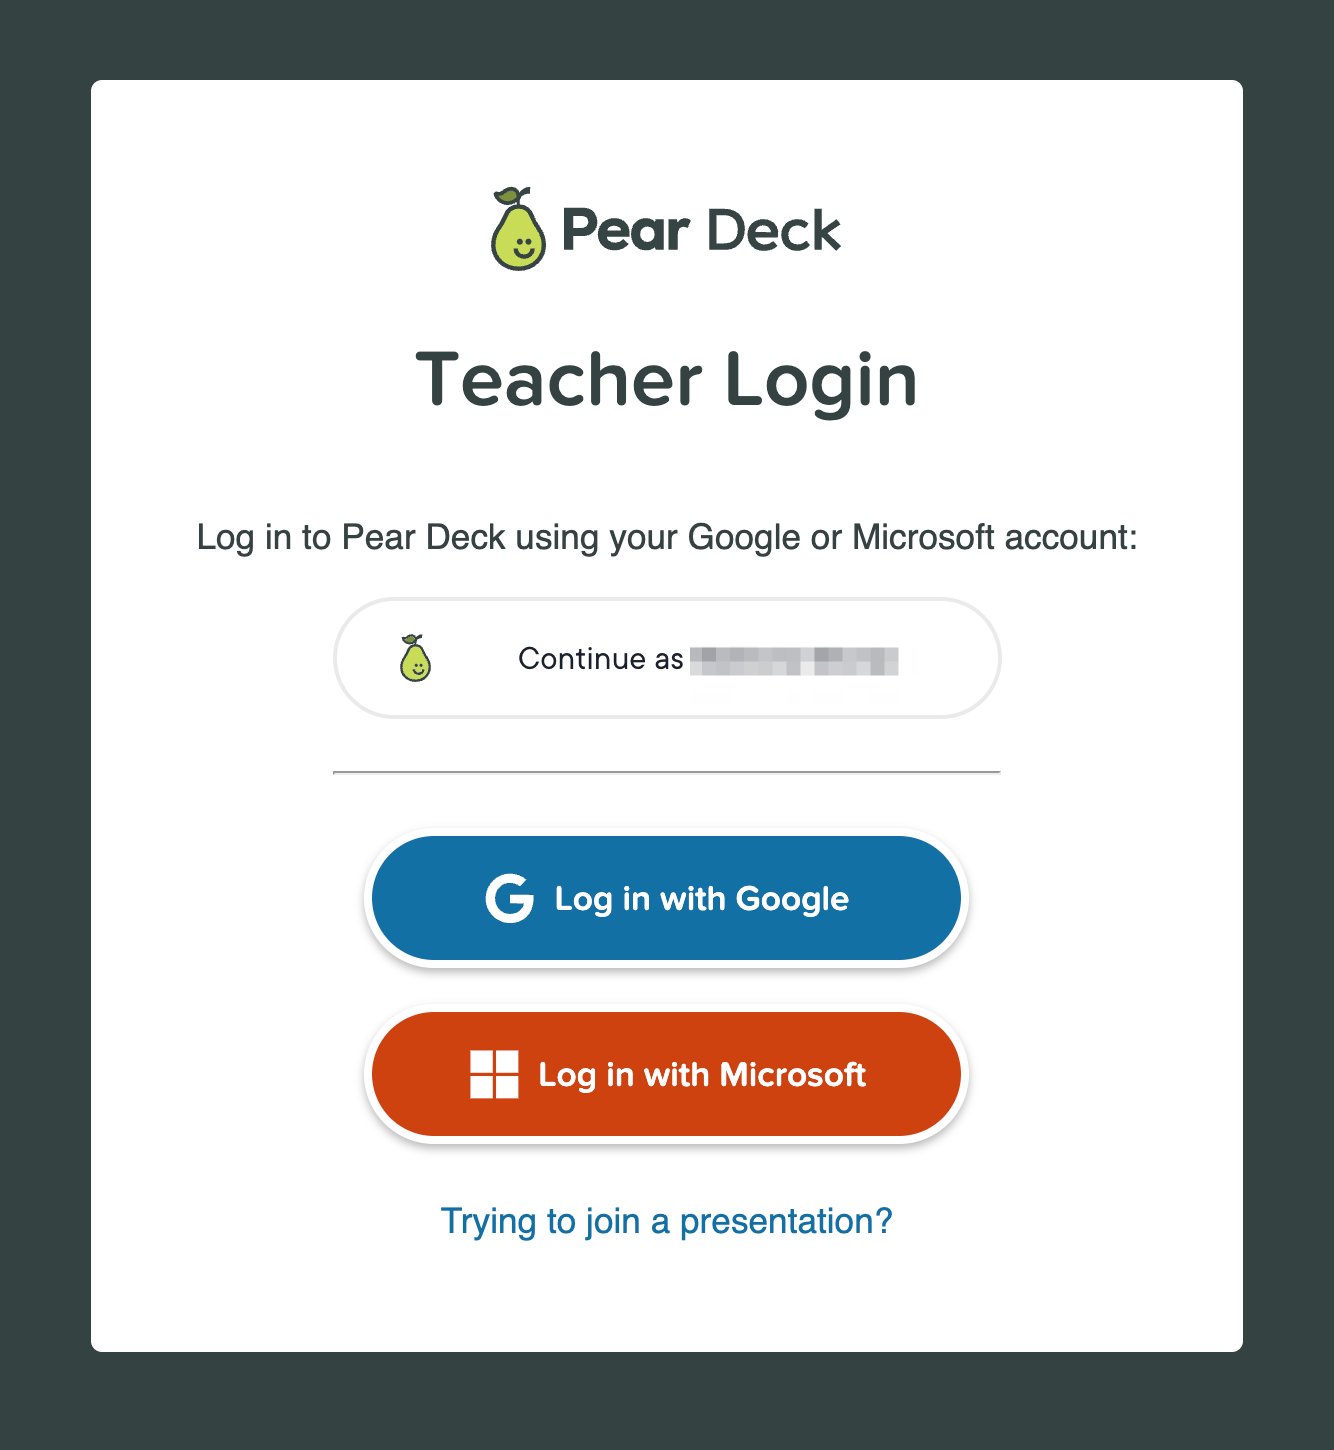
3. Choose your account type — Google or Microsoft Office 365 — and sign in.
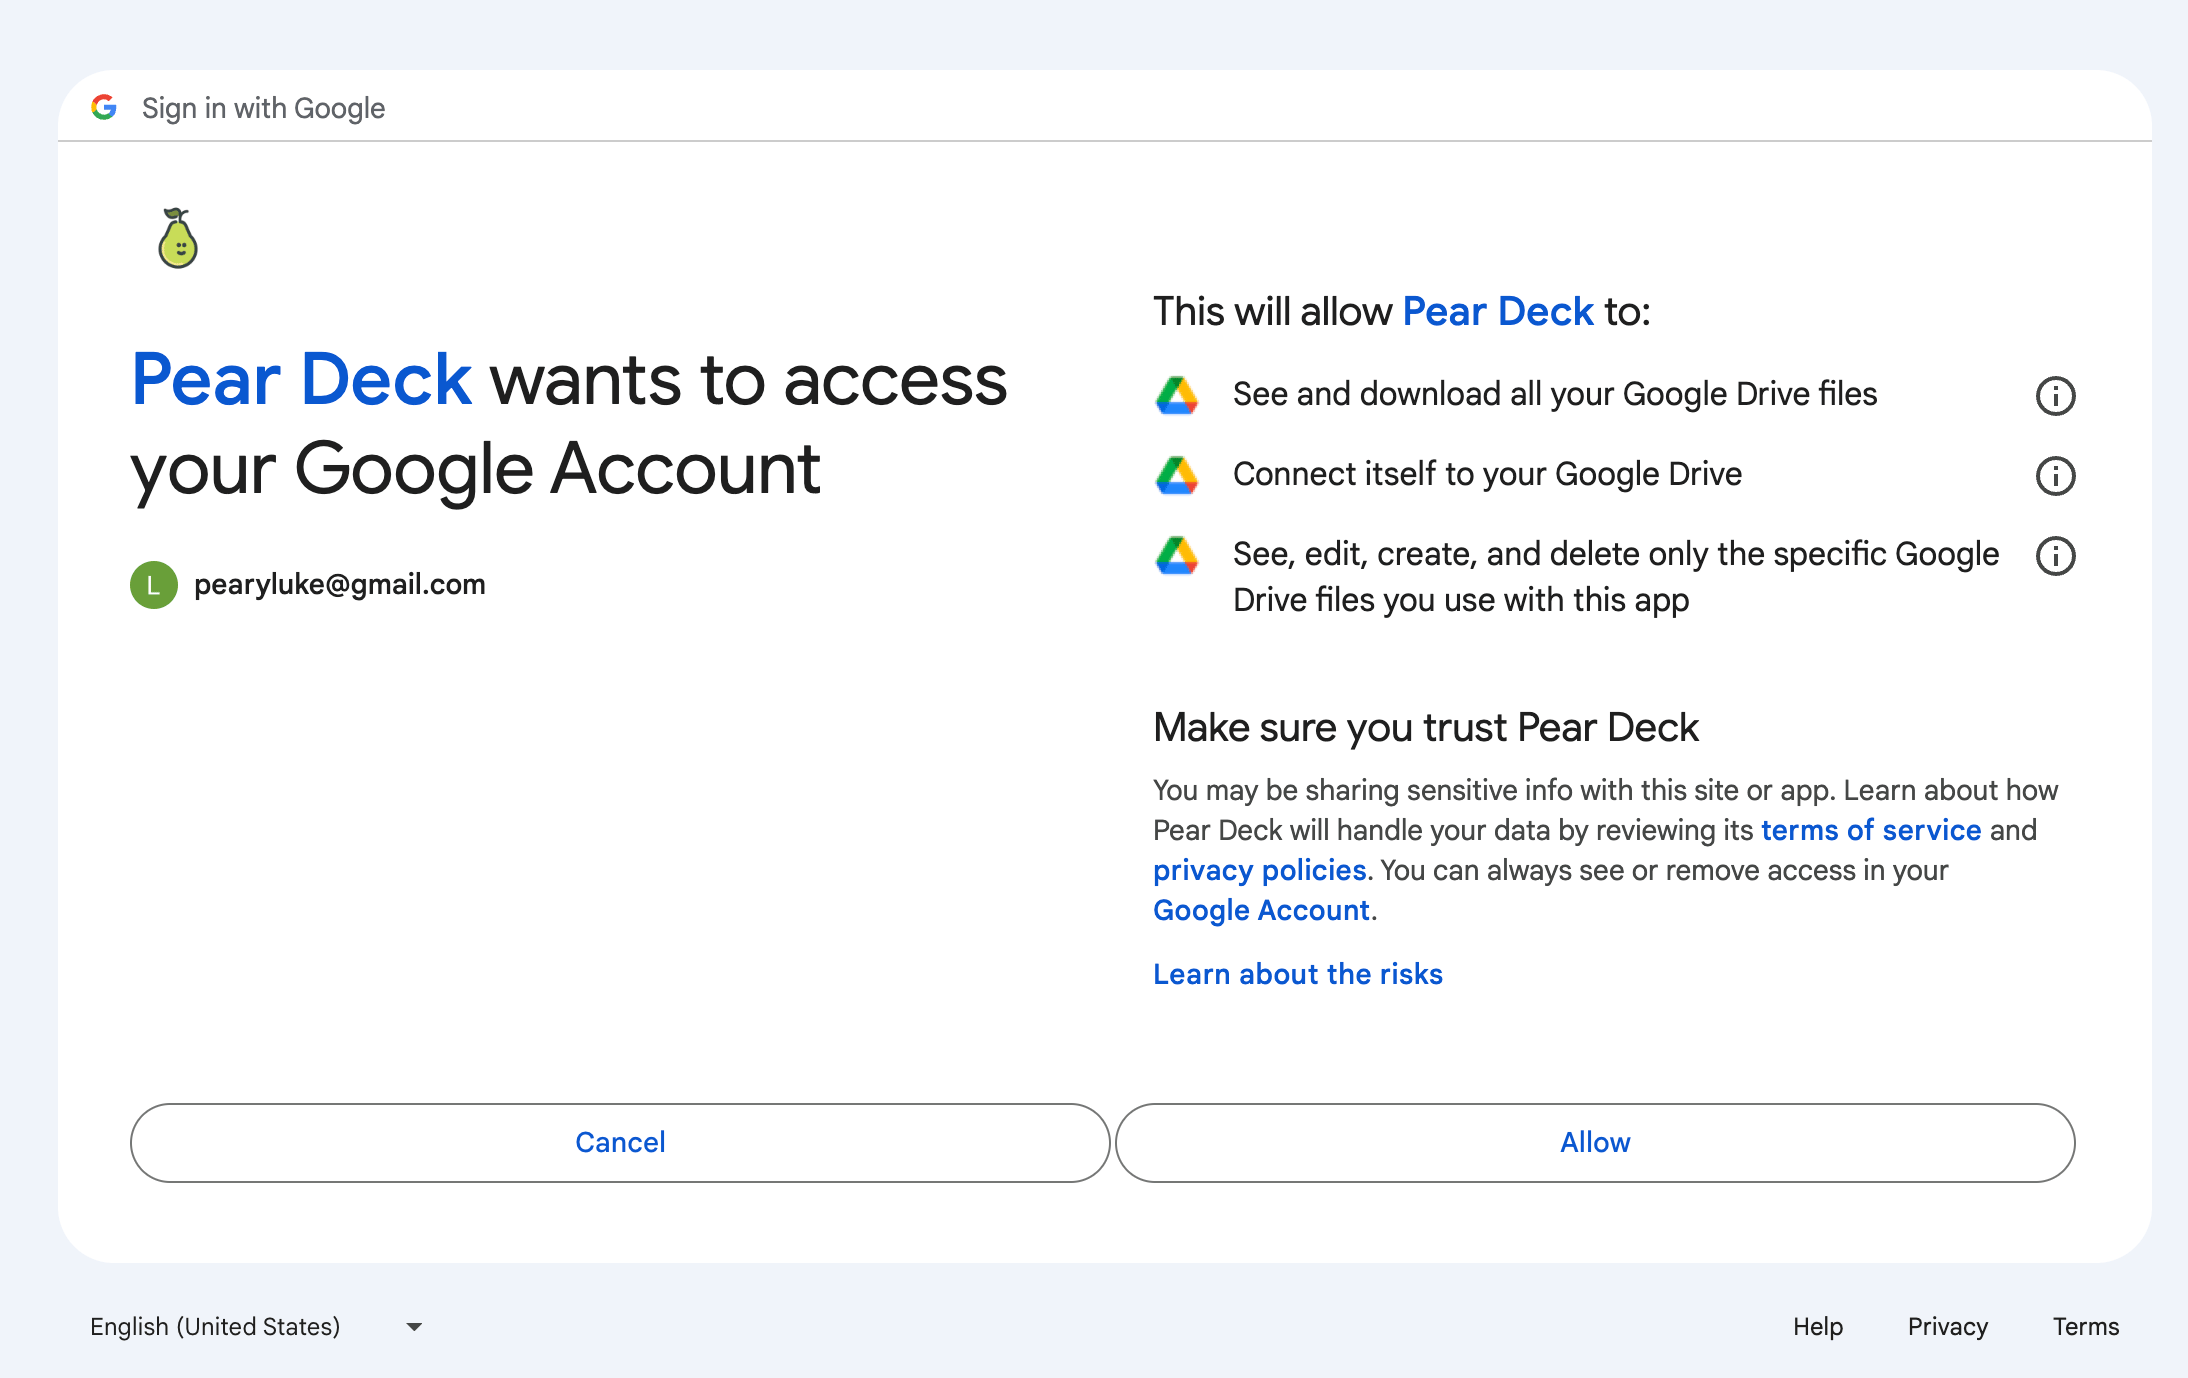
4. Click **Allow** to grant Pear Deck access to your Google Drive or OneDrive. Pear Deck stores your presentation files in your drive and needs access to add interactive questions to them.
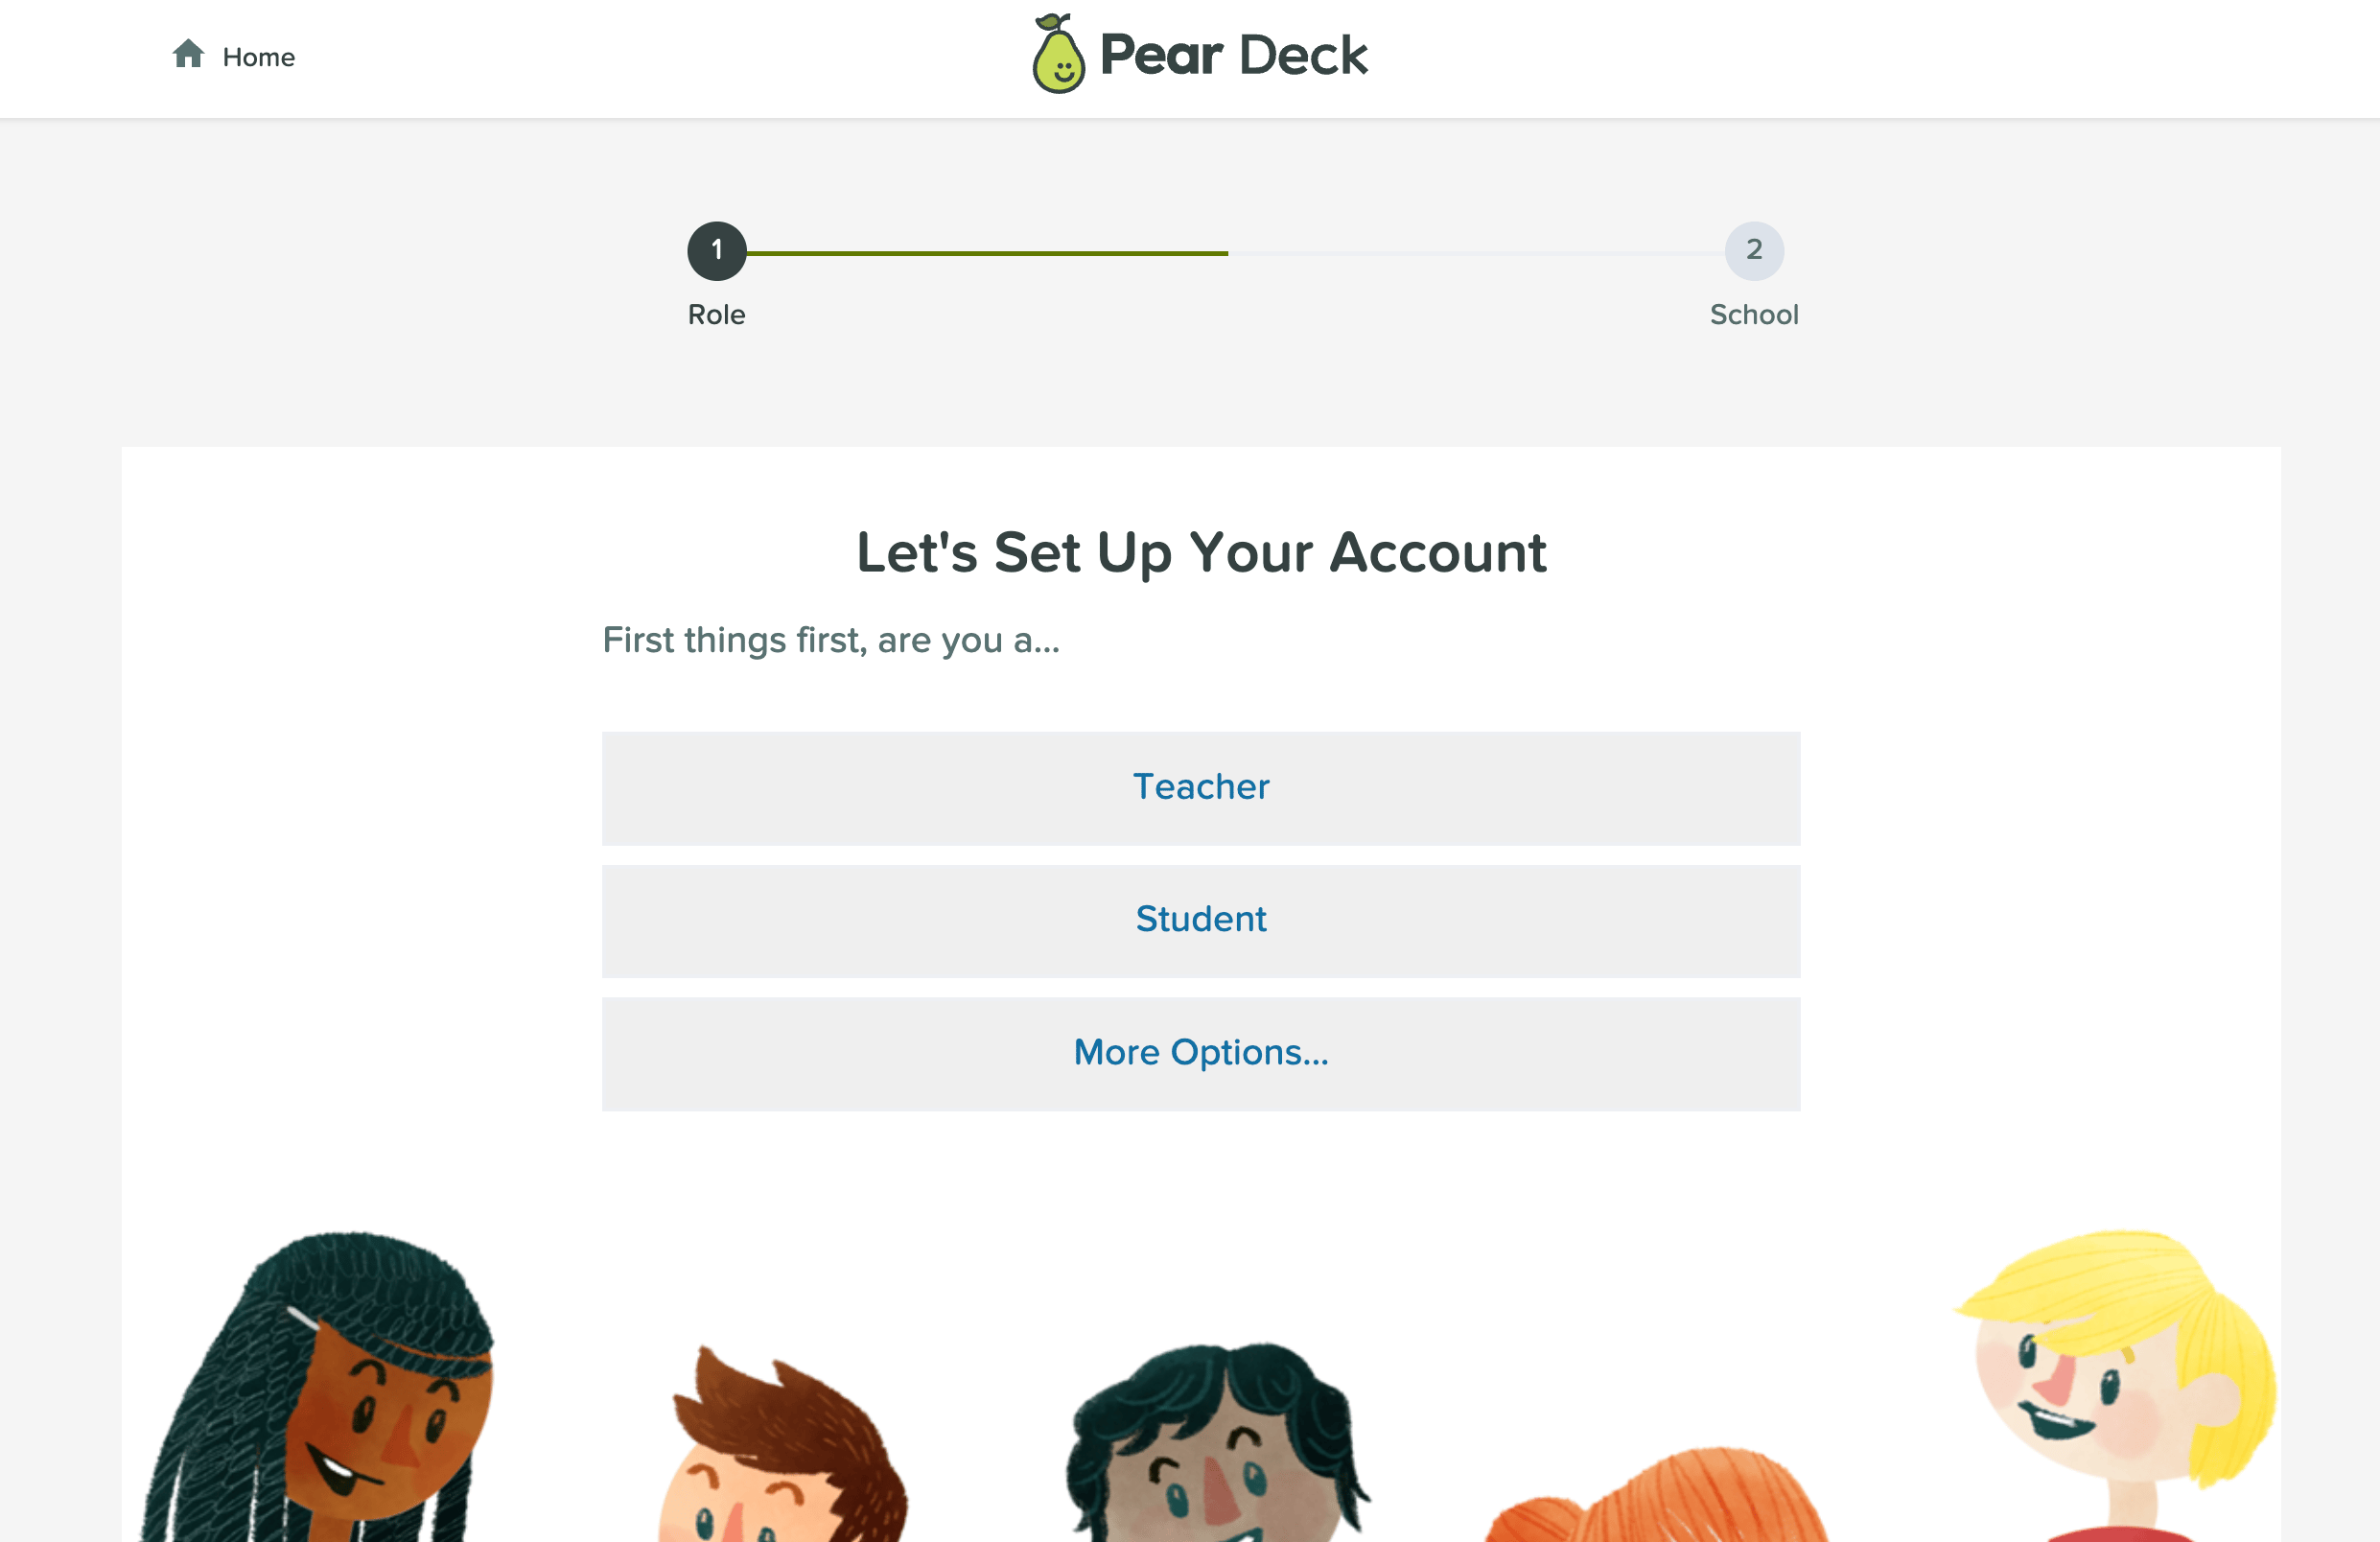
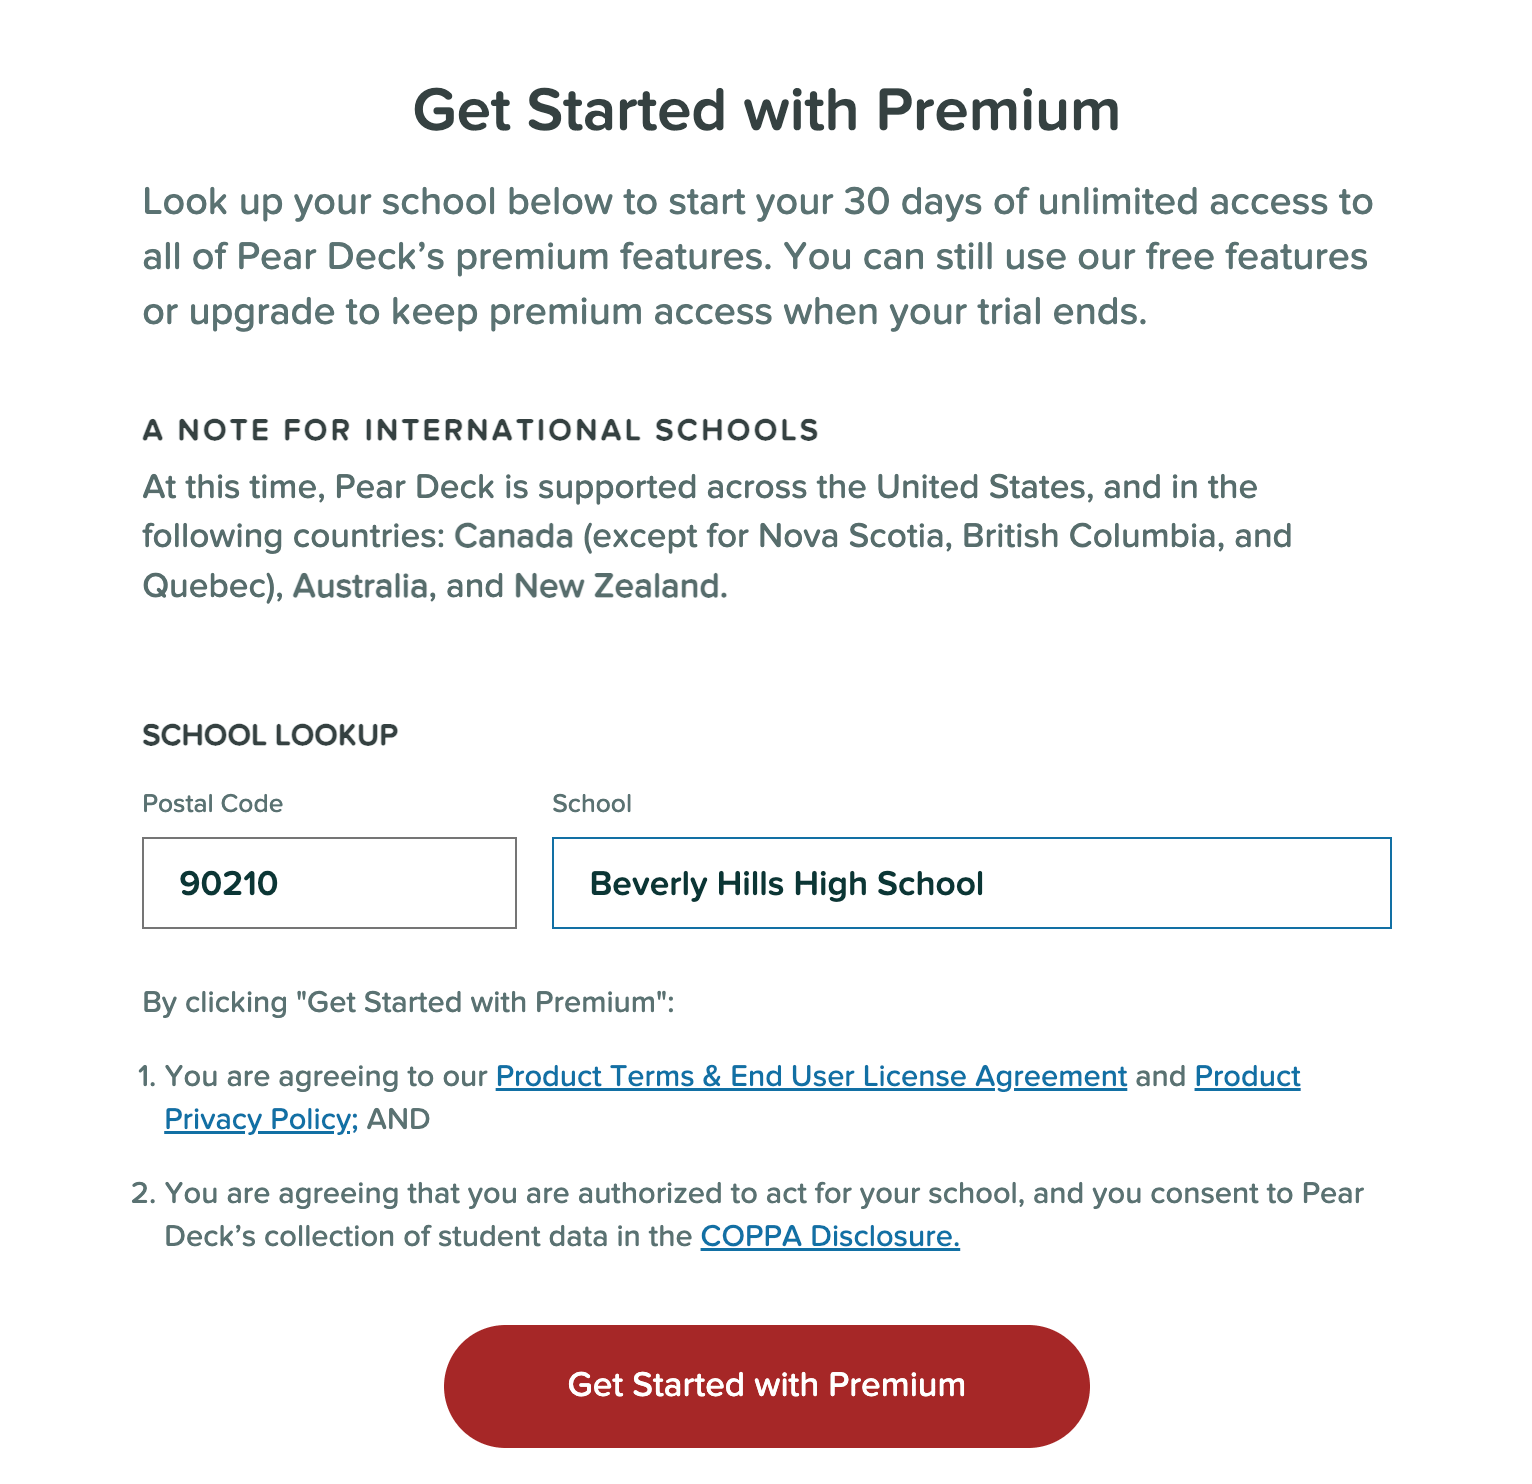
5. Complete the account setup questions: select your role as **Teacher**, enter your postal code, and enter your school name. If your school does not appear in the dropdown, type the name directly.
6. Verify the result: Your free 30-day Pear Deck Premium trial starts automatically. No payment information is required.
 ## Start From Google Slides
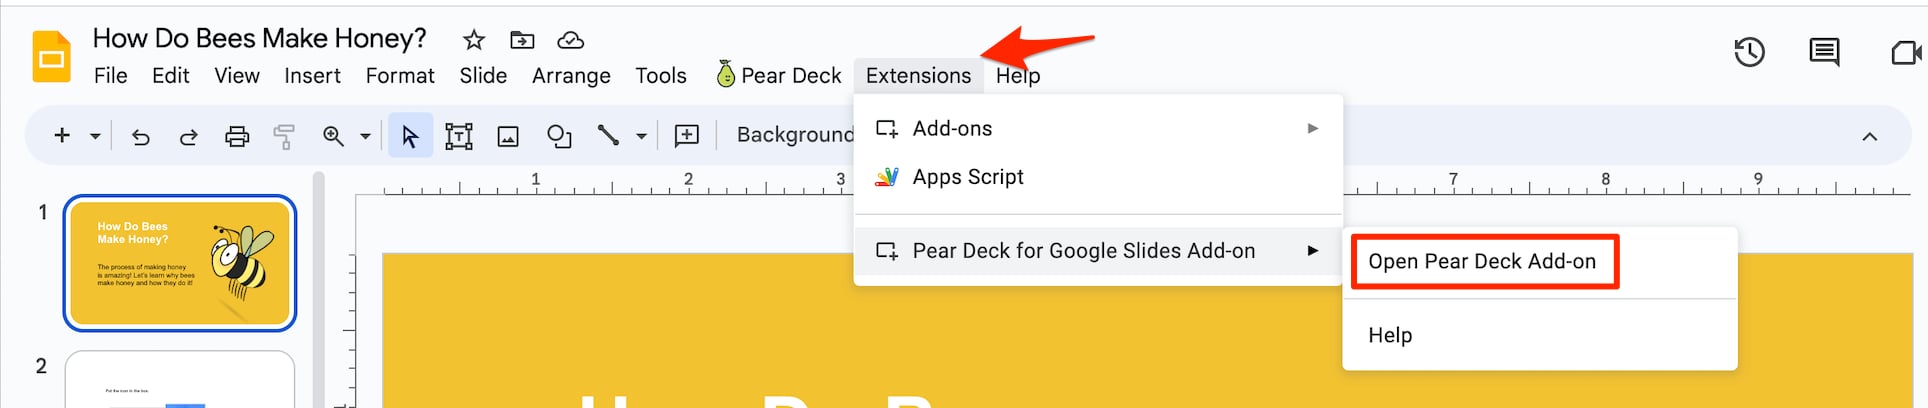
If you use Google, you can install the Pear Deck Add-on and create your account in one step from inside Google Slides.
1. Open any [Google Slides](https://docs.google.com/presentation) presentation.
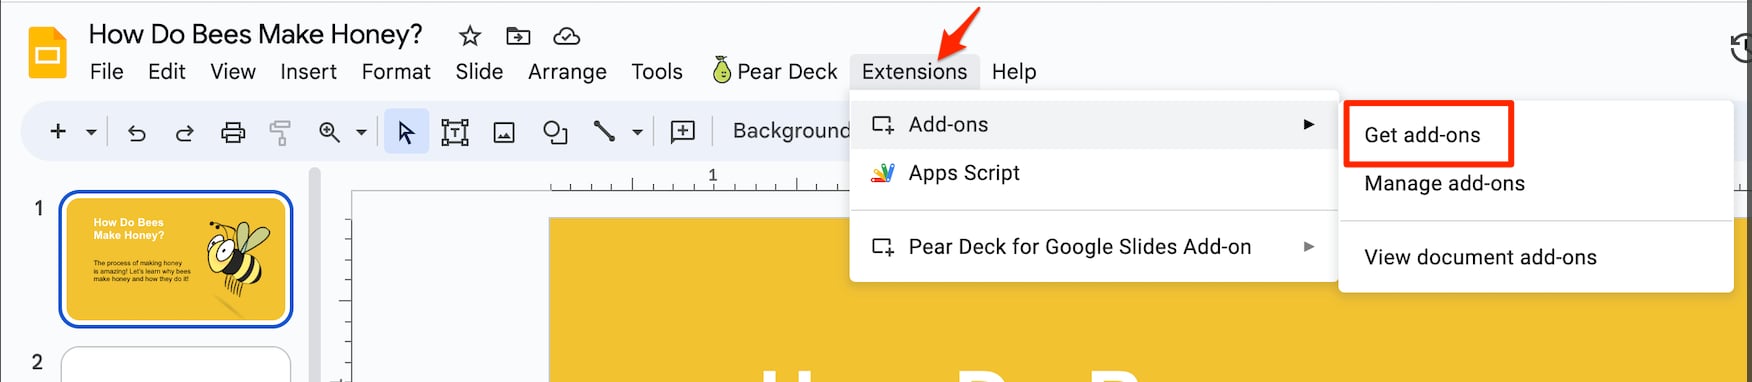
2. Click **Extensions** > **Add-ons** > **Get add-ons**.
3. In the Google Workspace Marketplace window, search for **Pear Deck for Google Slides** and click on the result.
4. Click **Install**, then click **Continue** when prompted for permissions.
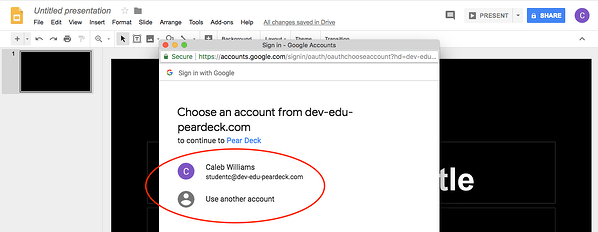
5. Select the Google account you want to use with Pear Deck.
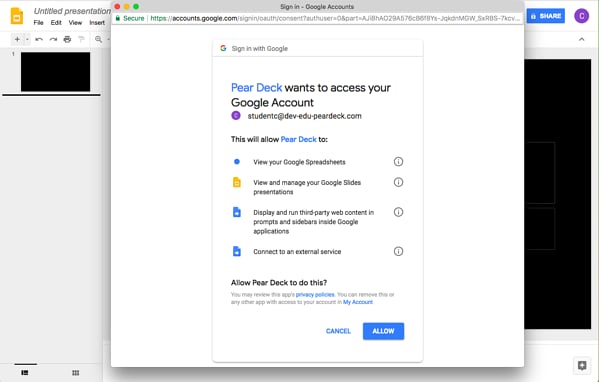
6. Click **Allow** to grant Pear Deck access to your Google account.
7. Verify the result: The Pear Deck Add-on is now available in the **Extensions** menu of any Google Slides presentation. The first time you present with Pear Deck, you are prompted to complete the account setup questions described in Step 5 of [Start From peardeck.com](#start-from-peardeckcom).
## Start From Google Slides
If you use Google, you can install the Pear Deck Add-on and create your account in one step from inside Google Slides.
1. Open any [Google Slides](https://docs.google.com/presentation) presentation.
2. Click **Extensions** > **Add-ons** > **Get add-ons**.
3. In the Google Workspace Marketplace window, search for **Pear Deck for Google Slides** and click on the result.
4. Click **Install**, then click **Continue** when prompted for permissions.
5. Select the Google account you want to use with Pear Deck.
6. Click **Allow** to grant Pear Deck access to your Google account.
7. Verify the result: The Pear Deck Add-on is now available in the **Extensions** menu of any Google Slides presentation. The first time you present with Pear Deck, you are prompted to complete the account setup questions described in Step 5 of [Start From peardeck.com](#start-from-peardeckcom).

 ## Start From PowerPoint Online
If you use Microsoft Office 365, you can install the Pear Deck Add-in and create your account from inside PowerPoint Online.
1. Open any PowerPoint Online presentation.
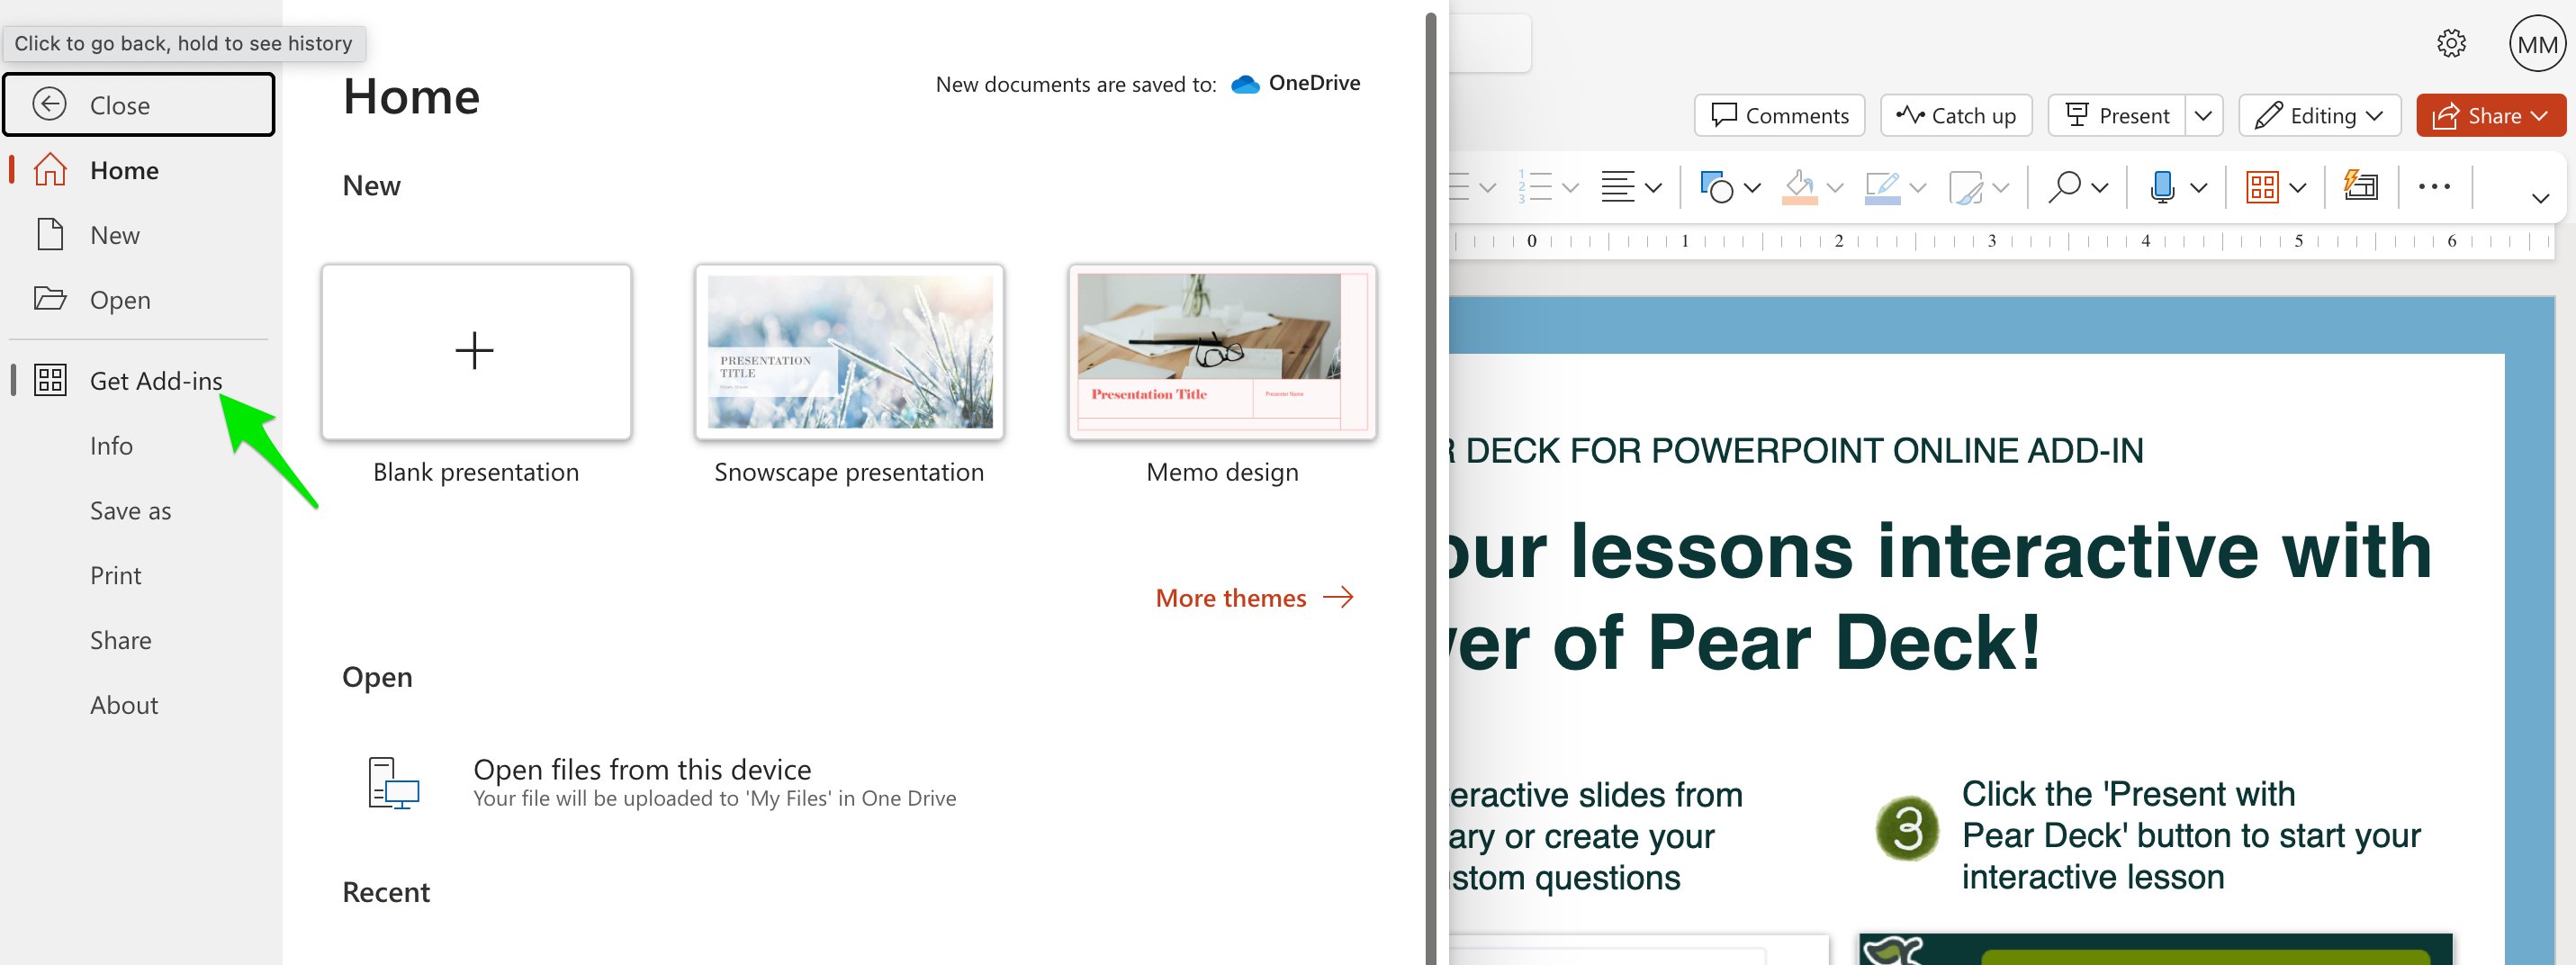
2. Click **File** > **Get Add-ins**.
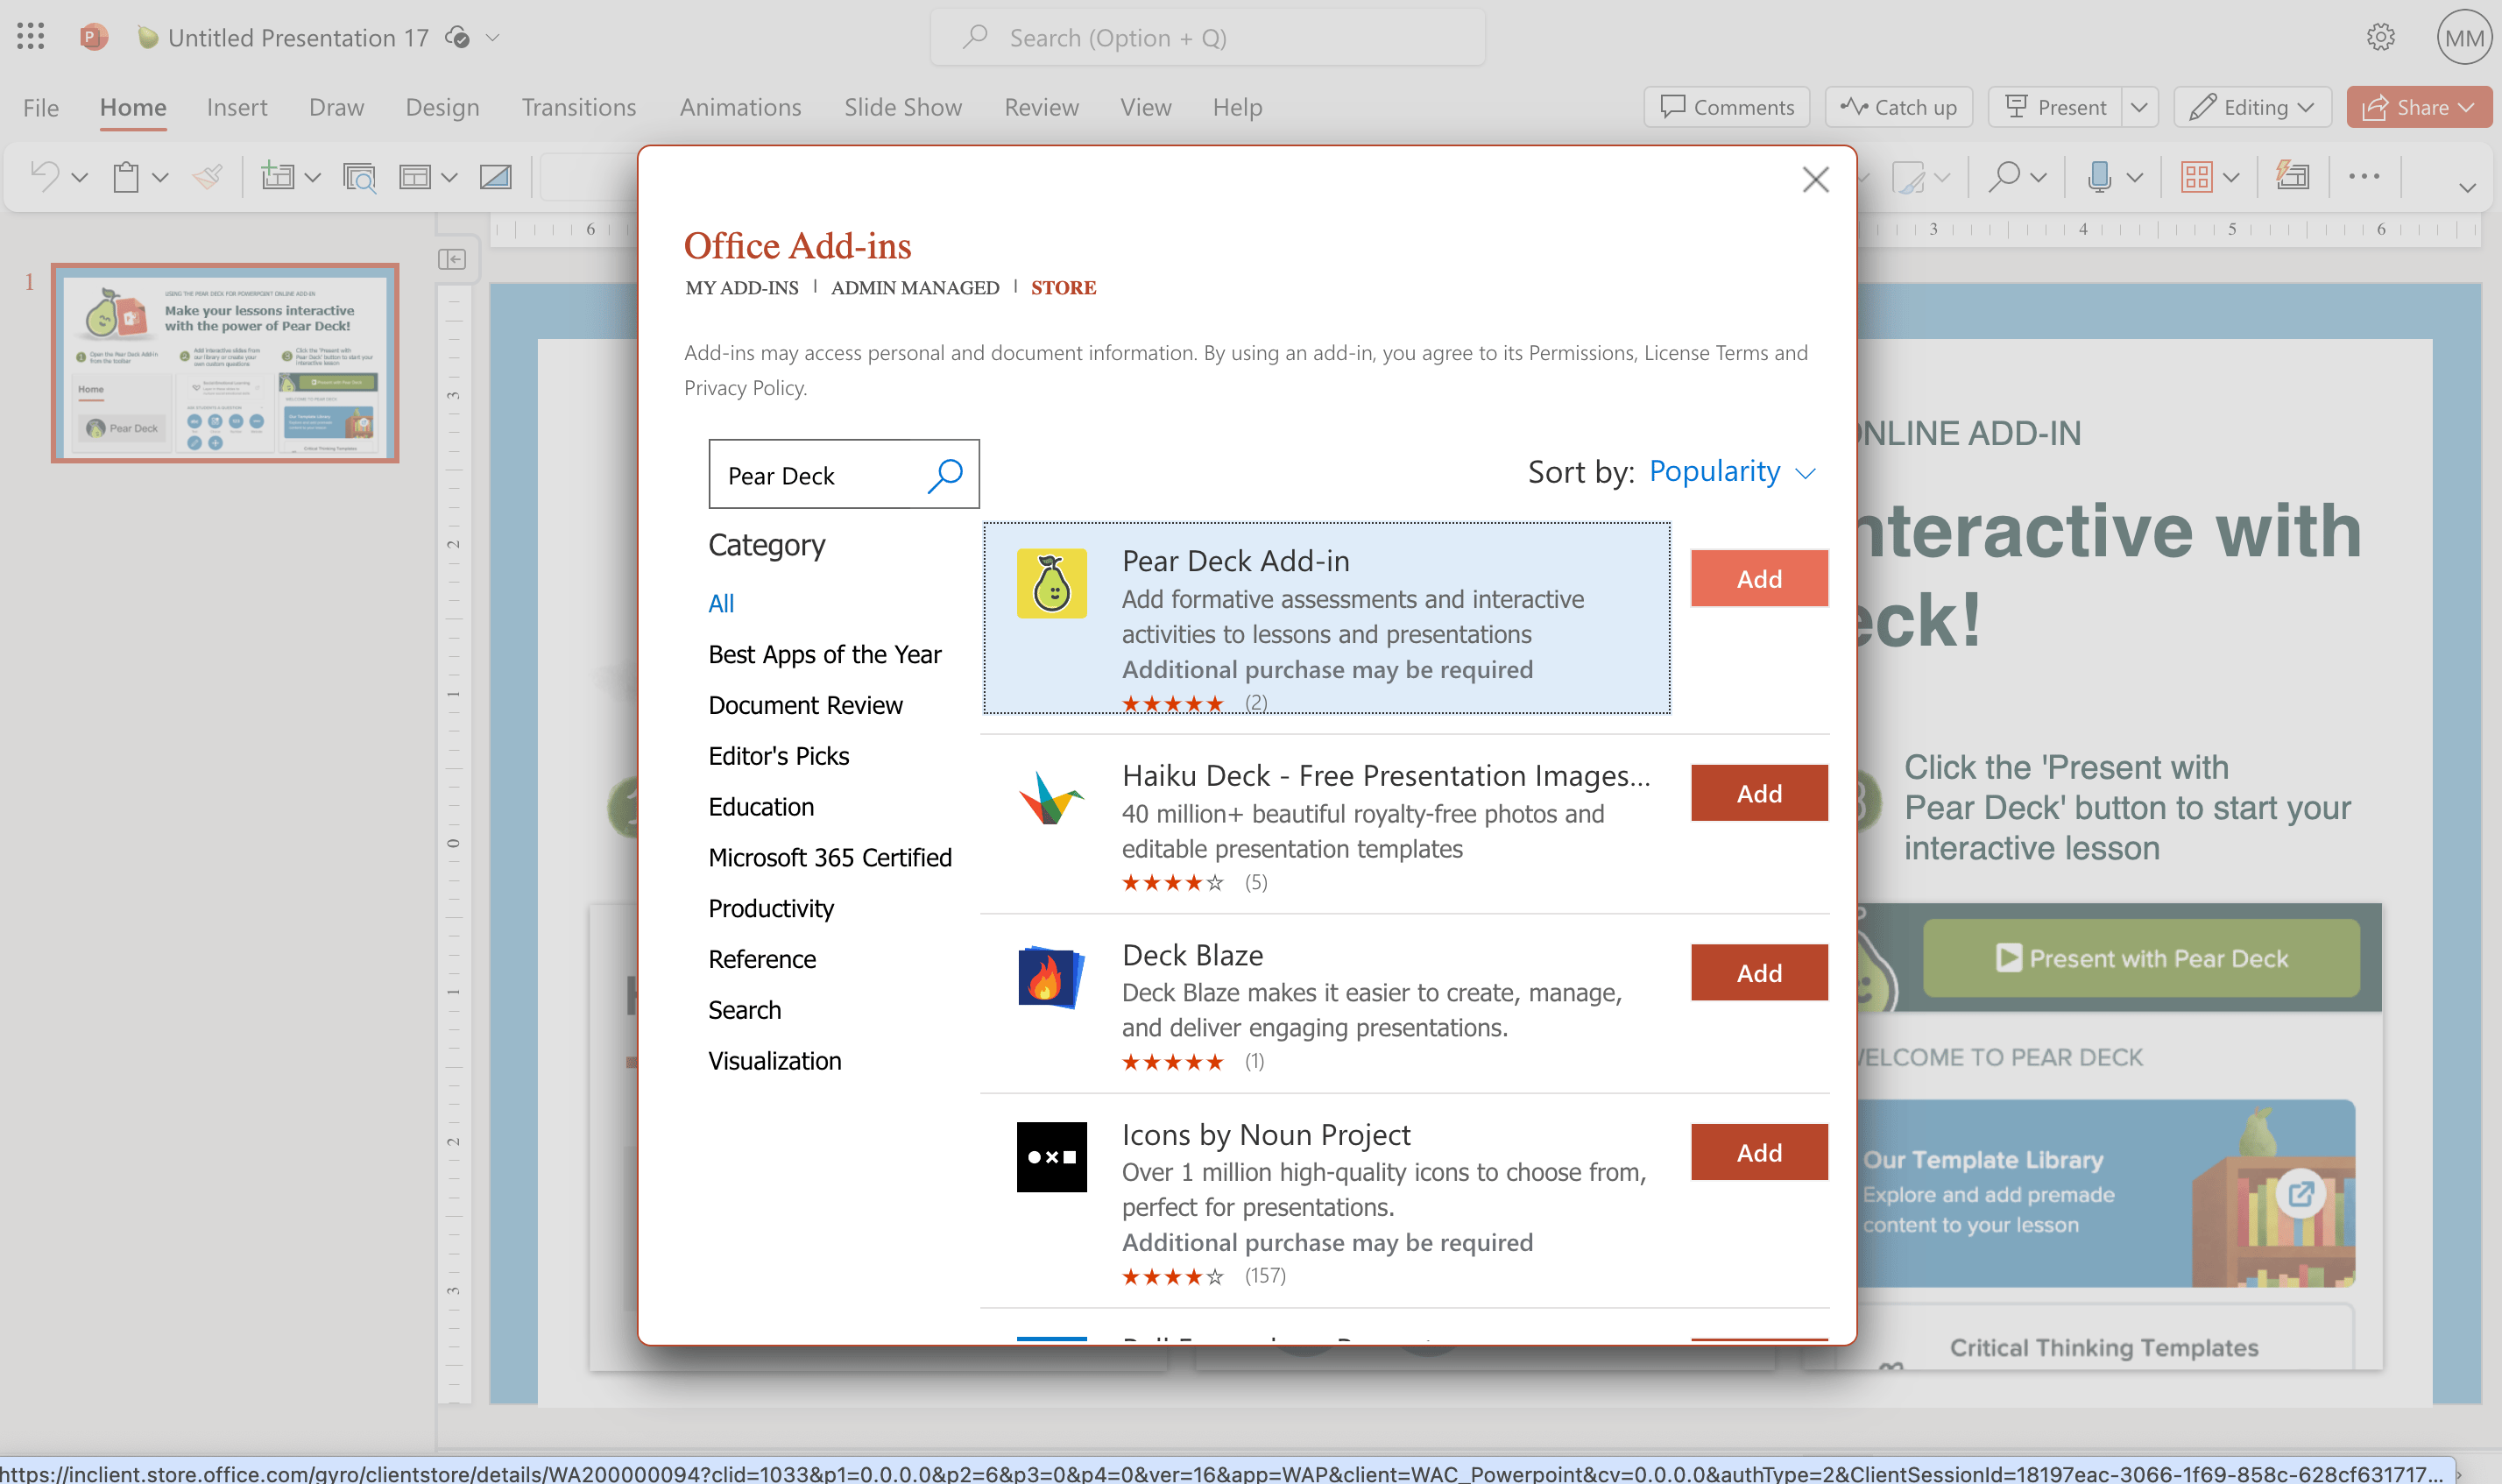
3. In the Office Add-ins menu, click **+ More Add-ins** and search for **Pear Deck**.
4. Select **Pear Deck** and click **Add**.
5. Click **Continue** to confirm.
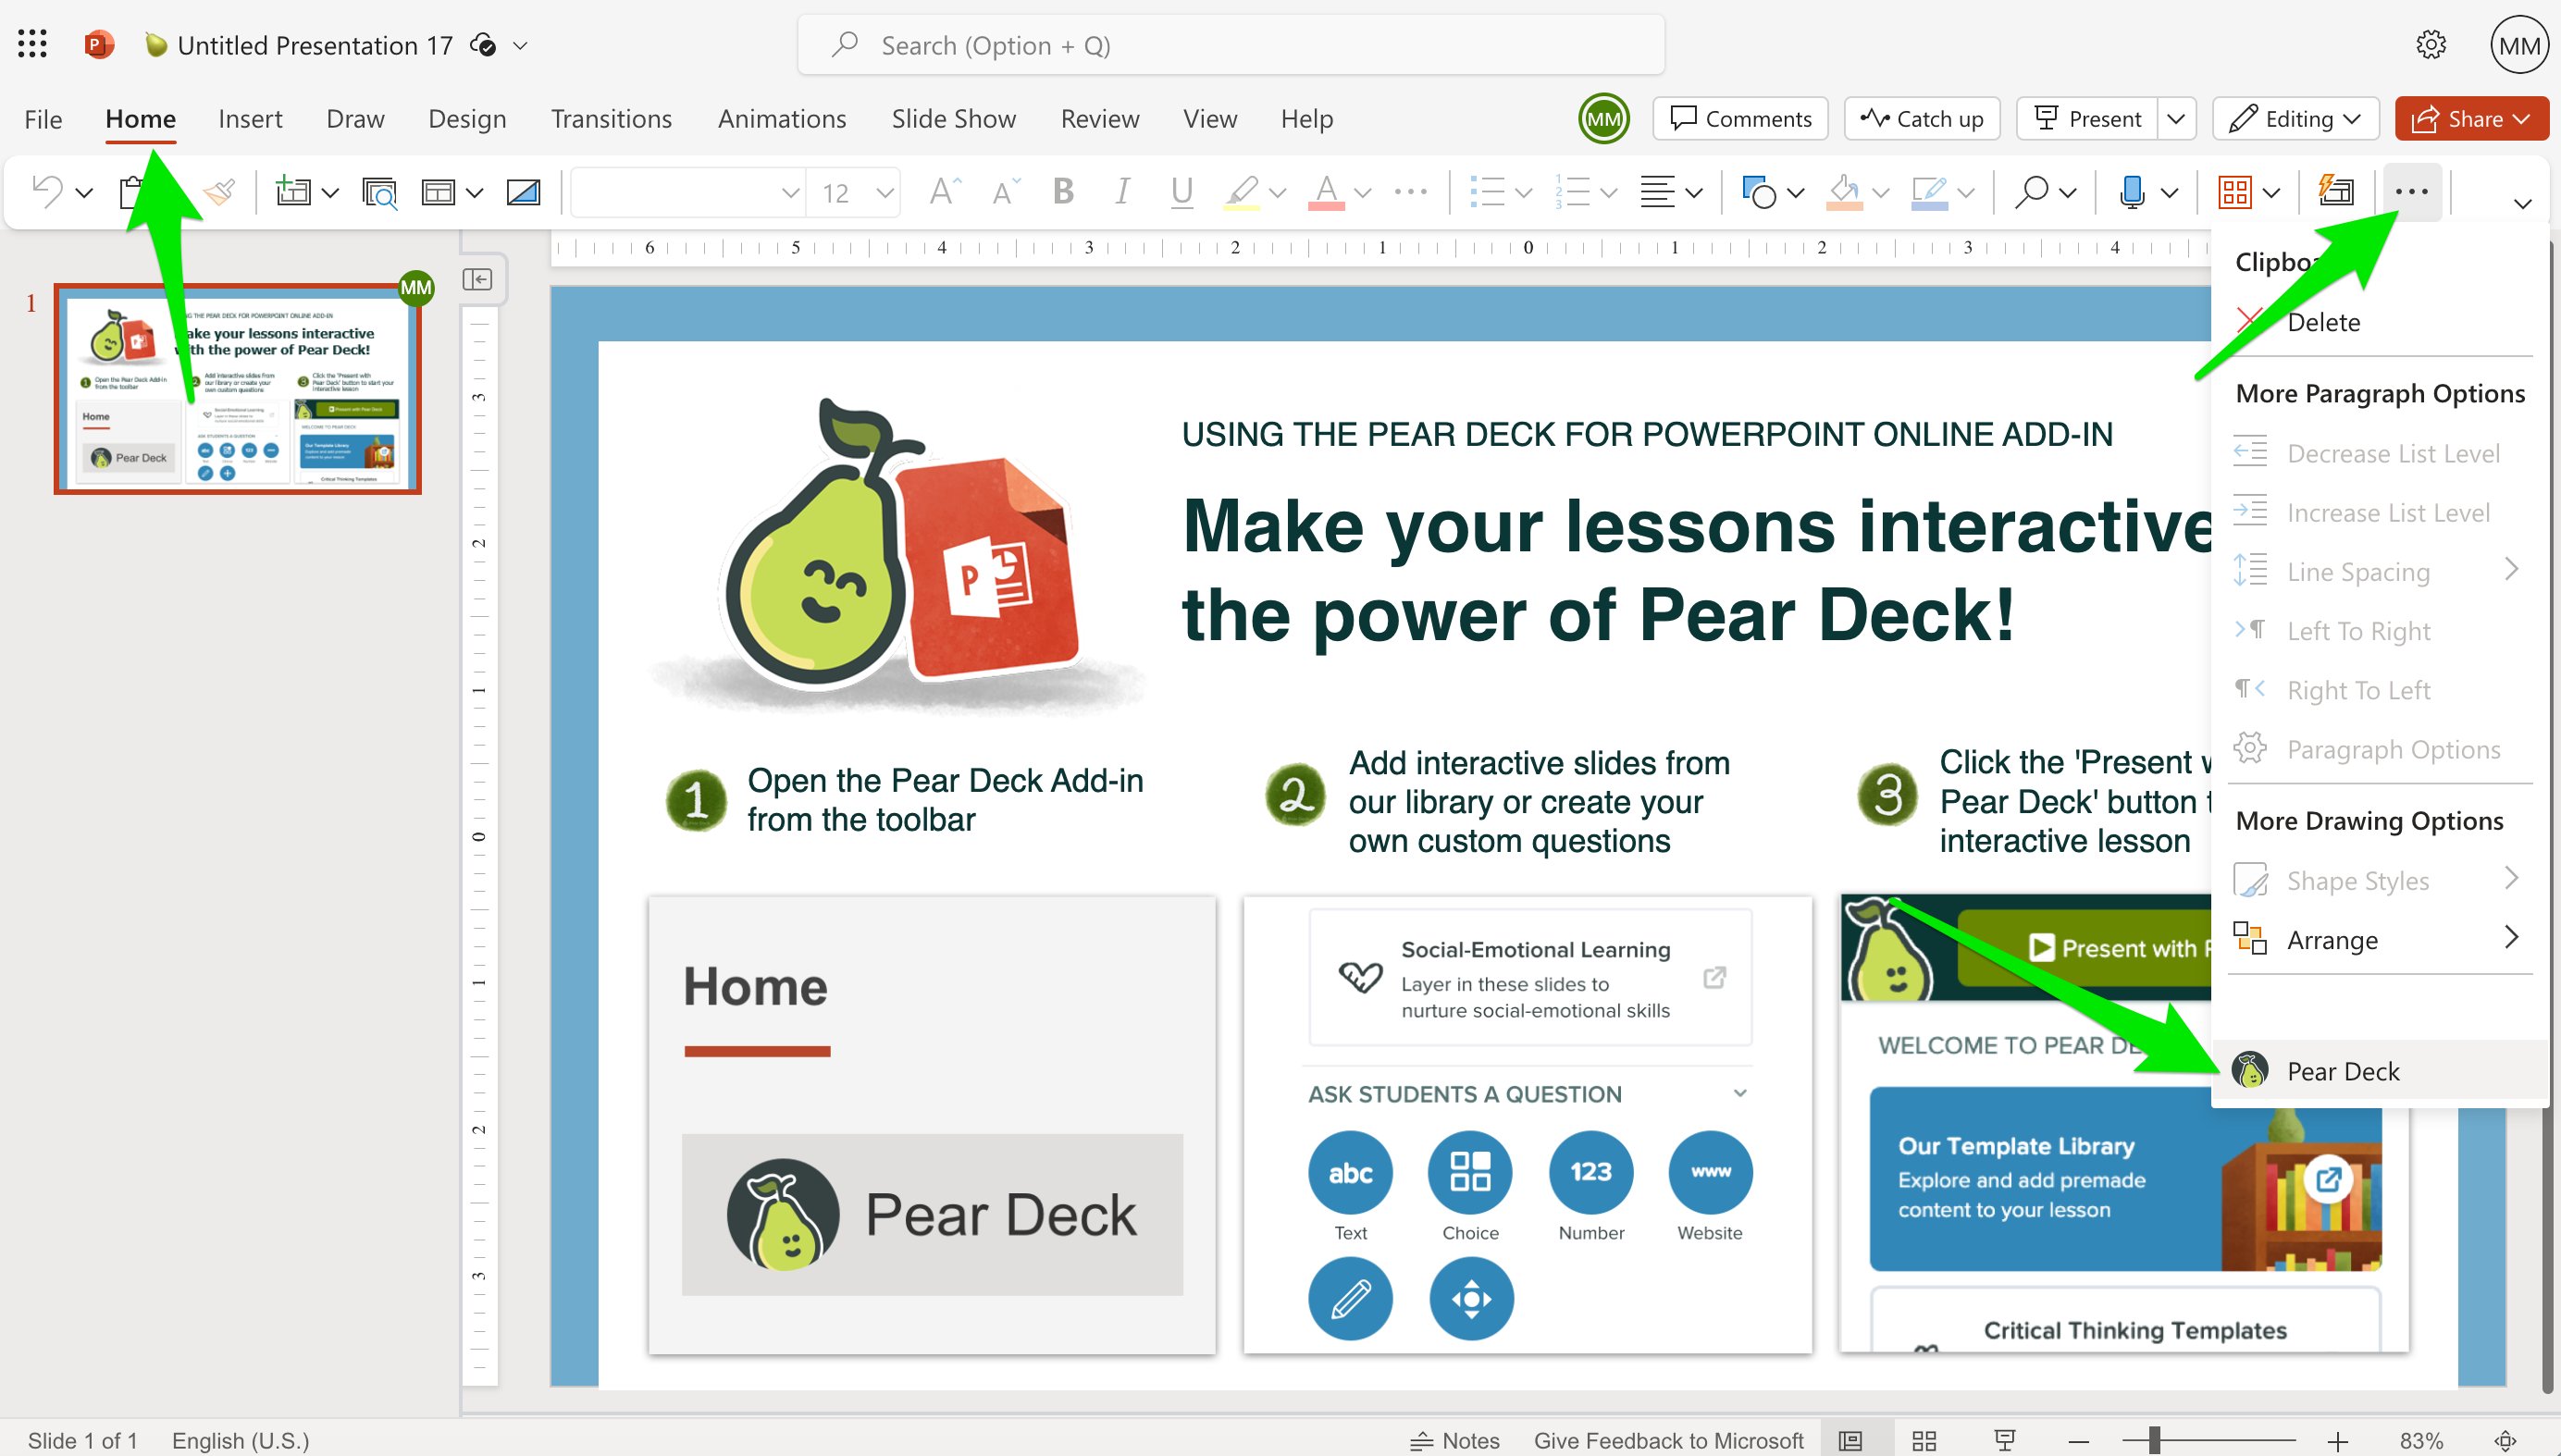
6. Once the add-in installs, click the **Home** tab, then click the **More Options** (three-dots) button and select **Pear Deck** to open the sidebar.
## Start From PowerPoint Online
If you use Microsoft Office 365, you can install the Pear Deck Add-in and create your account from inside PowerPoint Online.
1. Open any PowerPoint Online presentation.
2. Click **File** > **Get Add-ins**.
3. In the Office Add-ins menu, click **+ More Add-ins** and search for **Pear Deck**.
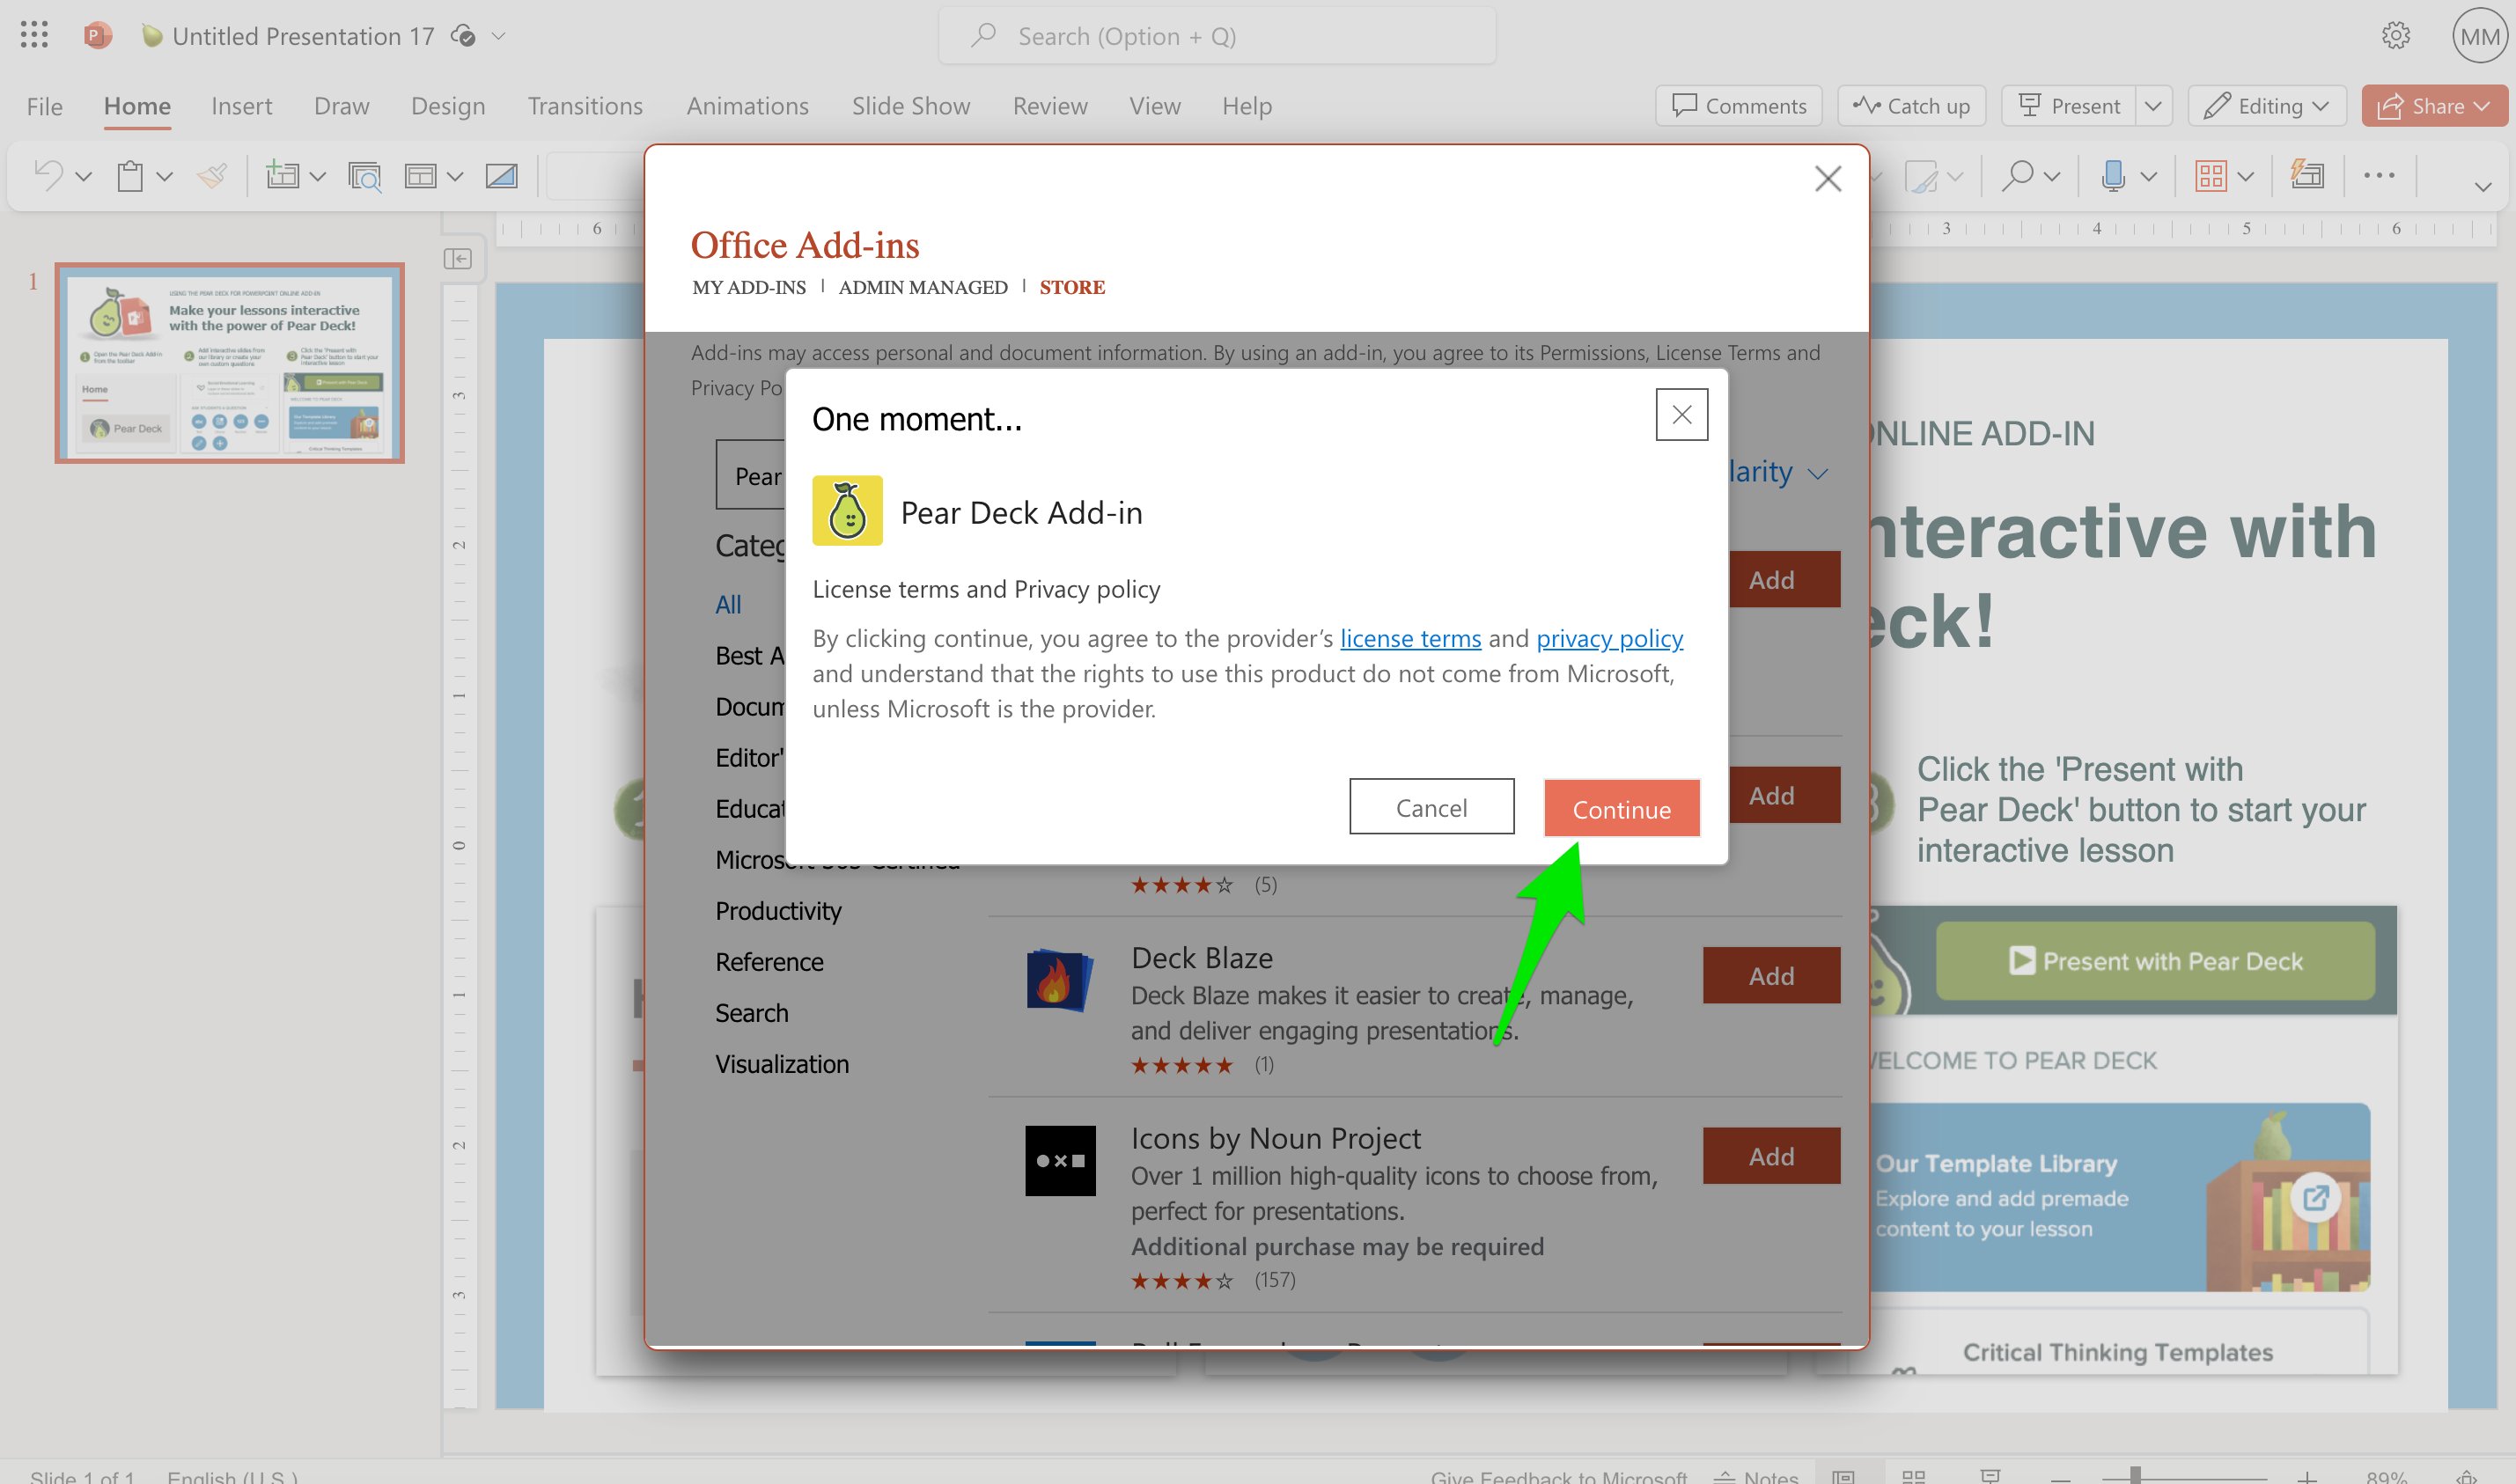
4. Select **Pear Deck** and click **Add**.
5. Click **Continue** to confirm.
6. Once the add-in installs, click the **Home** tab, then click the **More Options** (three-dots) button and select **Pear Deck** to open the sidebar.
 7\. In the Pear Deck sidebar, click **Log In** and complete authorization with your Microsoft Office 365 account.
8. Verify the result: The Pear Deck sidebar opens in PowerPoint Online. Going forward, access it from the **Home** tab > **More Options** (three-dots) > **Pear Deck**.
7\. In the Pear Deck sidebar, click **Log In** and complete authorization with your Microsoft Office 365 account.
8. Verify the result: The Pear Deck sidebar opens in PowerPoint Online. Going forward, access it from the **Home** tab > **More Options** (three-dots) > **Pear Deck**.

 ## Find Your Account After Setup
After creating your account, go to [app.peardeck.com/home](https://app.peardeck.com/home) at any time to:
* View and present recent files
* Open past sessions (student responses are stored here automatically)
* Adjust account settings
* Review plan and billing information in **My Account**
## For Administrators
Pear Deck works well for schools that use Google or Microsoft 365. If you are a school administrator, use the following resources to make sure teachers can get Pear Deck at your site:
* Enable or install Pear Deck in the [Google Admin Console](/products/pear-deck/install-power-up-domain-wide).
* Deploy Pear Deck in your [Microsoft 365 Admin Center](/products/pear-deck/install-powerpoint-online-add-in).
* To upgrade to Premium at your school or district, request a quote on the [Pear Deck Pricing Page](https://www.peardeck.com/pricing).
## FAQ
### Do Students Need a Pear Deck Account?
Students do not need an account to join a session. They join using a six-letter Join Code at [joinpd.com](https://app.peardeck.com/join) or a Join Link. If you want to see students' names next to their responses, turn on email sign-in so students sign in with a Google or Microsoft Office 365 account when joining. Students only need their own Pear Deck account if they want to create and present their own Pear Deck lessons.
We do not collect student data. Anyone who chooses the role of Student during account setup is directed to [joinpd.com](https://app.peardeck.com/join) to join a presentation.
### Can I Use Google Slides and PowerPoint Online With the Same Account?
Your account is tied to the platform you use to sign in — Google or Microsoft. If you created your account with a Google address, use Google Slides. If you used a Microsoft Office 365 address, use PowerPoint Online.
### My School Is Not in the Dropdown List. What Do I Do?
Type your school's name directly into the field. If you are not affiliated with a school, enter your organization name or any descriptive text.
### Why Does Pear Deck Need Access to My Drive?
Pear Deck stores your presentation files in Google Drive or OneDrive and needs access to add interactive questions to them. For details, see [Understand Pear Deck Security Practices](/products/pear-deck/understand-security-practices).
## Resources
Build your first interactive presentation, run a session, and review student responses.
Switch from Premium to Free, or disconnect Pear Deck from Google Drive or PowerPoint Online.
## Find Your Account After Setup
After creating your account, go to [app.peardeck.com/home](https://app.peardeck.com/home) at any time to:
* View and present recent files
* Open past sessions (student responses are stored here automatically)
* Adjust account settings
* Review plan and billing information in **My Account**
## For Administrators
Pear Deck works well for schools that use Google or Microsoft 365. If you are a school administrator, use the following resources to make sure teachers can get Pear Deck at your site:
* Enable or install Pear Deck in the [Google Admin Console](/products/pear-deck/install-power-up-domain-wide).
* Deploy Pear Deck in your [Microsoft 365 Admin Center](/products/pear-deck/install-powerpoint-online-add-in).
* To upgrade to Premium at your school or district, request a quote on the [Pear Deck Pricing Page](https://www.peardeck.com/pricing).
## FAQ
### Do Students Need a Pear Deck Account?
Students do not need an account to join a session. They join using a six-letter Join Code at [joinpd.com](https://app.peardeck.com/join) or a Join Link. If you want to see students' names next to their responses, turn on email sign-in so students sign in with a Google or Microsoft Office 365 account when joining. Students only need their own Pear Deck account if they want to create and present their own Pear Deck lessons.
We do not collect student data. Anyone who chooses the role of Student during account setup is directed to [joinpd.com](https://app.peardeck.com/join) to join a presentation.
### Can I Use Google Slides and PowerPoint Online With the Same Account?
Your account is tied to the platform you use to sign in — Google or Microsoft. If you created your account with a Google address, use Google Slides. If you used a Microsoft Office 365 address, use PowerPoint Online.
### My School Is Not in the Dropdown List. What Do I Do?
Type your school's name directly into the field. If you are not affiliated with a school, enter your organization name or any descriptive text.
### Why Does Pear Deck Need Access to My Drive?
Pear Deck stores your presentation files in Google Drive or OneDrive and needs access to add interactive questions to them. For details, see [Understand Pear Deck Security Practices](/products/pear-deck/understand-security-practices).
## Resources
Build your first interactive presentation, run a session, and review student responses.
Switch from Premium to Free, or disconnect Pear Deck from Google Drive or PowerPoint Online.