

This integration is available only to users who have a district- or school-wide Pear Deck subscription. Ask your school’s Pear Deck Subscription Manager if you are eligible, or submit a support request if you have questions. Administrators, see Install the Pear Deck Schoology Integration to set up the integration at your school or district.
Create a Pear Deck Assignment
- Open Schoology.
- Go to Courses. You can create a new course or open an existing one.
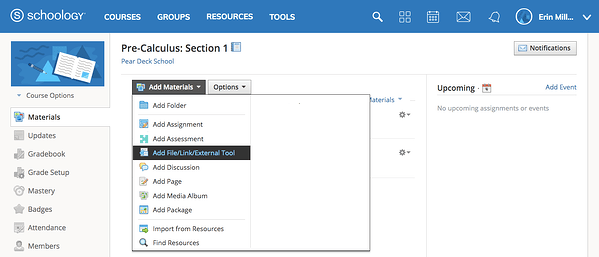
- On the Course page, click Add Materials and select Add File/Link/External Tool.
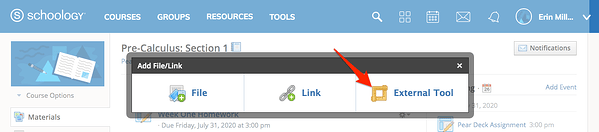
- In the pop-up window, select External Tool.
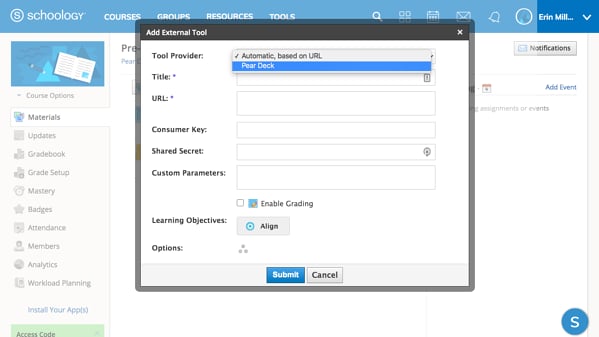
- In the Tool Provider section, open the drop-down menu and select Pear Deck.
-
Customize your assignment with a title, parameters, and grading settings. The URL, Consumer Key, and Shared Secret have already been installed for you.
Check the Enable Grading box if you want students to be able to click Submit Work in Schoology when they finish the lesson.
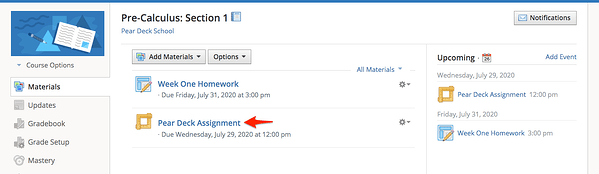
- Click Submit to return to the Courses page. Your assignment is now published. If you are not ready to configure the session, use the Gear icon to un-publish the assignment until you are ready.
Start Your Assignment
- Have an interactive Pear Deck for Google Slides or PowerPoint Online Slides file ready to present. The file is saved in your Google Drive or OneDrive. You will select it in step 6.
- Open the Schoology Courses page.
- Click on the Pear Deck assignment you created.
- If you want to prevent students from seeing the assignment while you configure the session, use the Gear icon to un-publish it.
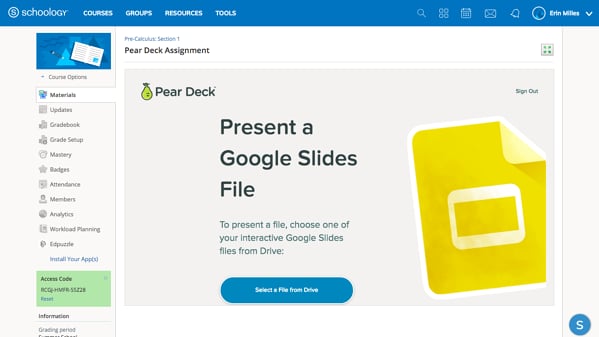
- Click Select a file from Drive or OneDrive. The first time you present a Pear Deck file in Schoology, you will be prompted to sign in to Pear Deck.
- In the file chooser, search for and select the Google Slides or PowerPoint Online Slides file you want to present.
- Choose your Lesson Mode. Depending on the mode you choose, the corresponding Presenter View opens in Schoology.

- Student-Paced Mode (asynchronous, recommended for this integration): The private Dashboard View opens so you can see students’ names next to their responses in real time. Students get navigation controls that let them scroll through the slides and respond to interactive questions at their own pace.
- Instructor-Paced Mode (synchronous): The Projector View opens and responses are anonymous by default. The Student View syncs to your current slide, so you advance slides to control what students see.
Have Students Complete Your Assignment
For students to submit a Pear Deck assignment, the session must be in Student-Paced Mode. The Student View appears automatically on each student’s Schoology page. Students:- Sign in to Schoology.
- Select your course.
- Click the Pear Deck Assignment to open the Student View of the Session. They can scroll through the slides and respond to interactive questions.
- When they reach the end, click Submit Work to turn in the assignment.
Grade Your Assignment
You can grade assignments by completion, view response status for individual students, open the Teacher Dashboard, and manually assign points in the Gradebook. You can also evaluate individual responses in Pear Deck. In Schoology- Open Schoology and go to Gradebook.
- In Course Options, select Grades. Use the Schoology tools to customize your grading options.
- Return to the Courses page and click the assignment to open the Teacher Dashboard. Click a slide in the Dashboard to see individual responses with student names. If the Projector View is open, click the three-dot menu to open the Dashboard in a new tab.
- Open the Teacher Dashboard and click a slide to view all responses.
-
Publish Takeaways when you sign in to Pear Deck with Google.
When you publish Takeaways from Schoology, they are not automatically shared with your students. Follow the steps below to share them.
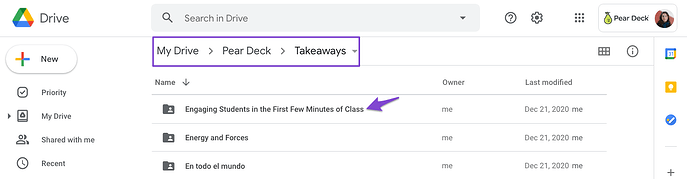
- Open Google Drive → Pear Deck → Takeaways folder, then open the Deck folder.
- Open the Session folder to find all Takeaways you published for the session.
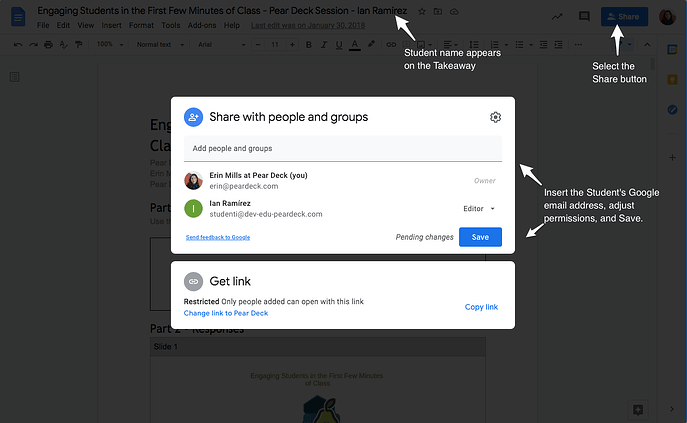
- Open a Takeaway Doc to see which student it belongs to. Then click Share to share it in Drive with that student. To extend the lesson, give the student editing permission so they can continue adding to the document.
- When the student’s name and email address appear, the document has been shared. The student can find it in the Shared with me section of their Google Drive.
Resources
Use the Teacher Dashboard
View student responses and manage your session from the Teacher Dashboard.