

Confirm Visitor Is Enabled
- Go to manage.goguardian.com and sign in with your Super User account.
- Open Product Settings and confirm Hall Pass/Visitor appears. If your organization has only Visitor, the menu is named Visitor. Use that name wherever this article says Hall Pass/Visitor.
- If neither appears, contact GoGuardian Support to confirm your organization’s license.
- Verify the result: You can open Sites without an access error.
Create a Site for Each School or Building
Each school or building that uses Visitor needs a site in Org Management. Sites are shared between GoGuardian Hall Pass and GoGuardian Visitor. If a school already has a Hall Pass site, see Turn On Visitor for an Existing Site instead.- In Org Management, go to Product Settings → Hall Pass/Visitor → Sites.
- Click Add Site.
- Enter a name that helps users identify the school or building.
- If you see Enable Visitor for this Site, turn it on. This toggle appears only when your organization also has Hall Pass. Otherwise, Visitor is on for every site.
-
If the school won’t use Hall Pass, turn off Enable Hall Pass for this Site.
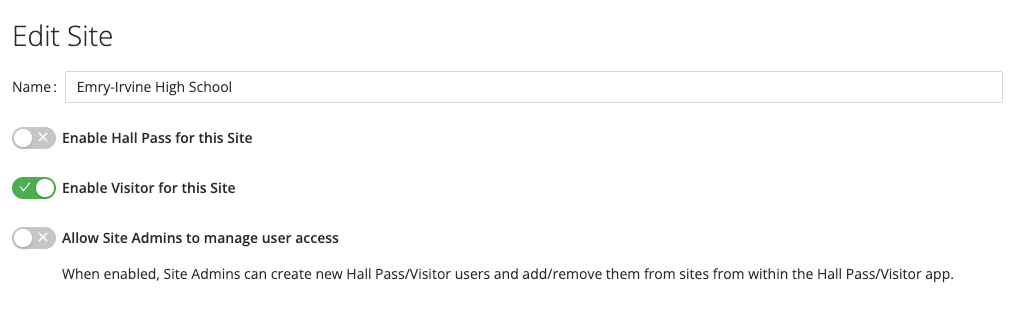
- Click Save Site.
- Repeat these steps for each additional school or building.
- Verify the result: Each school or building appears in the Sites list.
Turn On Visitor for an Existing Site
Visitor isn’t turned on automatically for existing Hall Pass sites, so you choose which schools use it.- Go to Product Settings → Hall Pass/Visitor → Sites.
- Click Edit for the site.
-
Turn on Enable Visitor for this Site. Leave Enable Hall Pass for this Site as it is.
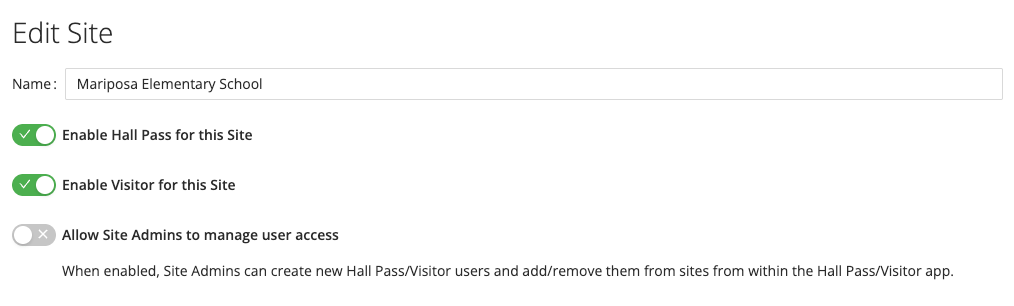
- Click Save Site.
- Verify the result: The site’s existing Admins, Staff, and Students now apply to both products.
Assign Site Admins
The Admins tab assigns the Site Admin role. Site Admins set up Visitor for the site, change its settings, and have full access to every check-in point at the site.- Go to Product Settings → Hall Pass/Visitor → Sites.
- Click Edit for the site.
- Select the Admins tab.
- Assign an organizational unit (OU) or individual user by following Add Organizational Units or Add Individual Users.
- Optional: To let Site Admins add users and change their site access from inside Visitor, turn on Allow Site Admins to manage user access.
- Click Save Site.
- Verify the result: The assigned user can open Visitor at the site with the Site Admin role.
Assign Staff and Students
Use the Staff tab for the staff who work at the site. Visitors can choose them as a host when checking in, and they receive a notification when their visitor arrives. Staff assigned to a room also receive a notification when a visitor or student chooses that room as their destination. Most staff never sign in to Visitor. The Staff tab alone doesn’t give anyone access to it. To let front office staff work the Front Desk, give them access inside Visitor after setup, as described in Users and Permissions. Use the Students tab for the students who can check in late, check themselves out, or be picked up by a parent or guardian at this site. Students don’t sign in to Visitor.- Go to Product Settings → Hall Pass/Visitor → Sites.
- Click Edit for the site.
- Select Staff or Students.
- Assign an OU or individual user by following the applicable method below.
- Click Save Site.
- Verify the result: The assigned staff or students appear under Assigned OUs or Assigned Users on the tab. Visitors can now choose assigned staff as a host.
Add Organizational Units
Use an OU assignment when everyone in an applicable directory path needs the same role at a site.- Open the site with Edit, then select Admins, Staff, or Students.
- In Available OUs, find the applicable OU path and select its checkbox.
- Click Add OU. The OU moves to Assigned OUs.
- Click Save Site.
- Verify the result: The OU appears under Assigned OUs, and its users have the selected role at the site.
/east_high/students doesn’t include students in /east_high/students/grade_9. To include them, assign /east_high/students/grade_9 too.
Add Individual Users
Use an individual assignment for an exception, such as a staff member who works at multiple sites or an administrator who needs a different role from their OU assignment.- Open the site with Edit, then select Admins, Staff, or Students.
- In Available Users, find the user and select their checkbox.
- Click Add User. The user moves to Assigned Users.
- Click Save Site.
- Verify the result: The user appears under Assigned Users with the selected role at the site.
Upload Individual Users with CSV
Use a CSV to assign multiple individual users to the selected role.- Open the site with Edit, then select Admins, Staff, or Students.
- Click Upload CSV above Available Users.
- Add the CSV file.
- Click Add Users.
- Click Save Site.
- Verify the result: The uploaded users appear under Assigned Users for the selected role.
The CSV must contain 1 email address per row in a single column with no header. Each upload is limited to 500 users.
Set Up Guardians for Student Pickup
If the site uses the Parent/Guardian Pickup form, guardian records in Org Management let Visitor show each guardian the students associated with them. Visitor finds a guardian by the first and last name they enter at check-in, so guardian names in Org Management need to match. A guardian who checks in sees only their own students to pick up, unless the form’s Select Students step turns on Allow Non-Guardian Student Selection. Without that option, a guardian with no associated students sees No Students Found and a prompt to ask the front desk for help. Guardians aren’t assigned to a site. Manage them for your whole organization in one of these ways:- Sync from Clever, ClassLink, or OneRoster. Guardians and the students they’re associated with sync automatically. See Sync Rosters with Clever, ClassLink, or OneRoster.
- Add them in Org Management. Go to Parents & Guardians to add a guardian and associate them with students. See Add Guardian Contact Information.
Verify Role and Site Access
Test Site Admin access before continuing with setup in Visitor. Staff and students don’t need to sign in, so review their assignments on the Staff and Students tabs instead.- Sign in with a Site Admin test account.
- Confirm that Visitor appears in the GoGuardian product switcher.
- Open Visitor and confirm that the Front Desk shows the Set Up Visitor checklist for the correct site.
- Verify the result: The Site Admin reaches the expected site with full access.