

Find a Check-In or Check-Out
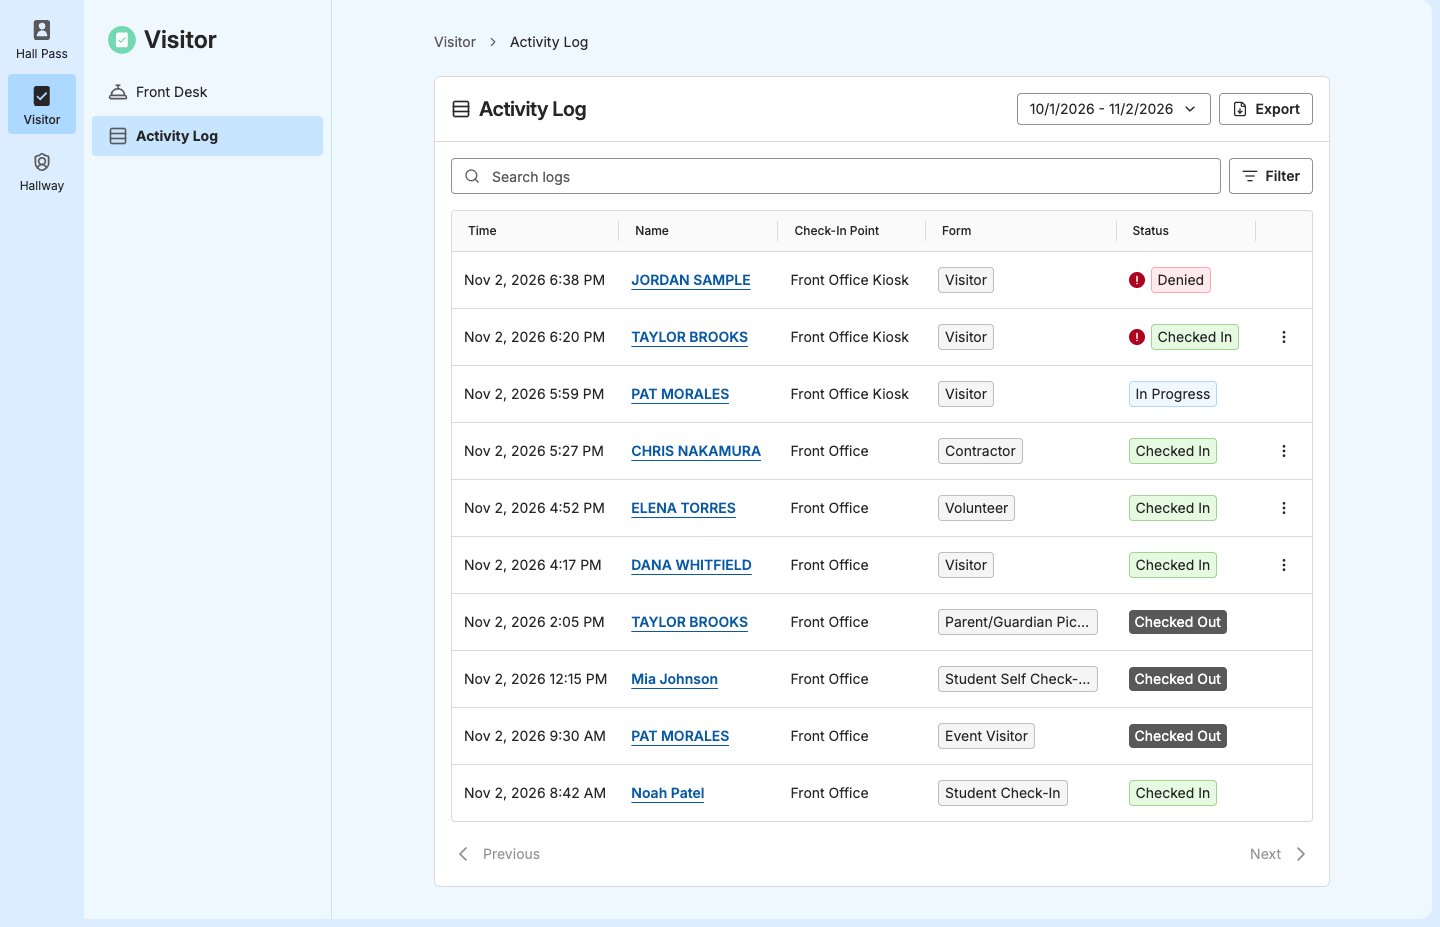
The Activity Log lists the newest check-ins and check-outs first, 10 per page, with the Time, Name, Check-In Point, Form, and Status. A red alert icon next to the status means the check-in or check-out had a screening alert or flagged answer.- Select the dates in the date picker at the top. The list starts with the last month and includes check-ins and check-outs started on those dates.
- To find a visitor or student, enter their name in Search logs. Search matches the first or last name of the visitor or guardian who checked in. It also matches a student who checked in or out or was picked up.
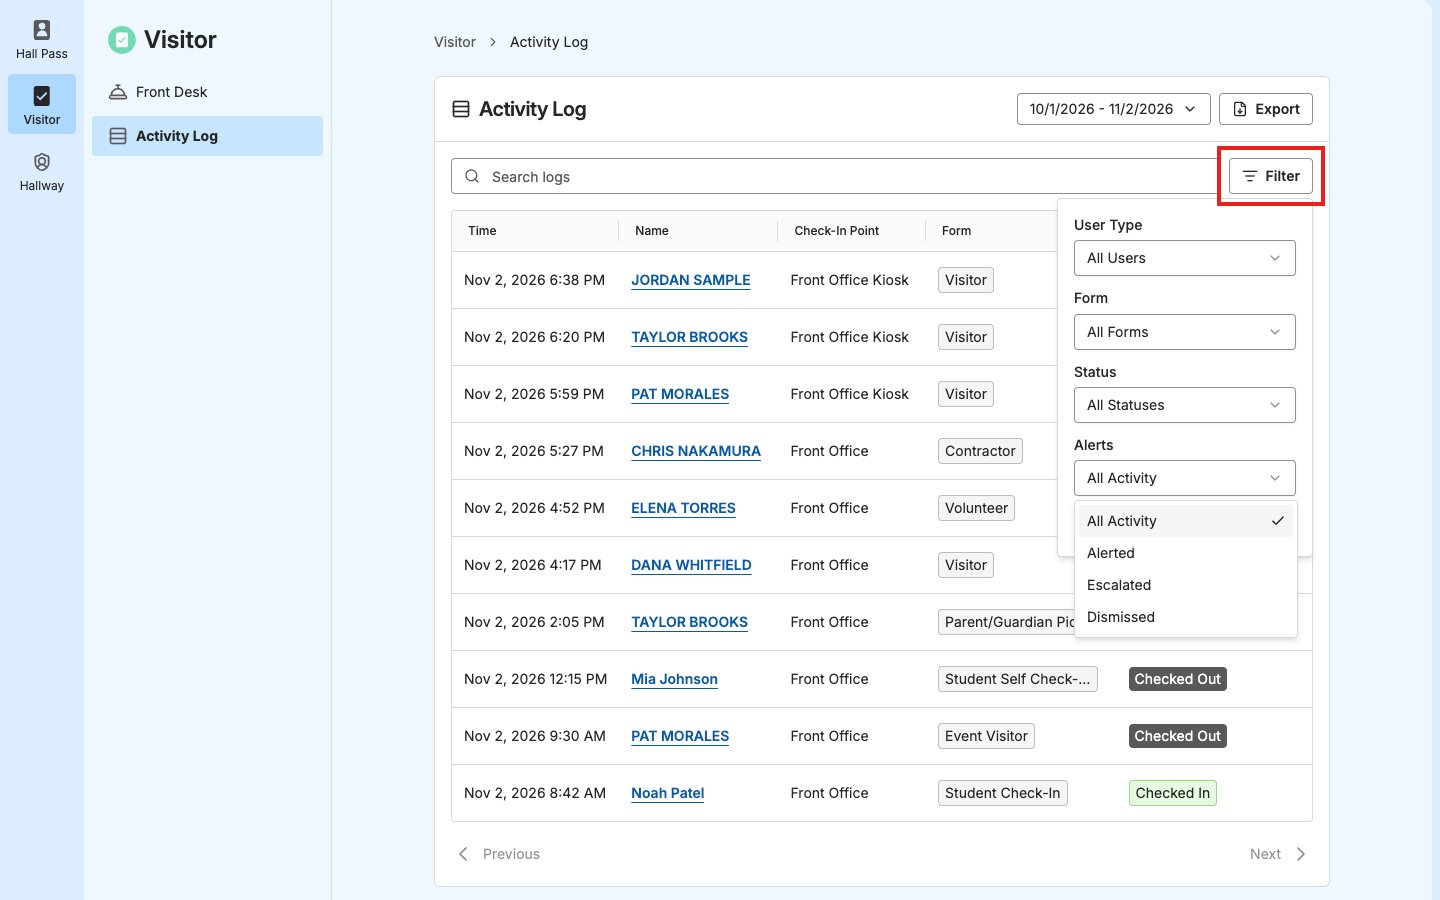
- To narrow the list, click Filter and select any of these. The number on Filter shows how many filters are on.
- User Type: Visitors or Students.
- Form: One form. The list shows only forms used at your check-in points.
- Status: One status, such as Denied. Complete includes every visitor and student who checked in or out.
- Alerts: Check-ins and check-outs with alerts. See Find Check-Ins with Alerts.
- Click a name to open the details.
- Verify the result: The details show the visitor’s or student’s name, status, and date at the top.
Find Check-Ins with Alerts
The Alerts filter finds check-ins and check-outs where screening or a form answer needed a staff decision. Confirming students for a pickup is routine, so it doesn’t count as an alert here.
For what each alert means, see Understand Visitor Screening.
Read the Status
Each check-in and check-out shows one status.
In the Status filter, Checked In and Checked Out are both Complete.
Visitors still checked in at midnight, in your site’s time zone, are checked out automatically. Their details say “Checked out automatically.” To record when the visitor actually left, change the check-out time. See Change Check-In and Check-Out Times.
Open the Details
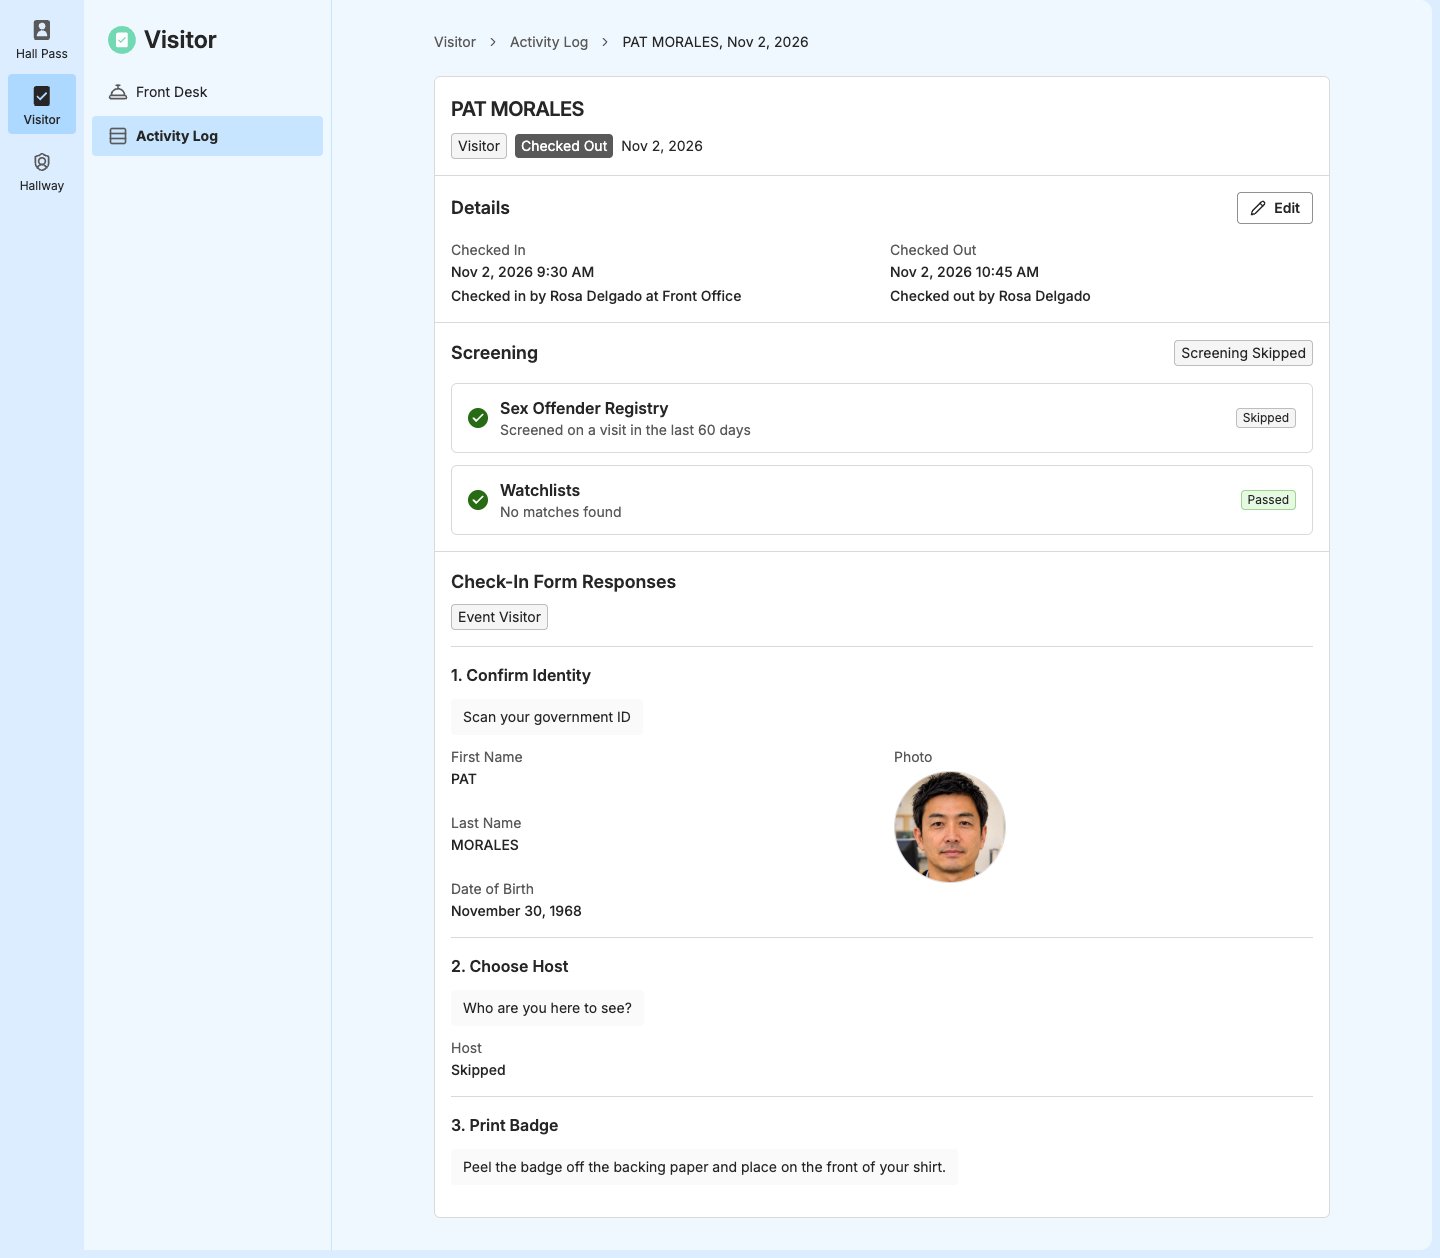
The details for a check-in or check-out show everything recorded for it, in 3 sections. At the top are the visitor’s or student’s name, Visitor or Student, the status, and the date.- Details: When they checked in and out, who checked them in or out, and where. The location is the kiosk, or the check-in point for a check-in made at the Front Desk. A visitor who hasn’t checked out shows “Still here.” Destination and Host show when the form asked for them.
- Screening: The result of each security check and each alert or student confirmation, with who decided and when. See Review Screening Results. This section shows only when the form screened the visitor or something needed a staff decision.
- Check-In Form Responses or Check-Out Form Responses: Each step of the form, in order, with the answer. The form’s name shows under the title.
- Confirm Identity shows the visitor’s name and date of birth as staff confirmed them, plus the ID and photo when the form captured them. Click an image to enlarge it. GoGuardian Visitor encrypts ID images and photos. It doesn’t check in visitors under 16 and deletes anything already captured for them. See Understand Visitor Screening.
- A flagged answer shows Flagged Answer, and who allowed it, such as “Allowed by Dana Lee.”
- Select Students lists the students the guardian picked up, and who confirmed them.
- Create Hall Pass lists each hall pass the form created. To open a pass, click View next to it.
- Skipped means the visitor or student skipped an optional step. Not answered means they didn’t reach it.
- “From previous check-in” or “From previous check-out” means the answer came from an earlier visit, so the step was skipped this time. This happens only when a Site Admin turns on Save answer and skip for future visits for an Ask Question or Sign Document step. See Form Steps Reference.
- If the form has Additional Languages, select a language at the top right to read the form in that language. Typed answers stay as they were entered.
Review Screening Results
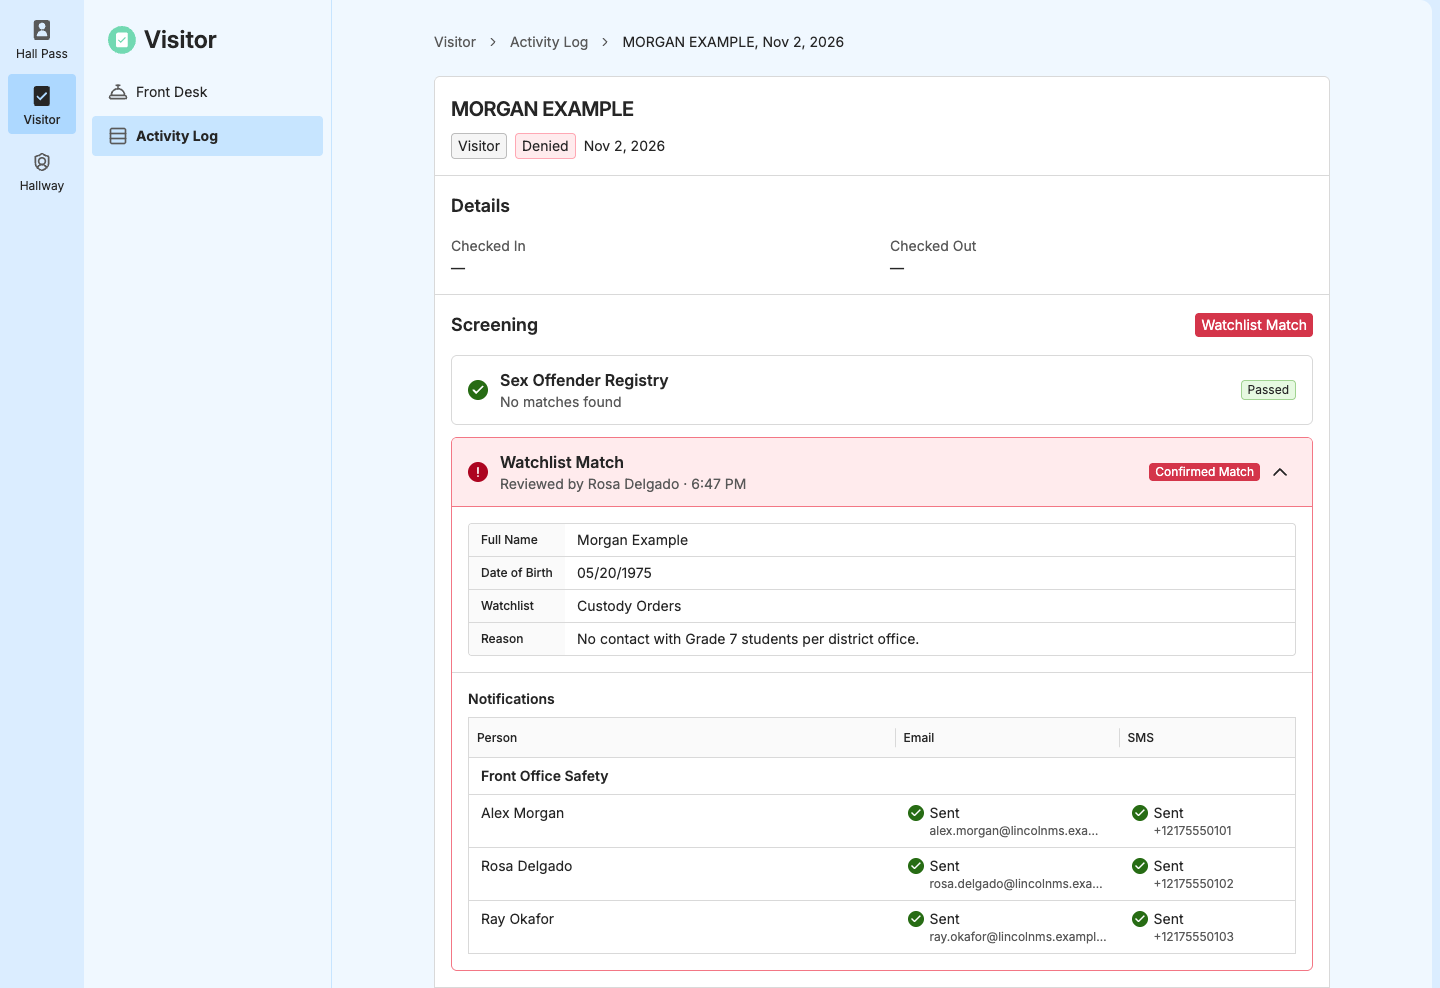
The Screening section shows a card for each security check, each alert, and each student confirmation staff didn’t approve, most serious first. A label on each card shows the outcome.
Each decided card shows who reviewed it and when, such as “Reviewed by Dana Lee · 9:42 AM.”
Click the arrow on a card to see the registry records, watchlist entry, answer, or notifications. Cards where staff confirmed a match, denied a flagged answer, or didn’t confirm students open on their own.
- Sex offender registry match: A visitor can match more than 1 registry record, so the card lists every record that was a possible match, with its name, date of birth, and source. The record staff confirmed shows Confirmed Match and opens on its own. A record staff permanently dismissed for this visitor shows who dismissed it and when. Registry data comes from third parties and isn’t independently verified.
- Watchlist match: The watchlist entry, including its note as Reason.
- Notifications: For a confirmed match, each notification list member’s Email and SMS status: Sent, Failed, Pending, or Off, with the reason for a failure, such as No phone number. See Notification Lists.
Change Check-In and Check-Out Times
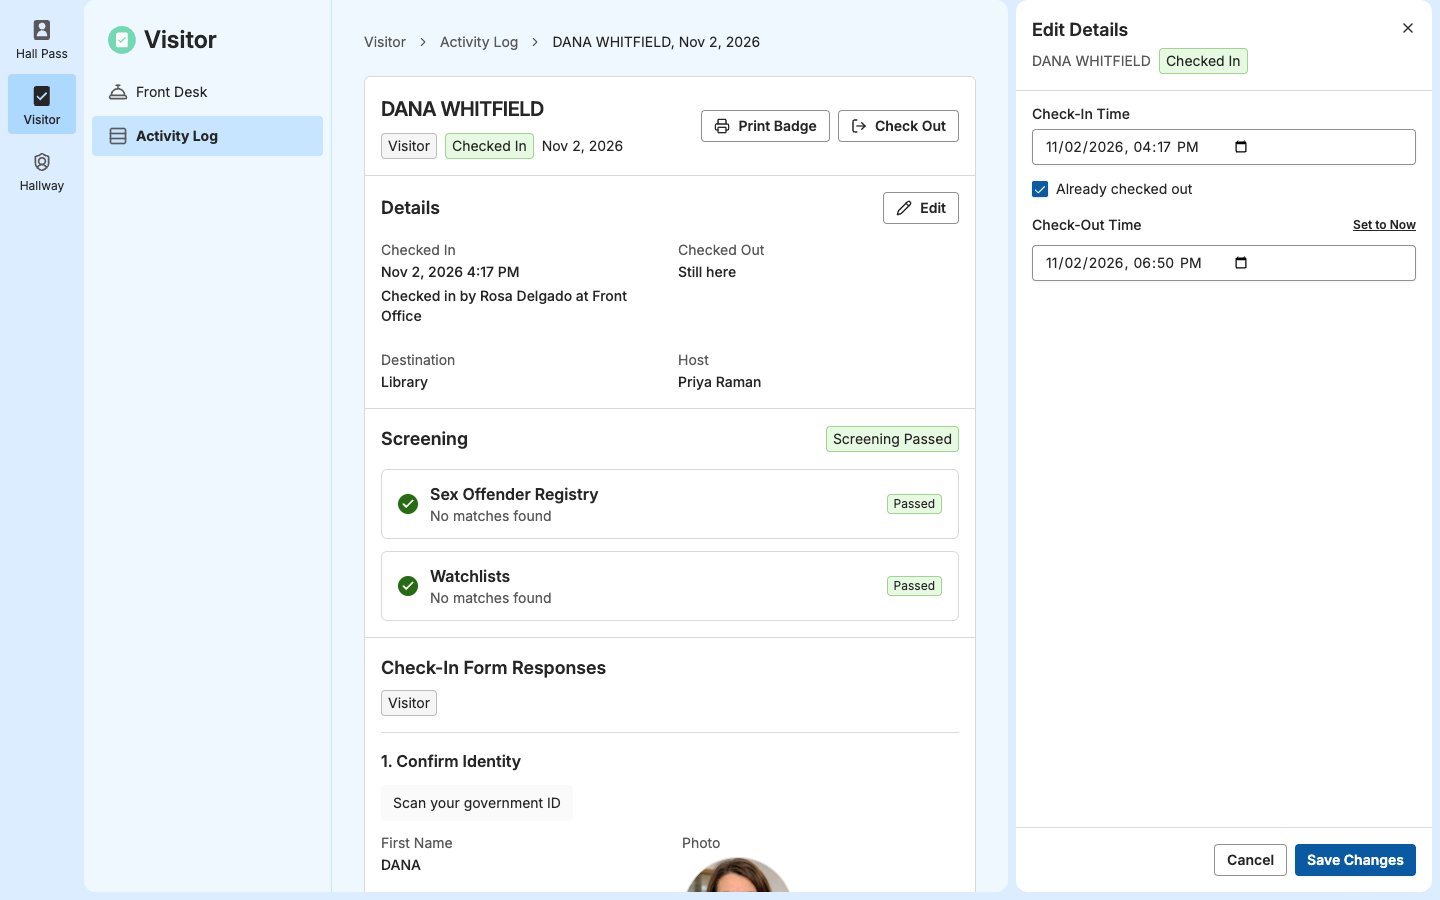
Correct a time when a visitor or student checked in or out at a different time than the one recorded, such as when a visitor left without checking out. You can change the times for any check-in or check-out with the status Checked In or Checked Out.- Open the details and click Edit in Details.
- If the visitor is still checked in and has left, select Already checked out in Edit Details.
- Change Check-In Time or Check-Out Time. For the check-out time, click Set to Now to use the current time. Times can’t be in the future, and a check-out can’t be earlier than the check-in.
- Click Save Changes.
- Verify the result: Details shows the new times.
Check Out a Visitor or Print a Badge
From the Activity Log, you can check out a visitor who’s still checked in, or reprint a badge for a visitor or student who’s checked in, the same as on the Front Desk. A check-out can’t be undone, but you can change the check-out time afterward.- From the details: Click Check Out or Print Badge at the top.
- From the list: Click More actions (⋮) on the row, then select Check Out or Print Badge.
Export the Activity Log
Export a CSV of the check-ins and check-outs in the list, for your records or to share with your district.- Select the dates, and set any search and filters.
- Click Export, then confirm in Export CSV.
- When the report is ready, GoGuardian Visitor emails you a link. Open the email and click the link. The link expires after 7 days.
- Verify the result: The CSV downloads.
- The time the check-in or check-out started
- The name, date of birth for visitors, and email for students
- The form, user type, action, and status
- The check-in method (Kiosk or Staff) and check-in point
- The destination and host
- The check-in and check-out times
- Whether staff didn’t confirm the selected students, and whether the check-in had a flagged answer or a confirmed watchlist or sex offender registry match