

Before You Begin
- A supported printer and labels. See Compatibility and Requirements.
- A check-in point. Every printer belongs to 1 check-in point. See Check-In Points.
- For network printers, the same network. The printer must be on the same network as the kiosks and computers that print to it, with the ports in Allow Network Traffic open.
- On Windows, no other label printer software. Uninstall other label printer software, such as Dymo Connect for Desktop. It can take over the printer’s connection and stop badges from printing.
Choose Where Badges Print
Choose the setup that matches how your school checks people in, or combine them.Add a Printer to a Kiosk
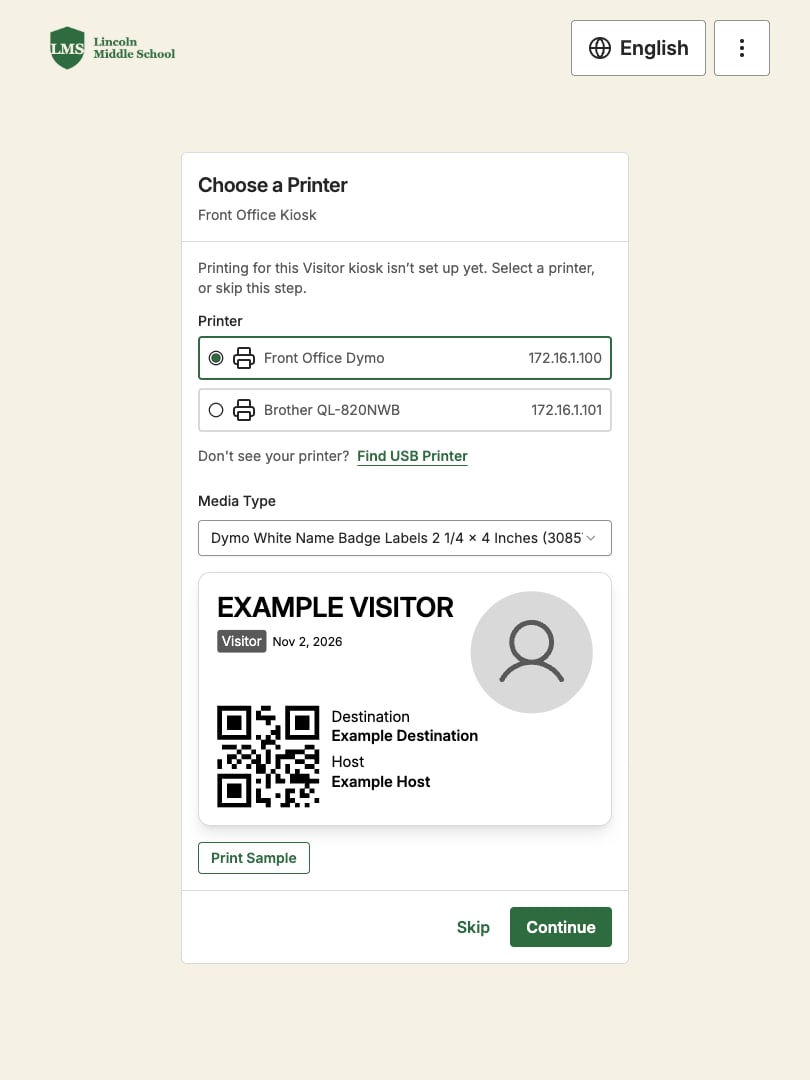
A kiosk prints to 1 printer, connected to the kiosk device. Choose the printer on the kiosk itself, because that’s where the printer connects. For the connections each kiosk platform supports, see Compatibility and Requirements.- Connect the printer:
- USB: Plug the printer into the kiosk device. On a Chromebook kiosk, allow USB printers in the Google Admin console first. See Set Up a Chromebook Kiosk.
- Network: Connect the printer to the same network as the kiosk. On an iPad, allow Local Network access when the kiosk asks.
- On the kiosk, open the printer settings:
- When you sign in: If the kiosk doesn’t have a printer, it asks you to Choose a Printer.
- Any other time: Tap More (⋮), tap Edit Kiosk Settings, select your name in Your User, and enter your PIN in Your PIN. Go to Printer Settings. Only a Site Admin’s PIN unlocks kiosk settings.
- Select the printer. On a Chromebook, if a USB printer isn’t listed, tap Find USB Printer, select the printer, and tap Connect.
- In Media Type, select the labels loaded in the printer.
- Tap Print Sample, and check that the sample badge prints correctly on the label.
- Tap Continue on Choose a Printer, or Save Changes in kiosk settings.
- Verify the result: In Visitor, go to Check-In Points and open the check-in point. Under Printers, the printer appears with the kiosk counted in Connected Devices.
Set Up a Front Desk Computer to Print
A front desk computer can print to a printer connected to it, or to a kiosk’s printer. To print to a printer connected to the computer, a Windows computer needs software installed first. Chromebooks and Macs don’t.Set Up a Windows Computer
Windows front desk computers print through Campus Front Desk Print Service, a feature of the GoGuardian Campus installer for Windows. With it, the computer prints to USB and network printers.- In GoGuardian Org Management, go to Installation → Campus. On the Windows tab, click Download MSI or Download Intune Package.
- Install it on the computer, or deploy it with a tool such as Microsoft Intune. Keep Campus Front Desk Print Service selected. A front desk computer doesn’t need Campus Kiosk Application, so you can clear it.
- Verify the result: Connect the printer, then add it from the Front Desk. See Add a Printer at the Front Desk.
Set Up a Chromebook or Mac
Chromebooks and Macs print to USB printers connected to them through the browser, with no software to install. Plug the printer into the computer, then add it from the Front Desk. The first time, click Find USB Printer to let the browser connect to the printer. See Add a Printer at the Front Desk. To print to a network printer from a Chromebook or Mac, print through a kiosk instead. See Print to a Kiosk’s Printer from the Front Desk.Add a Printer at the Front Desk
Add the printer from the computer it’s connected to, while printing a badge. You can use a test check-in.- On the Front Desk, check a visitor in with a form that prints badges. When the check-in is done, the panel asks you to choose a printer for their badge.
- Next to Printer, make sure the check-in point is selected.
- Click Add Printer.
- Select the printer. On a Chromebook or Mac, if a USB printer isn’t listed, click Find USB Printer, select the printer, and click Connect. On Windows, printers appear without this step.
- In Media Type, select the labels loaded in the printer.
- Click Print Sample, and check that the sample badge prints correctly on the label.
- Click Add.
- Verify the result: The printer appears under Printer with Ready and “Connected to this computer.”
Print Badges from the Front Desk
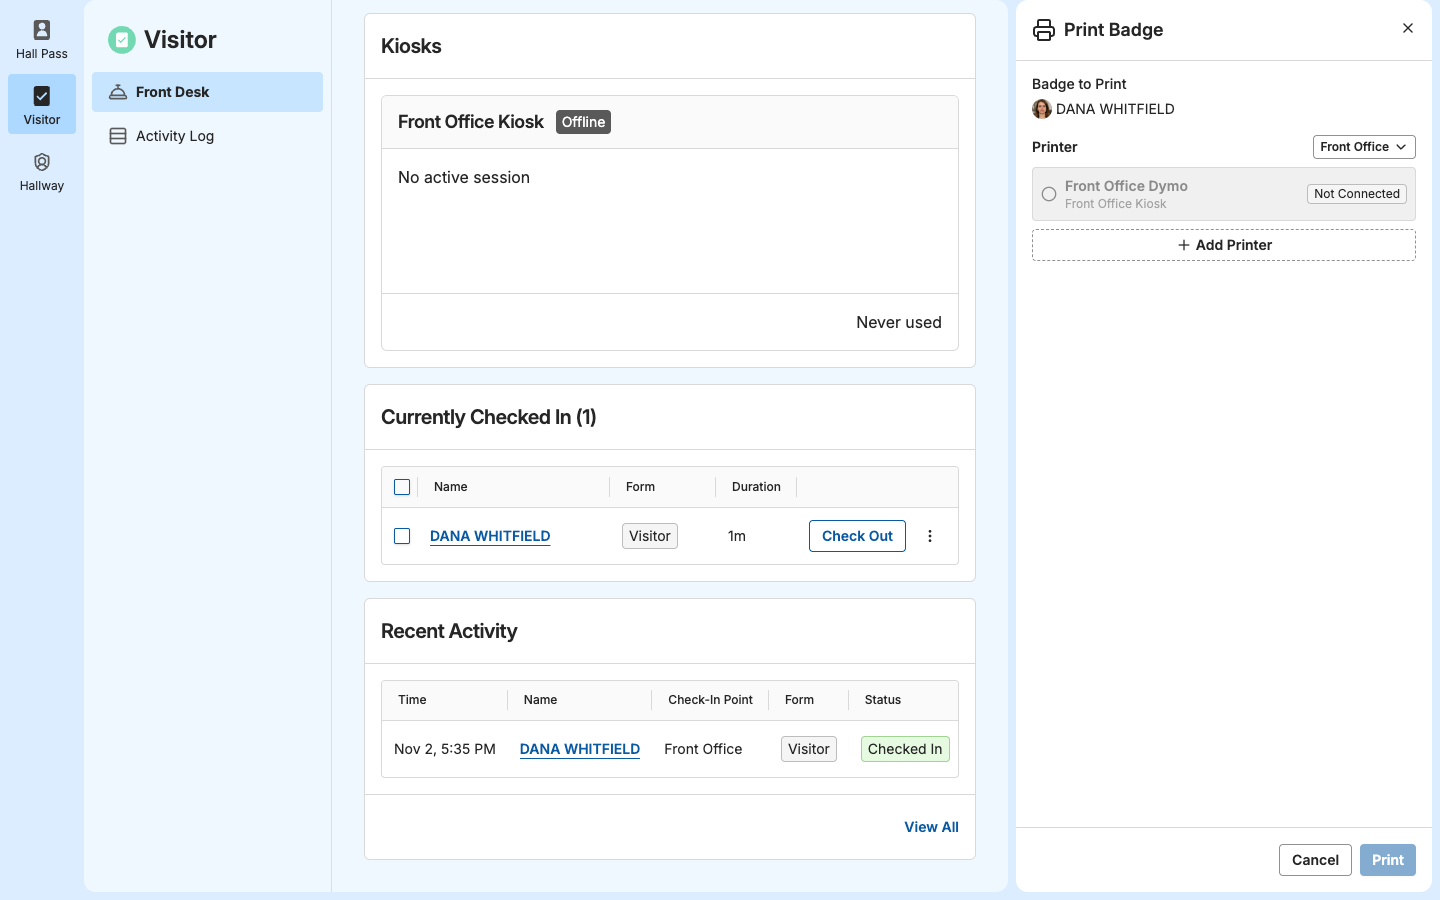
Staff print badges from the Front Desk or the Activity Log when staff check a visitor or student in at the Front Desk, when a kiosk doesn’t print, or when a badge needs to be reprinted.- After a Front Desk check-in: The panel asks you to choose a printer for the badge. Select a printer and click Print, or click Skip. If the badge doesn’t print, click Retry, or click Change Printer to choose another printer.
- For 1 badge: Under Currently Checked In or Recent Activity, click More actions (⋮) next to the visitor or student, then select Print Badge. Students appear only under Recent Activity.
- For several visitors: Under Currently Checked In, select the visitors, then click Print Badges. Badges print in order. If one fails, printing stops so you can fix the printer, then click Retry.
- From the Activity Log: Open the check-in and click Print Badge. Print Badge appears only while the visitor or student is still checked in.
Print to a Kiosk’s Printer from the Front Desk
Staff can print badges from the Front Desk to any kiosk’s printer at the check-in point, so 1 printer can serve both the kiosk and the desk. This also lets Chromebooks and Macs at the front desk print to a network printer through a kiosk. There’s nothing to set up: each kiosk’s printer appears in the Printer list, with the kiosk’s name below it.- The kiosk must be online. Its printer shows Ready while the kiosk is online, and Not Connected while it’s offline.
- The kiosk prints the badge right away, even if a visitor or student is checking in on it.
- If the kiosk doesn’t print the badge within about 15 seconds, the Front Desk shows that the print failed. Make sure the kiosk is on and the printer has labels, then try again or choose another printer.
Let Staff Decide When Badges Print
By default, a kiosk prints the badge as soon as a visitor or student finishes checking in. To have staff print every badge instead, select Staff Print Only in the form’s Print Badge step. Kiosks using that form don’t print badges, and staff print them from the Front Desk when they’re ready, such as after greeting the visitor or confirming their destination.- In Visitor, go to Forms and open the form.
- Select the Print Badge step.
- Under Additional Options, select Staff Print Only.
- Save the form.
- Verify the result: Check in on a kiosk with the form. The kiosk doesn’t print a badge, and staff can print it from the Front Desk.
Test Printing Before Go-Live
Test each printer before visitors use it, so front office staff don’t find a problem during a busy morning.- Kiosk printers: In Visitor, go to Check-In Points, open the check-in point, click the kiosk, and click Print Sample. The kiosk must be online. A sample badge prints on the kiosk’s printer.
- Front desk printers: On each front desk computer, check in a test visitor on the Front Desk with a form that prints badges. When the panel asks you to choose a printer, select the printer and click Print.
- Kiosks: Check in a test visitor on each kiosk with each form that prints badges, the way a visitor would.
- Check out the test visitors on the Front Desk.
- Verify the result: Each badge prints on the right printer, fits the label, and shows the details the form includes.
Change a Printer’s Settings
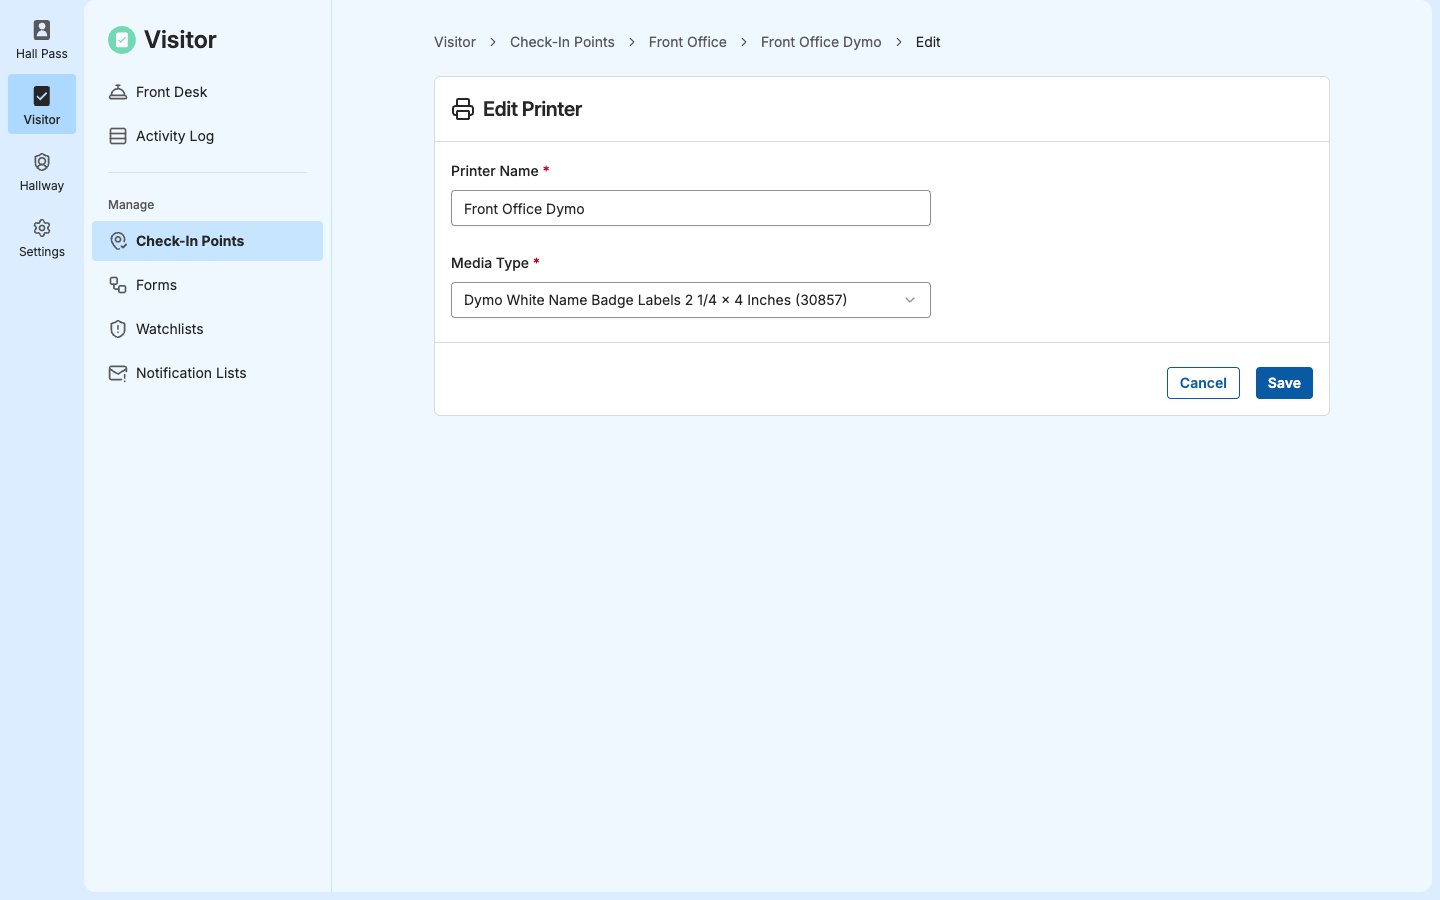
To see a printer’s details, go to Check-In Points, open the check-in point, and click the printer under Printers. Its page shows the Connection, Model, Media Type, network details, and Connected Devices (the kiosks and Front Desk that print to it).- Rename a printer or change its labels: On the printer’s page, click Edit Printer, change the Printer Name or Media Type, and click Save.
- Change labels from the Front Desk: In the Print Badge panel, click Settings next to a printer connected to this computer. Change the Media Type, click Print Sample to check the fit, and click Save. A kiosk’s printer has no Settings button here, so change its labels on the kiosk or on the printer’s page.
- Use a different printer at a kiosk: Change it on the kiosk, in Printer Settings. See Add a Printer to a Kiosk.
Archive a Printer
Archive a printer when you no longer use it, such as when you replace it.- Go to Check-In Points, open the check-in point, and click the printer under Printers.
- Click More actions (⋮), then select Archive.
- Review the message “This will remove the printer from any kiosks using it.” and click Archive to confirm.
- Verify the result: The printer no longer appears under Printers.
Troubleshoot Printing
If the fix needs software installed, network changes, or Google Admin console changes, contact your IT team. Tell them the printer’s name and what the Front Desk shows. In the meantime, print to another printer that shows Ready.
For more fixes, see Troubleshoot Badge Printing.