

Keep Checking In and Reprint from the Front Desk
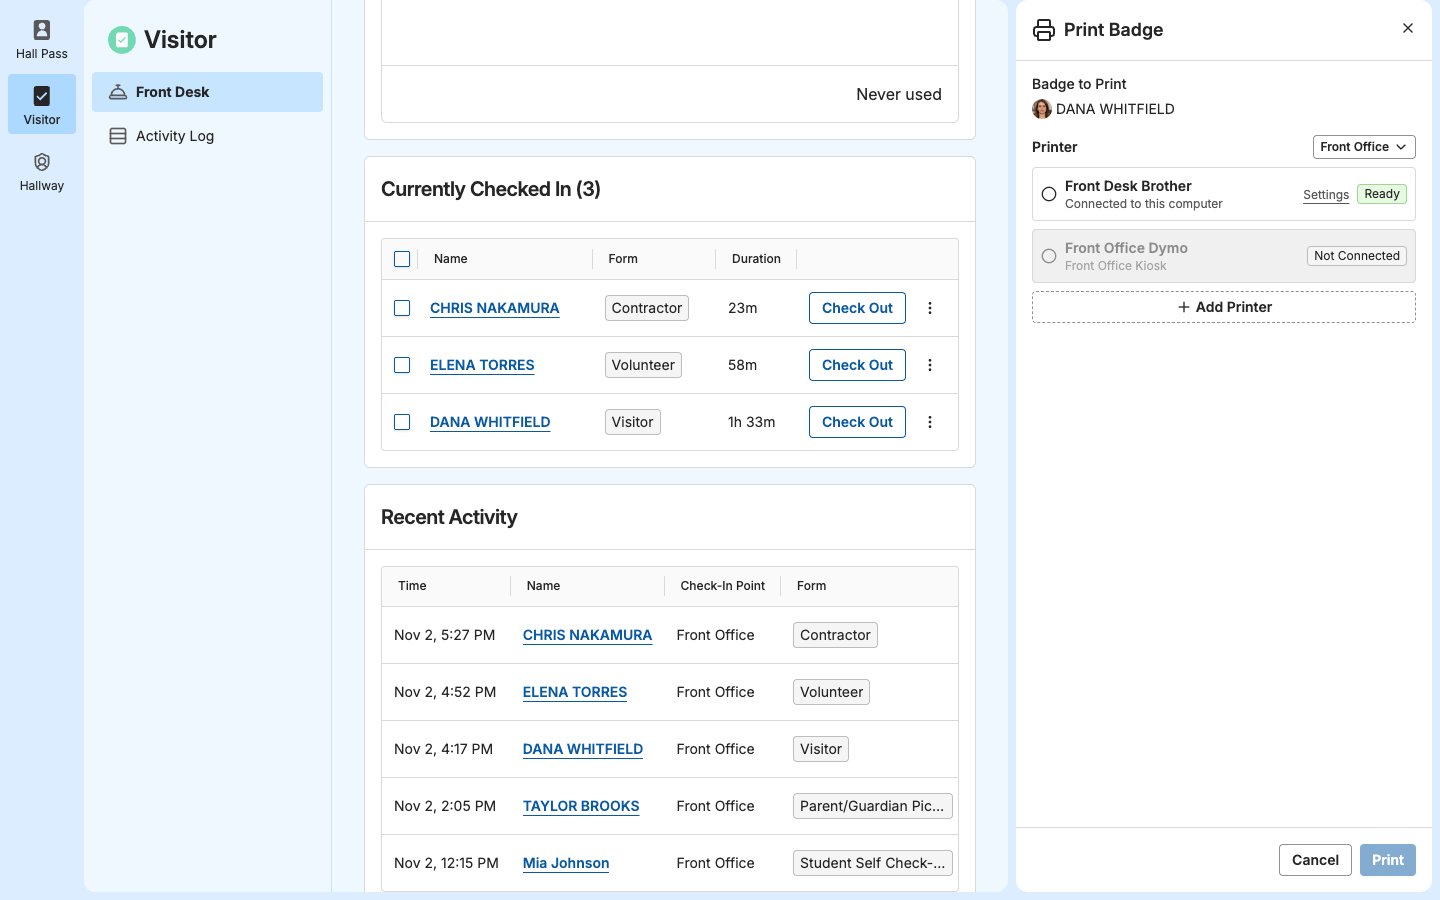
Every check-in appears under Recent Activity on the Front Desk and in the Activity Log, whether or not its badge printed. Visitors also appear under Currently Checked In. To print the badge again, to the same printer once it’s fixed or to another printer that shows Ready:- Open Print Badge for the check-in:
- A visitor: On the Front Desk, under Currently Checked In or Recent Activity, click More actions (⋮) next to the visitor, then select Print Badge.
- A student: On the Front Desk, under Recent Activity, click More actions (⋮) next to the student, then select Print Badge. Students don’t appear under Currently Checked In.
- An earlier check-in: In the Activity Log, open the check-in and click Print Badge.
- Under Printer, select a printer that shows Ready.
- Click Print.
- Verify the result: The badge prints.
Get Badges Printing Again
Print the badge first, then check the printer. Most printer problems are the printer itself: it’s off, out of labels, jammed, or its cover is open. Find what the kiosk or the Front Desk shows below, and try that fix. If badges still don’t print after the fix, stop and tell IT. See Tell IT What’s Wrong.Fix a Badge That Failed on the Kiosk
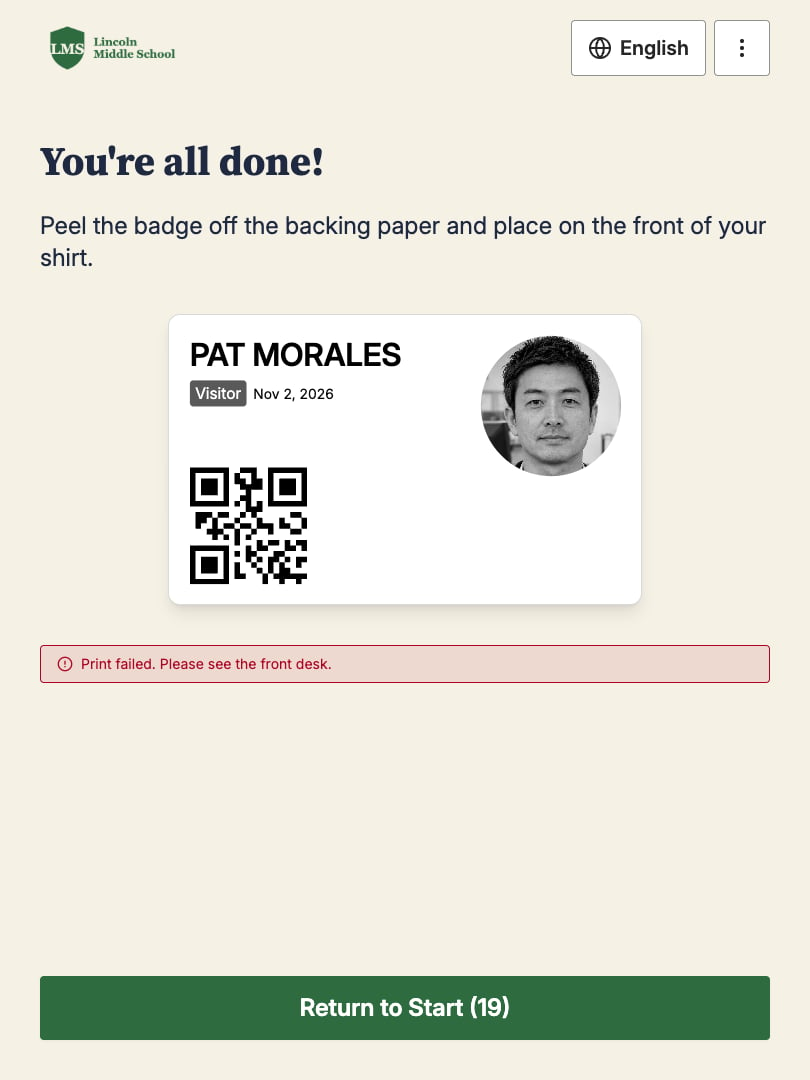
The kiosk shows “Print failed. Please see the front desk.” on its last screen.- Print the visitor’s or student’s badge from the Front Desk, to a printer that shows Ready. See Keep Checking In and Reprint from the Front Desk.
- Before the next check-in, check the kiosk’s printer: it’s on, it has labels, the labels are loaded correctly, its cover is closed, and its cable is plugged in.
- On the Front Desk, print a badge to the kiosk’s printer. It appears in the Printer list with the kiosk’s name below it.
- Verify the result: The badge prints on the kiosk’s printer.
Fix “Badge Didn’t Print” on the Front Desk
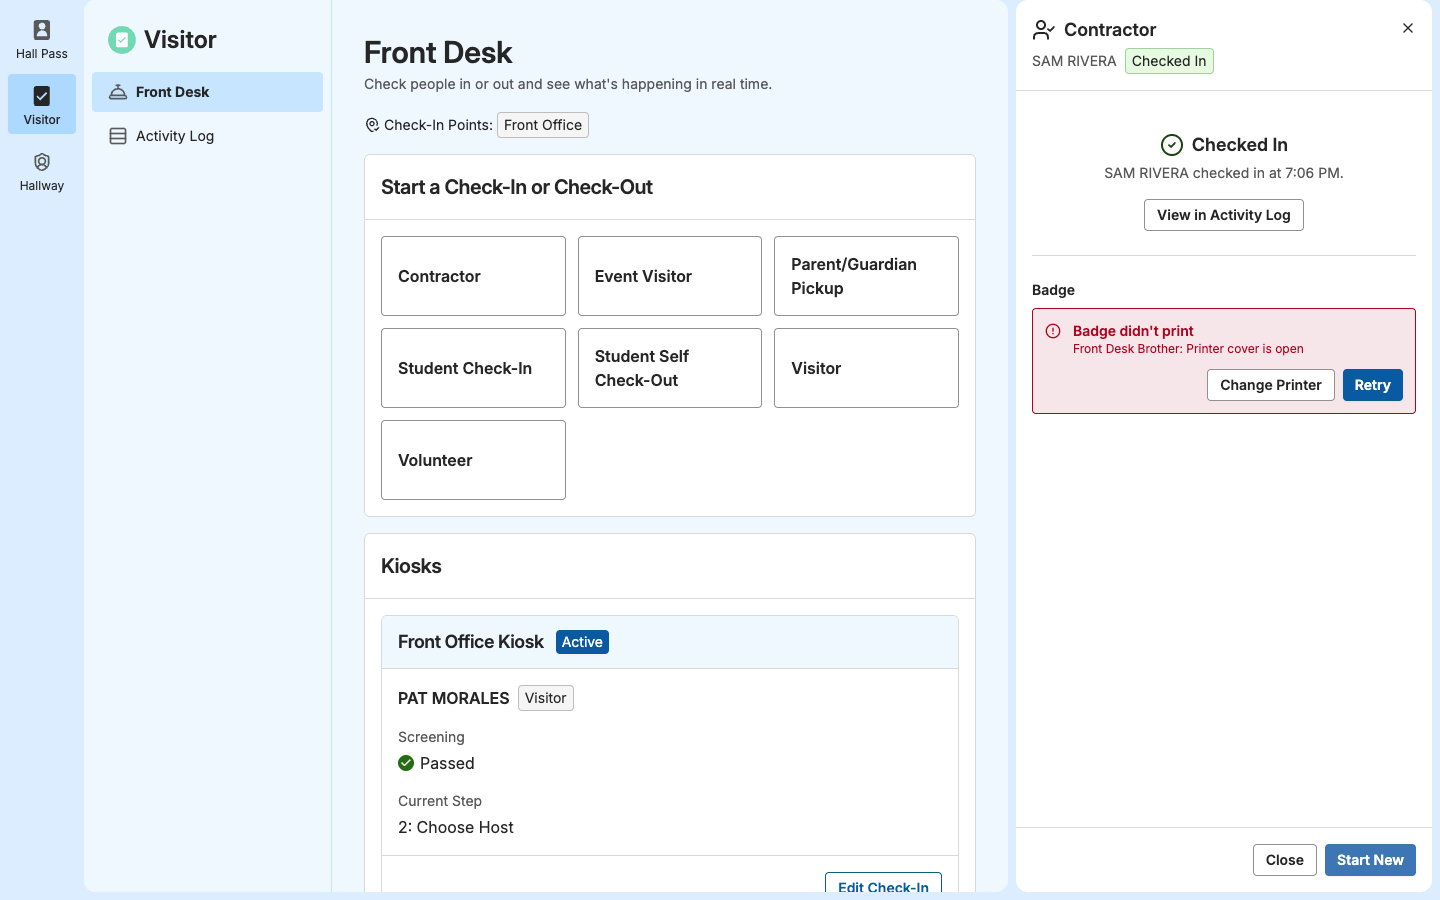
After a check-in on the Front Desk, the panel shows Badge didn’t print with the printer’s name and a reason. If a visitor or student is waiting, click Change Printer and select another printer that shows Ready. Otherwise, find the reason below, fix it, and click Retry.
Verify the result: The panel shows Badge printed. If Retry fails twice, tell IT.
Finish Printing Several Badges
When you select several visitors under Currently Checked In and click Print Badges, badges print in order, and printing stops at the first badge that fails. That badge shows a red X, and the reason appears at the top of the panel.- Fix the printer using the reason. See Fix “Badge Didn’t Print” on the Front Desk.
- Click Retry. Printing picks up from the failed badge.
- Verify the result: Every badge shows a green check mark.
Fix a Printer That Shows “Not Connected”
In the Printer list on the Front Desk, a printer shows Not Connected and can’t be selected. What to do depends on the printer:- A front desk printer (it says “Connected to this computer”): The printer is off or unplugged, or it’s connected to a different front desk computer. If it’s connected to another computer, print from that computer. Otherwise, check that it’s on and its cable is plugged in, turn it off and on again, and reload the page. On a Chromebook or Mac with a USB printer, click Settings next to the printer, then Find USB Printer, select the printer, and click Connect.
- A kiosk’s printer (the kiosk’s name appears below it): The kiosk is offline. See Wake an Offline Kiosk.
Find a Printer That Isn’t Listed
The printer doesn’t appear in the Printer list or in Add Printer.- Check that the printer is on and connected to the computer or kiosk, by USB cable or to the same network.
- On a Chromebook or Mac with a USB printer, click Add Printer, then Find USB Printer. Select the printer, and click Connect. If the printer isn’t in the list that opens, try another USB port or cable.
- Wait about 1 minute. A printer you just turned on can take that long to appear.
- Verify the result: The printer appears in the list.
Fix Badges That Don’t Fit the Label
Badges print cut off, shifted, or across 2 labels. The printer’s Media Type doesn’t match the labels loaded in it.- A front desk printer: In the Print Badge panel, click Settings next to the printer. Select the labels in Media Type, click Print Sample to check the fit, and click Save.
- A kiosk’s printer: Ask a Site Admin to change the Media Type on the kiosk or on the printer’s page. See Change a Printer’s Settings.
Tell IT What’s Wrong
Call IT when a fix doesn’t work, the same problem keeps coming back, or a printer isn’t listed. Tell them:- Which printer: The printer’s name in the Printer list, and its check-in point.
- Where it’s connected: The kiosk’s name, or which front desk computer.
- What you see: The exact message, such as Badge didn’t print with Communication with printer failed, or “Print failed. Please see the front desk.” on the kiosk. A photo of the screen helps.
- Whether other printers work: Such as another printer at the desk, or the same printer from another computer.
- When it started: The time, and whether it happened before.
- What you tried: Such as reloading labels, turning the printer off and on, or clicking Find USB Printer.
Fix Printing Problems as IT
These fixes need access to the kiosk or computer, your network or device management tools, or the Site Admin role in GoGuardian Visitor. Start from what front office staff report:Check How the Printer Is Set Up
- In Visitor, go to Check-In Points, open the check-in point, and click the printer under Printers.
- Check the Connection (USB or Network), Model, Media Type, and network details.
- Under Connected Devices, check which kiosks and front desk computers print to it.
Restore Printing on Windows Computers
Windows front desk computers print through a Windows service that finds USB and network printers and prints badges for the browser. You install it with the Campus Front Desk Print Service feature of the GoGuardian Campus installer, and it’s listed in Windows as GoGuardian Campus Print Service. Without it, the Front Desk lists no printers connected to the computer. Windows kiosks don’t need the service, because the GoGuardian Campus app prints on its own.- Install the service. Check that the GoGuardian Campus installer for Windows is installed with Campus Front Desk Print Service selected. See Set Up a Windows Computer.
- Check that it’s running. In Services, find GoGuardian Campus Print Service and make sure it’s Running. Start it if it isn’t.
- Reload the Front Desk. The browser connects to the service when GoGuardian Visitor loads. After you install or start the service, close the browser tab and open the Front Desk again.
- Remove other label printer software. Software such as Dymo Connect for Desktop can take over the printer’s connection. Uninstall it, then unplug the printer and plug it back in.
- Allow the local connection. The browser connects to the service on the computer itself, at
127.0.0.1on TCP port 47328. If that port is in use, the service uses the next free port, up to 47333. The service accepts only connections from the same computer, so it doesn’t need a firewall rule. Make sure endpoint security or browser policies don’t block the browser from reaching127.0.0.1on those ports. - Verify the result: On the Front Desk, the printer shows Ready.
Fix Network Printer Discovery
Kiosks on iPad and Windows, and Windows front desk computers, find network printers with multicast DNS (mDNS). Chromebooks, Macs, and web browser kiosks print to network printers through a kiosk.- Allow local network access on iPads. On an iPad kiosk, turn on Local Network for Campus in Settings.
- Use the same network. Put the printer on the same subnet as the kiosks and computers that print to it. mDNS doesn’t cross subnets or VLANs unless your network forwards it.
- Open the ports. Open UDP 5353 (discovery), TCP 9100 (printing), and, for Brother printers, UDP 161 (status). See Allow Network Traffic.
- Allow mDNS in Windows Firewall. The GoGuardian Campus installer adds Windows Firewall rules that allow UDP 5353 from the local subnet for the app and the print service. If you manage Windows Firewall with Group Policy or use another firewall, allow the same.
- Restart the printer. Turn the printer off and on, so it announces itself on the network again.
- Verify the result: Within about 1 minute, the printer appears in the kiosk’s Printer Settings or in Add Printer on the Front Desk.
Connect USB Printers on Chromebooks and Macs
Chromebooks and Macs connect to USB printers through the browser, with Find USB Printer. Use Chrome or Microsoft Edge.- Chromebook kiosks: Allow the printer’s USB device in the Google Admin console, so the kiosk app can use it. See Set Up a Chromebook Kiosk.
- Front desk computers: Click Find USB Printer once on each computer, in each browser profile that uses the Front Desk. If the printer doesn’t appear in the browser’s list, check whether a policy blocks WebUSB, or whether other printer software is using the printer.
Check Kiosk Printers
A kiosk prints to the 1 printer assigned to it on the kiosk, at the end of each check-in.- Check the assigned printer. On the kiosk, tap More (⋮), then Edit Kiosk Settings, and enter your PIN. Under Printer Settings, the printer shows Not connected if the kiosk can’t reach it. Select the right printer, tap Print Sample, and tap Save Changes. See Add a Printer to a Kiosk.
- After you archive or replace a printer, assign a new printer on each kiosk that used it.
- Printing from the Front Desk through a kiosk needs the kiosk online and the real-time connection in Allow Network Traffic. When the kiosk doesn’t report back in time, the Front Desk shows Printer software exception. See Bring an Offline Kiosk Back Online.
Contact GoGuardian Support
If badges still don’t print, contact GoGuardian Support. Include:- The site, check-in point, and printer name
- The printer’s Model and Connection from its page in GoGuardian Visitor
- Where it’s connected: the kiosk’s name with its Platform and Operating System, or the front desk computer’s operating system and browser
- The exact message staff see, and a photo of the screen
- When the problem started and what you’ve tried